
Every Thanksgiving or large family dinner, home cooks inevitably run into the exact same crisis: stove real estate.
You’ve got a turkey hogging the oven, gravy bubbling on one burner, green beans on another, and suddenly you realize you have zero space left to make a decent potato side dish.
A few years ago, I thought I had come up with a brilliant hack. I grabbed a five-pound bag of Russet potatoes, peeled them, cut them into giant chunks, tossed them raw into my slow cooker with a splash of water, butter, and dried herbs, clamped the lid on, and walked away.
It was one of the most embarrassing side dish disasters of my life.
Four hours later, right as everyone sat down at the table, I lifted the lid. The potatoes hadn’t turned creamy or golden. The Russets had oxidized into a dull, greyish-brown color, and half of them had disintegrated into a gritty, waterlogged starch slurry.
Even worse? While the outsides had turned to mush, the centers of the larger chunks were still chalky, raw, and crunchy. My uncle bit down on one, paused, and asked with a completely straight face if I had invented “potato tartare.” I wanted the kitchen floor to open up and swallow me whole.
That flop sent me on a mission. The slow cooker can be the ultimate weapon for hands-off, golden, buttery potatoes—but you cannot treat it like a boiling pot of water.
After testing every potato variety under the sun, experimenting with slicing thickness, playing with fats, and mastering steam control, I landed on this exact method.
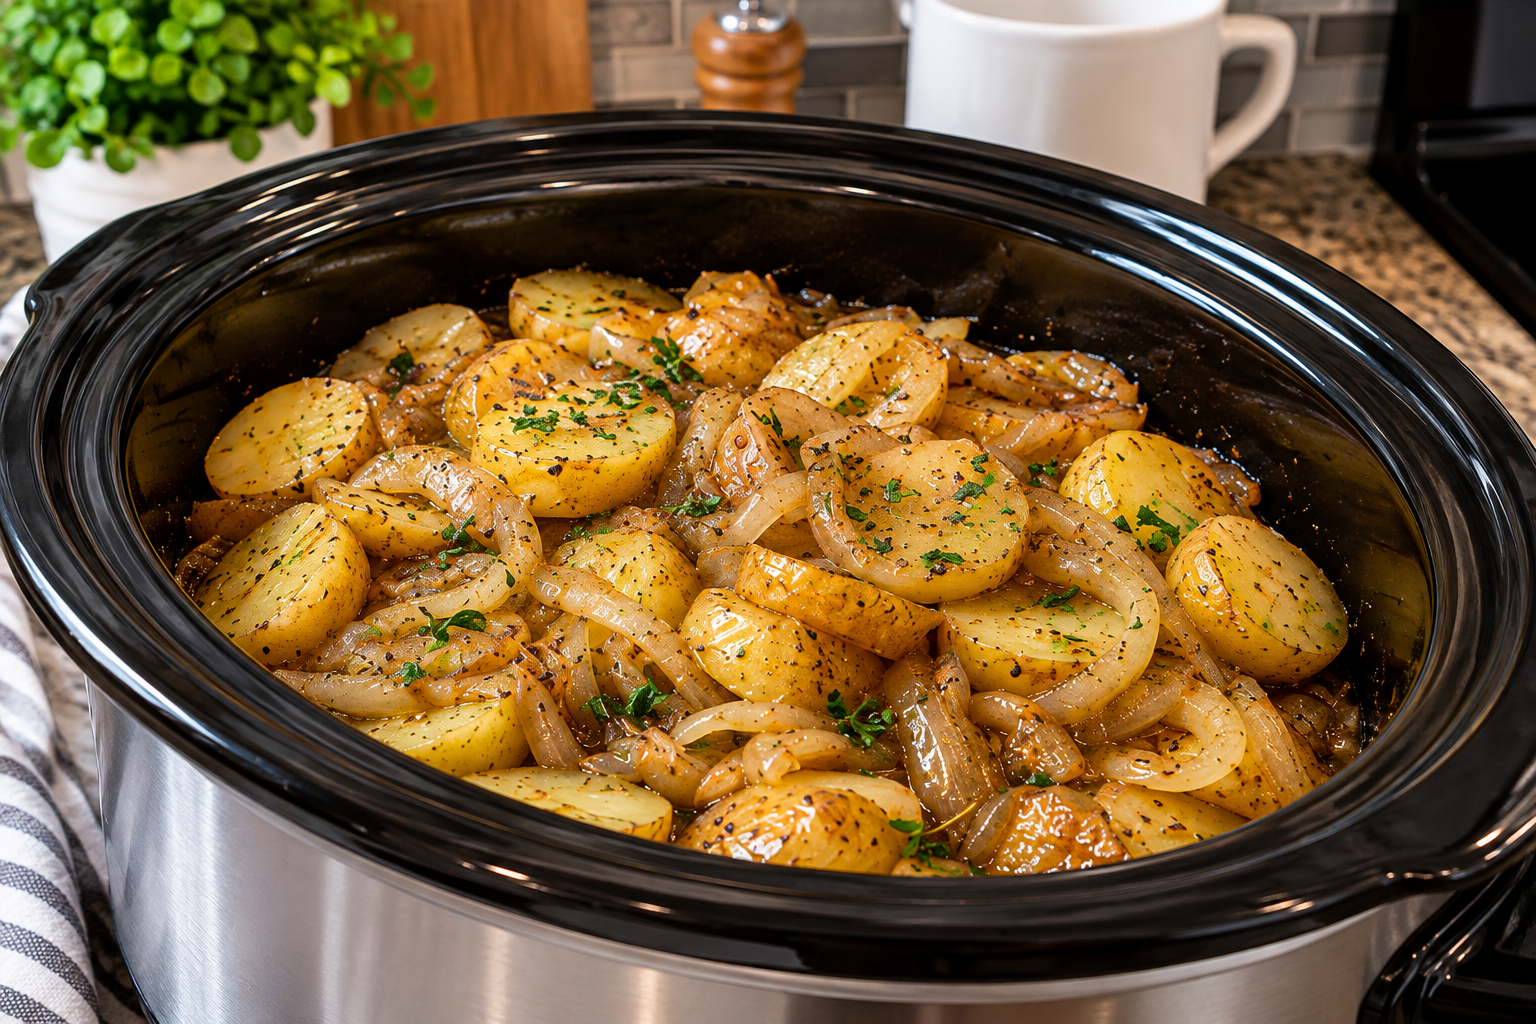
The photo above shows the glorious standard: tender, thick-sliced baby Yukon Gold potatoes and sweet yellow onions glistening in a rich garlic-herb butter bath, holding their shape without turning to mush, ready to scoop straight onto dinner plates.
Here is how you make foolproof, fork-tender slow-cooker potatoes at home without a drop of starch soup in sight.
Why Slow-Cooker Potatoes Usually Go Wrong
Potatoes are dense bundles of starch and moisture. Inside the humid, trapped-steam environment of a slow cooker, normal stovetop rules do not apply:
1. Picking the Wrong Potato (The Russet Trap)
Russet or Idaho potatoes are high in starch and low in moisture. That makes them incredible for fluffy baked potatoes or French fries, but they are disastrous in a slow cooker. As steam hits raw Russets, their cell walls break down rapidly from the outside inward, sloughing off into wet mush while the dense core stays hard.
You need waxy or all-purpose potatoes, specifically Yukon Golds or yellow baby potatoes. They have thin skins, a naturally buttery texture, and low starch levels that allow them to hold their clean sliced shape through hours of gentle cooking.
2. The Excess Liquid Mistake
The number one reason slow-cooker potatoes turn soggy is adding too much water or broth. Potatoes release their own natural water as they heat up, and onions are roughly 89% water. If you dump cups of liquid into the pot, you end up boiling the potatoes. You only need a couple of tablespoons of broth to start the gentle steam; the real cooking medium should be melted butter, olive oil, and rendered onion juices.
3. Inconsistent Slicing
If you throw in whole baby potatoes alongside halved ones, or cut uneven wedges, they will finish cooking at wildly different times. Slicing baby Yukon potatoes into uniform ½-inch rounds guarantees that every single piece cooks through at the exact same minute while maximizing the surface area that drinks in garlic and herb butter.
Ingredients & Tools You’ll Need
Essential Gear
- 6-Quart Oval Slow Cooker: (A standard stainless-steel oval cooker, like the one in the photo, provides a wide base so the potato slices can spread out in even layers).
- Sharp Chef’s Knife: For cutting uniform, smooth potato discs without tearing the delicate skins.
- Large Mixing Bowl: Roomy enough to toss the sliced spuds with oil, butter, and seasonings before they hit the crock.
- Large Metal Serving Spoon: Perfect for scooping and ladling the buttery pan juices over each portion.
The Ingredient Breakdown
| Component | Ingredient | Quantity | Practical Role |
| The Star | Baby Yukon Gold or Yellow Creamer Potatoes | 2.5 to 3 lbs (sliced into ½-inch rounds) | Waxy texture ensures they hold their shape and stay velvety. |
| Aromatic Sweetness | Sweet Yellow or Vidalia Onions | 2 medium (halved and thinly sliced) | Melts into sweet, jammy ribbons between the potato layers. |
| The Rich Fat | Unsalted Butter | 4 tbsp (half a stick, melted) | Coats every slice in rich flavor and gives that glossy sheen. |
| The Sear Fat | Extra Virgin Olive Oil | 2 tbsp | Blended with butter to prevent the dairy solids from scorching. |
| Aromatic Punch | Fresh Garlic | 5 cloves (finely minced) | Infuses the warm butter with steakhouse-level savory aroma. |
| Braising Splash | Low-Sodium Chicken or Vegetable Broth | ¼ cup | Just enough liquid to create localized steam without boiling the spuds. |
| Herbal Backbone | Fresh Thyme Leaves | 1 tbsp (or 1 tsp dried) | Classic woodsy herb that pairs naturally with butter and potatoes. |
| Herbal Backbone | Dried Rosemary & Oregano | ½ tsp each (crushed) | Adds earthy depth that perfumes the entire slow-cooker crock. |
| Savory Lift | Onion Powder & Garlic Powder | 1 tsp each | Dry powder adheres directly to the potato slices for deep seasoning. |
| Seasoning | Coarse Kosher Salt | 1.5 tsp | Essential for penetrating into the dense potato flesh. |
| Seasoning | Freshly Ground Black Pepper | 1 tsp (coarsely cracked) | Cuts through the rich butter with a sharp bite. |
| Finishing Touch | Fresh Flat-Leaf Parsley | 2 tbsp (finely chopped) | Sprinkled right before serving for a vibrant pop of color. |
Step-by-Step Cooking Instructions
Step 1: Wash, Dry, and Slice the Potatoes
Rinse your baby Yukon Gold potatoes thoroughly under cold running water to remove any garden dirt.
Do not peel them! The thin, golden skin of Yukon Golds not only provides color and fiber, but it also acts as a structural belt that keeps each round intact while it softens in the slow cooker.
Pat the potatoes completely dry with a clean kitchen towel.
Using your sharp chef’s knife, slice the potatoes into uniform ½-inch thick rounds.
Cook’s Tip from My Kitchen: Try to keep the thickness as consistent as possible. Slices that are too thin (under ¼ inch) will turn fragile, while slices that are too thick (over ¾ inch) will take much longer to cook through in the center.
Step 2: Slice the Sweet Onions
Peel your yellow onions, cut them in half from root to stem, and slice them into ¼-inch half-moons.
Separate the onion layers with your fingers so you have loose ribbons.
As these onions cook alongside the potatoes, they release natural sugars and moisture, creating a savory, jammy pan juice that prevents the potatoes from sticking to the crock.
Step 3: Whisk the Garlic Herb Butter
In a small bowl or glass measuring cup, combine:
- 4 tablespoons of melted unsalted butter
- 2 tablespoons of extra virgin olive oil
- 5 minced fresh garlic cloves
- 1 tablespoon fresh thyme leaves
- ½ teaspoon crushed dried rosemary
- ½ teaspoon dried oregano
- 1 teaspoon garlic powder
- 1 teaspoon onion powder
- 1.5 teaspoons coarse kosher salt
- 1 teaspoon freshly ground coarse black pepper
Whisk vigorously until the salt is incorporated into the warm, fragrant herb butter.
Step 4: Toss for Full Coverage
Place your sliced potatoes and sliced onions into a large mixing bowl.
Pour the garlic herb butter mixture over the top.
Use clean hands or a large rubber spatula to toss and turn the vegetables until every single potato round is glistening with seasoned butter and herbs.
Taking thirty seconds to coat the vegetables in a bowl beforehand ensures every bite is seasoned, rather than pouring butter over the top in the cooker and hoping it trickles down.
Step 5: Pack the Slow Cooker
Lightly spray the ceramic insert of your oval slow cooker with nonstick olive oil spray.
Pour the seasoned potato and onion mixture into the crock.
Use your hands or a spoon to gently spread them into a relatively even layer across the bottom and sides.
Pour the ¼ cup of low-sodium chicken broth down along the inside edge of the crock (avoid pouring it directly over the top of the potatoes so you don’t wash off the butter and herbs).
Step 6: The Low-and-Slow Steam
Clamp the slow cooker lid down firmly.
- High Setting (Recommended for Speed): Cook for 3 to 3.5 hours.
- Low Setting (Recommended for Tenderness): Cook for 5 to 6 hours.
Cook’s Mistake to Avoid: Resist the temptation to take the lid off and stir during the first two hours! Every time you lift the lid of a slow cooker, you release the pocket of pressurized steam that is doing the hard work of softening the potato starch.
Around the 3-hour mark on High (or 5-hour mark on Low), slide a pairing knife into the center of a thick potato round near the middle of the pot.
It should glide in with zero resistance, yielding like soft, warm butter.
If it still feels slightly firm, replace the lid and give it another 20 to 30 minutes.
Step 7: Garnish and Serve Warm
Turn the slow cooker setting to “Warm”.
Uncover the crock. Use your large serving spoon to gently turn the potatoes from the bottom up, ladling the glistening garlic-butter pan juices that pooled at the base back over the top layers.
Scatter finely chopped fresh flat-leaf parsley across the golden spuds for a clean, vibrant contrast.
Serve straight from the slow cooker set on “Warm” for holiday buffet lines and dinner parties, letting guests spoon up their own helping of tender potatoes and jammy onions.
Practical Troubleshooting & Common Mistakes
- “My potatoes turned out dry.”
This happens if your slow-cooker lid doesn’t have a snug seal and allowed too much steam to escape, or if you skipped the splash of broth in Step 5. If you notice the pot looks dry at hour 2, splash in another 2 to 3 tablespoons of warm broth along the side of the crock. - “The potato slices broke into mashed pieces.”
This is the classic result of over-stirring. Once the potatoes are tender, they are delicate. Do not aggressively stir them like a soup. Use a wide spoon to gently scoop and fold from underneath just once or twice before serving. - “The garlic tasted bitter.”
Never use jarred minced garlic from water or oil. Pre-minced jarred garlic has a harsh, preservative-heavy flavor that turns sharp and metallic during long slow-cooks. Freshly minced garlic cloves will soften, sweeten, and melt into the butter naturally.
Fun Flavor Variations
While the classic garlic butter and herb combination in the photo is timeless, you can adapt this base recipe to match whatever meal you are planning:
- Loaded Baked Potato Style: During the final 15 minutes of cooking, scatter 1.5 cups of shredded sharp cheddar cheese and ½ cup of crumbled crisp bacon across the top. Cover until melted, then serve with sour cream and sliced scallions.
- The French Bistro Twist: Stir in 2 tablespoons of coarse Dijon mustard with the melted butter, and sprinkle freshly grated Gruyère cheese over the potatoes right before serving.
- Spicy Herb & Parmesan: Toss in ½ teaspoon of red pepper flakes with the herb butter, and finish the hot potatoes with a generous shower of freshly grated Parmigiano-Reggiano.
What to Serve with Slow-Cooker Potatoes & Handling Leftovers
These potatoes are rich, savory, and naturally versatile, making them the ultimate side dish for almost any protein:
- Grilled Ribeyes or Roast Beef: The sweet caramelized onions and garlic butter are a natural match for steak and roast beef.
- Roasted Chicken or Pork Chops: Spoon the herb butter pan drippings right over sliced poultry or pork.
- A Bright Garden Salad: A crisp salad with lemon vinaigrette provides a fresh, acidic contrast to the buttery spuds.
If you have leftovers, transfer them to an airtight glass container and refrigerate for up to 4 days.
Because Yukon Golds hold their structure, leftovers don’t turn into a watery mess.
For the ultimate next-day breakfast, melt a tablespoon of butter in a cast-iron skillet over medium-high heat, add the cold leftover potato slices and onions, and fry them untouched for 4 minutes until the bottoms develop a shatteringly crisp, golden hash-brown crust. Slide two sunny-side-up eggs on top, and you have a diner-level breakfast ready in minutes.