
I still remember the Friday game-night disaster that almost made me swear off making baked warm dips for good.
I had invited a crew of hungry friends over, determined to make an impressive, piping-hot skillet of layered beef enchilada dip. In my mind, it was going to be pure magic: seasoned ground beef, zesty red sauce, creamy refried beans, and a molten blanket of bubbly melted cheese, garnished with a crown of crunchy tortilla chips standing upright around the rim.
I figured it was as simple as layering everything into a ceramic bowl and baking it.
So I browned some beef, poured a can of enchilada sauce straight over it, stirred in cold refried beans, jammed two dozen raw tortilla chips deep into the liquid layers around the bowl, dumped a mountain of bagged cheese on top, and threw it into the oven for forty minutes.
When I set the dish down on our coffee table, it was a complete, sloppy heartbreak.
The steam and hot enchilada liquid had completely wicked up through the corn chips. The bottom half of every single chip had transformed into waterlogged, mushy corn dough that dissolved the second someone tried to pull it out. Even worse, because I hadn’t drained the ground beef fat, a layer of orange grease was pooling across the surface of the broken, grainy cheese. When my buddy tried to scoop a bite, his chip snapped right off at the base, leaving a sad chip handle in his fingers and his knuckle submerged in hot grease.
We ended up eating the top with spoons and tossing the soggy chip wreckage at the bottom.
That humiliating evening sent me straight back to the drawing board. A loaded, baked cheesy beef dip is the ultimate crowd-pleasing comfort food, but chips and hot moisture are natural enemies.
After testing multiple batches, mastering the bean-and-cream-cheese moisture seal, and figuring out the exact timing for embedding the perimeter chips, I finally perfected the recipe.
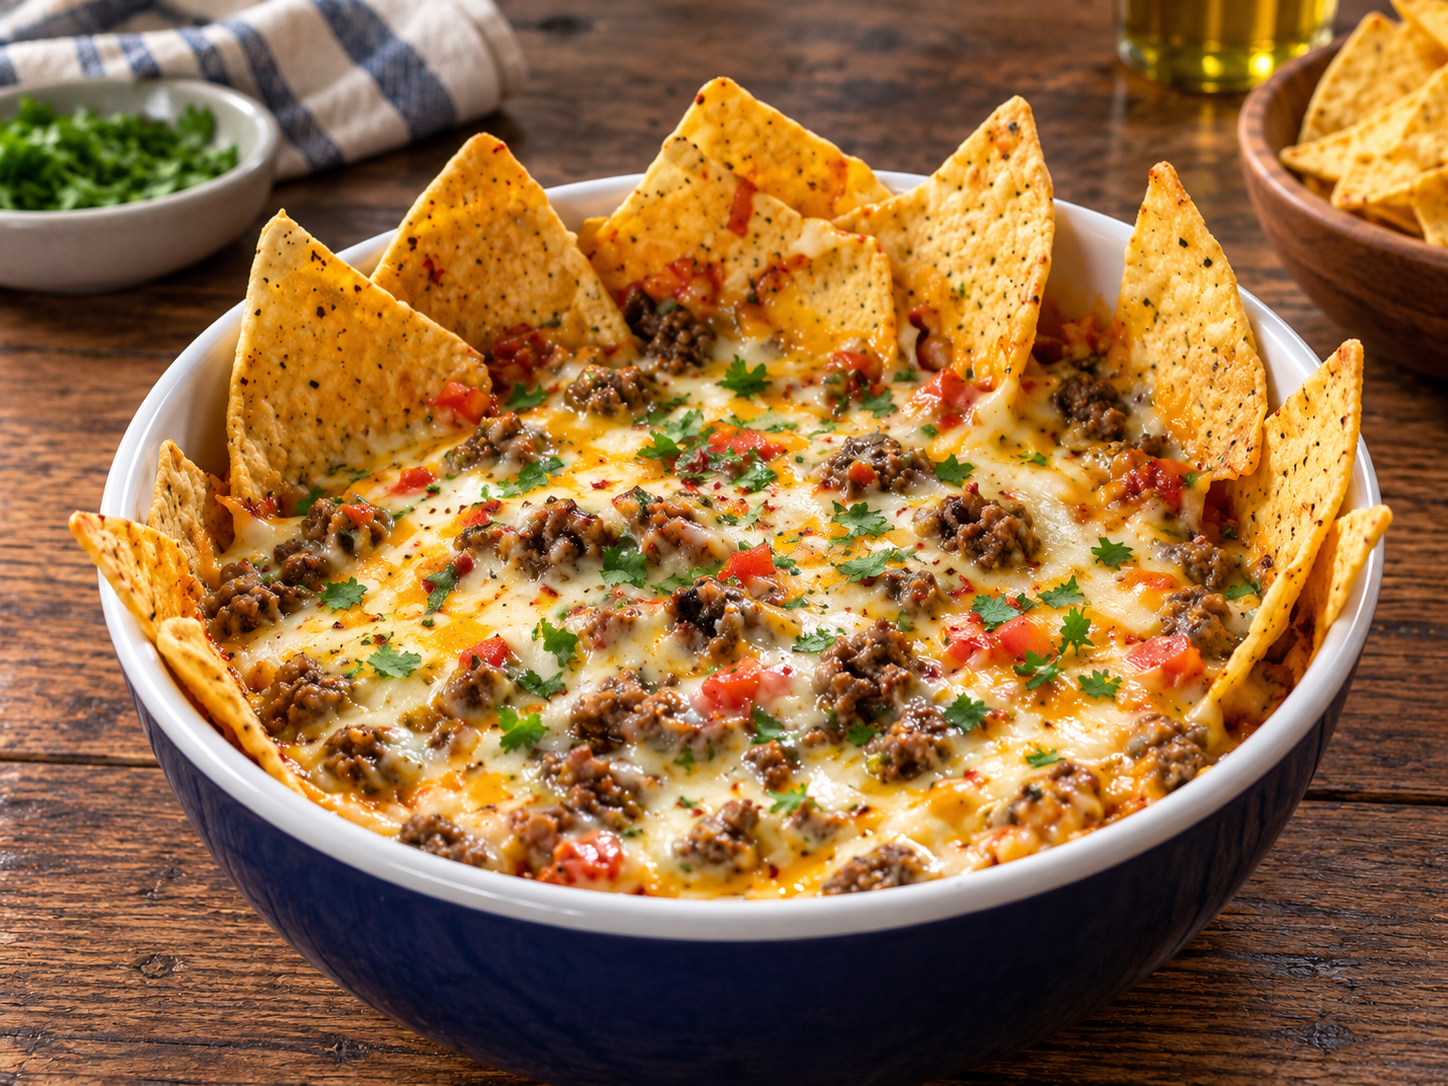
The photo above shows the hard-won standard in my home: a deep, navy-rimmed ceramic baking bowl filled with a velvety, rich layer of seasoned beef and enchilada sauce, smothered in bubbling, golden-blistered Monterey Jack and cheddar, flanked by sturdy, shatteringly crisp tortilla chips that stay crunchy down to the last scoop.
Here is how you make this foolproof Baked Cheesy Beef Dip at home without a single soggy chip in sight.
Why Baked Layered Dips Turn into a Greasy, Soggy Mess
Tortilla chips are porous, fried corn starches designed to absorb liquids. When you pair them with hot, steamy, multi-layered dips inside an oven, simple physics can ruin your presentation:
1. The Capillary Action Trap (Wicking Moisture)
If you press dry tortilla chips into wet, cold dip layers before shoving the dish into the oven, the chips act like paper lamp wicks. As the sauce heats up and generates steam, the porous corn tortilla draws that moisture upward. Within fifteen minutes, the chips lose their structural integrity and turn into limp, soggy paste. The solution? Par-bake the dip layers completely on their own first, and only tuck the perimeter chips into the molten cheese mantle during the final five minutes under the broiler!
2. Free Animal Fat vs. Dairy Emulsions
Ground beef naturally renders a significant amount of liquid fat. If you dump un-drained beef into a baking dish, that free liquid fat will not blend into the cheese. It separates under oven heat, rising to the surface to form an oily, orange grease slick. Thoroughly browning the beef, draining the fat on paper towels, and building an emulsified base with softened cream cheese locks the fats into a smooth, velvety dip that never splits.
3. Bagged Pre-Shredded Cheese
Pre-shredded cheese from the supermarket is coated with cellulose powder and potato starch to keep the shreds from sticking in the bag. That starch absorbs moisture and prevents the cheese from melting into a cohesive, gooey pull. Grating whole blocks of sharp cheddar, Monterey Jack, or Pepper Jack ensures that glossy, stretchy, blistered blanket that coats your chips like velvet.
Ingredients & Tools You’ll Need
Essential Gear
- 2-Quart Round Ceramic Baking Dish or Deep Pie Dish: (A thick ceramic or stoneware bowl, like the white-and-blue dish in the photo, retains heat evenly so the dip stays hot at the table without burning the bottom).
- 12-Inch Cast-Iron or Stainless-Steel Skillet: For browning the seasoned beef crumbles and blooming the spices.
- Meat Chopper or Wooden Spoon: Essential for mincing the ground beef into fine, uniform crumbles so the dip scoops smoothly without breaking chips.
- Box Grater: For grating fresh blocks of cheese into quick-melting shreds.
- Sturdy Restaurant-Style Tortilla Chips: Choose thick-cut corn tortilla chips or triangle strips that can support a heavy payload without snapping.
The Ingredient Breakdown
| Component | Ingredient | Quantity | Practical Role |
| The Savory Meat | 85/15 Ground Chuck or Lean Beef | 1 lb (450g) | Great beefy flavor; enough fat for richness without turning greasy. |
| The Foundation | Full-Fat Cream Cheese | 8 oz (1 block, softened to room temp) | Stabilizes the base, preventing the sauce and cheese from splitting. |
| The Legume Bed | Traditional Refried Beans (or Black Beans) | 1 can (15 oz) | Adds earthy body, richness, and forms the structural base layer. |
| The Rich Sauce | Red Enchilada Sauce (Mild or Medium) | 1 cup (divided) | Infuses the beef with savory chili, cumin, and garlic tang. |
| Aromatic Core | Sweet Yellow Onion | ½ medium (finely diced) | Sautéed with the beef to add natural sweetness and texture. |
| Aromatic Core | Fresh Garlic | 3 cloves (minced) | Delivers pungent, savory depth to the meat layer. |
| The Cheesy Blanket | Sharp Cheddar & Monterey Jack | 2.5 cups (freshly shredded, divided) | Melts into that bubbly, gooey, blistered top crust. |
| Zesty Texture | Canned Diced Green Chilies | 1 can (4 oz, well drained) | Adds mild, smoky pepper flavor throughout the cheese layers. |
| Steakhouse Spice | Taco Seasoning or Chili Powder | 1.5 tbsp | Rich blend of chili, cumin, oregano, and garlic that coats the beef. |
| Base Seasoning | Coarse Kosher Salt & Black Pepper | 1 tsp salt, ½ tsp coarse black pepper | Crucial seasoning across the ground beef and bean layers. |
| The Crunch Crown | Thick-Cut Restaurant-Style Tortilla Chips | 20 to 24 whole chips (plus extra for dipping) | Inserted along the rim to create that striking edible crown. |
| Fresh Finish | Diced Tomatoes, Green Onions, or Cilantro | Optional (for serving) | Bright, refreshing bite that cuts through the rich dairy and beef. |
Step-by-Step Cooking Instructions
Step 1: Brown and Drain the Beef
Set your 12-inch skillet over medium-high heat on the stovetop.
Add the 1 pound of ground chuck and finely diced yellow onion.
Use your meat chopper or wooden spoon to aggressively break the beef apart into fine, uniform morsels as it cooks.
Cook for 5 to 6 minutes until the meat is deeply browned and no pink remains.
Stir in the minced fresh garlic and cook for 60 seconds just until fragrant.
Tilt the skillet carefully and spoon off all the accumulated liquid grease, or transfer the cooked beef with a slotted spoon to a paper-towel-lined plate.
Return the drained beef to the skillet over medium-low heat.
Sprinkle the 1.5 tablespoons of taco seasoning, kosher salt, and black pepper evenly over the meat.
Pour in ½ cup of the red enchilada sauce.
Stir well and let it simmer gently for 2 to 3 minutes until the sauce reduces and clings tightly to the beef crumbles. Remove from the heat.
Step 2: Build the Creamy Bean Base
Preheat your oven to 375°F (190°C).
In a medium mixing bowl, combine the 8 ounces of softened cream cheese, the can of refried beans, and the remaining ½ cup of red enchilada sauce.
Whisk or beat with a spatula until smooth, creamy, and uniform.
Cook’s Tip from Experience: Mixing the cream cheese directly with the refried beans and sauce creates a protective emulsion. It keeps the beans from drying out into a stiff crust in the oven and ensures every scoop feels velvety and spreadable.
Step 3: Layer the Ceramic Baking Dish
Lightly grease the inside of your 2-quart round ceramic baking bowl with a touch of olive oil spray.
Assemble the dip in strategic layers:
- The Creamy Foundation: Spread the refried bean and cream cheese mixture evenly across the bottom of the dish using an offset spatula.
- The First Cheese Layer: Scatter 1 cup of your freshly shredded cheddar and Monterey Jack over the bean base.
- The Green Chili Layer: Scatter the well-drained diced green chilies across the cheese.
- The Seasoned Beef: Spoon your warm, saucy ground beef crumbles evenly over the chilies, pressing gently with the back of a spoon to create an even, compact bed.
- The Cheese Mantle: Blanket the top of the beef with another 1 cup of shredded cheese. (Reserve the remaining ½ cup of cheese for anchoring the chips in Step 5).
Step 4: The Initial Hot Bake
Slide the baking dish onto the center rack of your preheated 375°F (190°C) oven without any chips in the dish!
Bake uncovered for 20 to 25 minutes.
During this initial bake, the bean foundation warms through, the seasoned beef heats to piping-hot temperature, and the interior cheese melts into a smooth, cohesive layer.
You should see small bubbles breaking along the ceramic edges.
Step 5: The Chip Crown & Broiler Finish (The Crunch Secret)
Carefully pull the hot baking dish out of the oven using heavy oven mitts and set it on your stove or counter.
Now comes the signature presentation move:
Take your whole, thick-cut tortilla chips.
Gently tuck the bottom point of each chip—about ½-inch deep—into the perimeter of the hot melted cheese around the rim of the bowl, angling them outward in an overlapping sunburst ring (exactly like the beautiful arrangement in the reference photo).
Scatter your remaining ½ cup of shredded cheese across the center of the dip and lightly over the bases of the standing chips.
This extra layer of cheese acts like edible mortar, locking the chips in place while protecting their lower edges.
Switch your oven setting to BROIL (High).
Slide the dish back into the oven, keeping it on the middle rack (about 6 to 8 inches below the broiler element).
Watch through the oven window like a hawk for 2 to 3 minutes.
The direct radiant heat from the broiler will cause the cheese to puff up, bubble aggressively, and brown into savory, golden-caramelized blisters, while the exposed chip tips get toasted and shatteringly crisp.
Remove the dish immediately once the top cheese is molten, bubbling, and golden-spotted.
Step 6: The Mandatory 5-Minute Rest
Set the hot ceramic bowl on a wooden trivet or cutting board.
Important Cook’s Rule: Do not dive in immediately!
The cheese and bean layers straight out from under the broiler are blazing hot.
If you plunge a chip in right now, the molten sauce will burn your tongue and the chip will struggle under the loose heat.
Let the dip rest undisturbed for 5 full minutes.
During this short pause:
- The melted cheese cools down from boiling to a rich, stretchy, gooey consistency that clings to chips without slipping off.
- The moisture in the dip stabilizes, ensuring the standing chips stay perfectly crisp rather than absorbing steam.
Serve warm directly from the ceramic bowl, surrounded by a large basket of extra sturdy tortilla chips for dipping.
Practical Troubleshooting & Common Mistakes
- “My chips went soft along the edges.”
This happens if you stick the chips into the dip at the very beginning of the 25-minute bake. Always bake the dip first, and only tuck the chips in for the final 3-minute broiler finish. That brief flash of top heat toasts the chips without allowing steam to penetrate their starches. - “There is an oily yellow film on top of the cheese.”
This is the hallmark of using un-drained ground beef or pre-shredded cheese. Always blot the beef fat after browning, and always grate whole block cheese by hand. If oil still appears, gently dab the surface with the corner of a clean paper towel before serving. - “The refried beans were too dry or chalky.”
Never layer canned refried beans straight from the can into the dish. Always blend them with softened cream cheese and a splash of enchilada sauce first. The cream cheese provides the fat and moisture needed to keep the bean layer silky and dippable.
Delicious Upgrades & Variations
While the classic ground beef and enchilada sauce version is pure comfort, you can easily customize the layers to match your favorite Mexican flavors:
- The Shredded Tinga Chicken Twist: Swap the ground beef for shredded rotisserie chicken tossed in smoky chipotle adobo sauce and diced fire-roasted tomatoes.
- The Chorizo Kick: Replace half of the ground beef with Mexican pork chorizo. Cook and drain thoroughly for an intense, smoky, deep-red spiced layer.
- The Loaded Nacho Garnish: Right before serving, scatter diced Roma tomatoes, sliced pickled jalapeños, chopped green onions, a drizzle of sour cream, and fresh cilantro across the center of the blistered cheese.
What to Serve with Baked Beef Enchilada Dip
This loaded, cheesy skillet dip is a show-stopping centerpiece for game days, tailgates, and casual parties:
- Sturdy Dippers: Alongside restaurant-style tortilla chips, set out bowls of warm flour tortilla wedges, crunchy corn chips (like Fritos Scoops), or crisp mini bell pepper halves.
- Cool Fresh Salsas: A bowl of fresh Pico de Gallo or creamy Chunky Guacamole provides a cool, refreshing, acidic contrast that balances the rich, bubbling hot beef and cheese.
- Ice-Cold Drinks: Serve with chilled Mexican lagers with lime wedges, or a pitcher of fresh citrus margaritas to cut through the rich, savory cheddar and spiced meat.
Storing and Reheating Leftovers
If you have leftover dip, pull out and discard any remaining chips from the rim (as they will eventually soften in the fridge).
Cover the ceramic bowl tightly with aluminum foil or transfer the dip to an airtight container, and store in the refrigerator for up to 4 days.
When you are ready to enjoy it again, avoid using the microwave, which can make the cheese rubbery and separate the oils.
Instead, reheat in the oven:
- Cover the dish with foil and place in a 350°F (175°C) oven for 15 minutes until heated through to the center.
- Remove the foil, tuck a fresh ring of crispy tortilla chips around the perimeter, scatter a pinch of fresh cheese over the top, and broil for 2 minutes until bubbly and golden again.
It will taste just as crispy, decadent, and freshly baked as the day you made it!
Will make thus weekend. Looks delicious