
I will never forget the rainy autumn evening that nearly made me swear off cooking sausages in a slow cooker forever.
My partner and I were craving a hearty, British-pub-style plate of bangers and mash: plump, savory sausages drowned in a thick, sweet onion gravy over buttery potatoes. I had seen plenty of “dump-and-go” slow-cooker recipes online claiming you could simply toss raw bratwurst or pork sausages directly into the crock with raw sliced onions and a splash of broth, clamp the lid down, and walk away.
It sounded so effortless that I didn’t question it.
Six hours later, when I lifted the lid, I was met with complete culinary disappointment.
The sausages hadn’t browned at all; they had boiled in their own juices, leaving their casings pale, limp, and rubbery.
Worse, because I dumped the onions in completely raw, they never caramelized. They had merely sweated out all their water, turning the gravy into a thin, watery, greyish liquid that tasted like boiled grease. When we poked a fork into a sausage, the flabby casing tore, spilling unrendered fat across the plate. We ended up pulling the meat out, frying frozen pierogies instead, and tossing the rest.
That miserable dinner bugged me for weeks. Sausages and caramelized onion gravy are pure, soul-warming comfort food. And the slow cooker should be the ideal appliance for braising onions into sweet, velvety silk without standing over a stove for two hours.
I spent the following month testing batches, experimenting with different sausage varieties, figuring out casing physics, and tweaking the gravy thickeners.
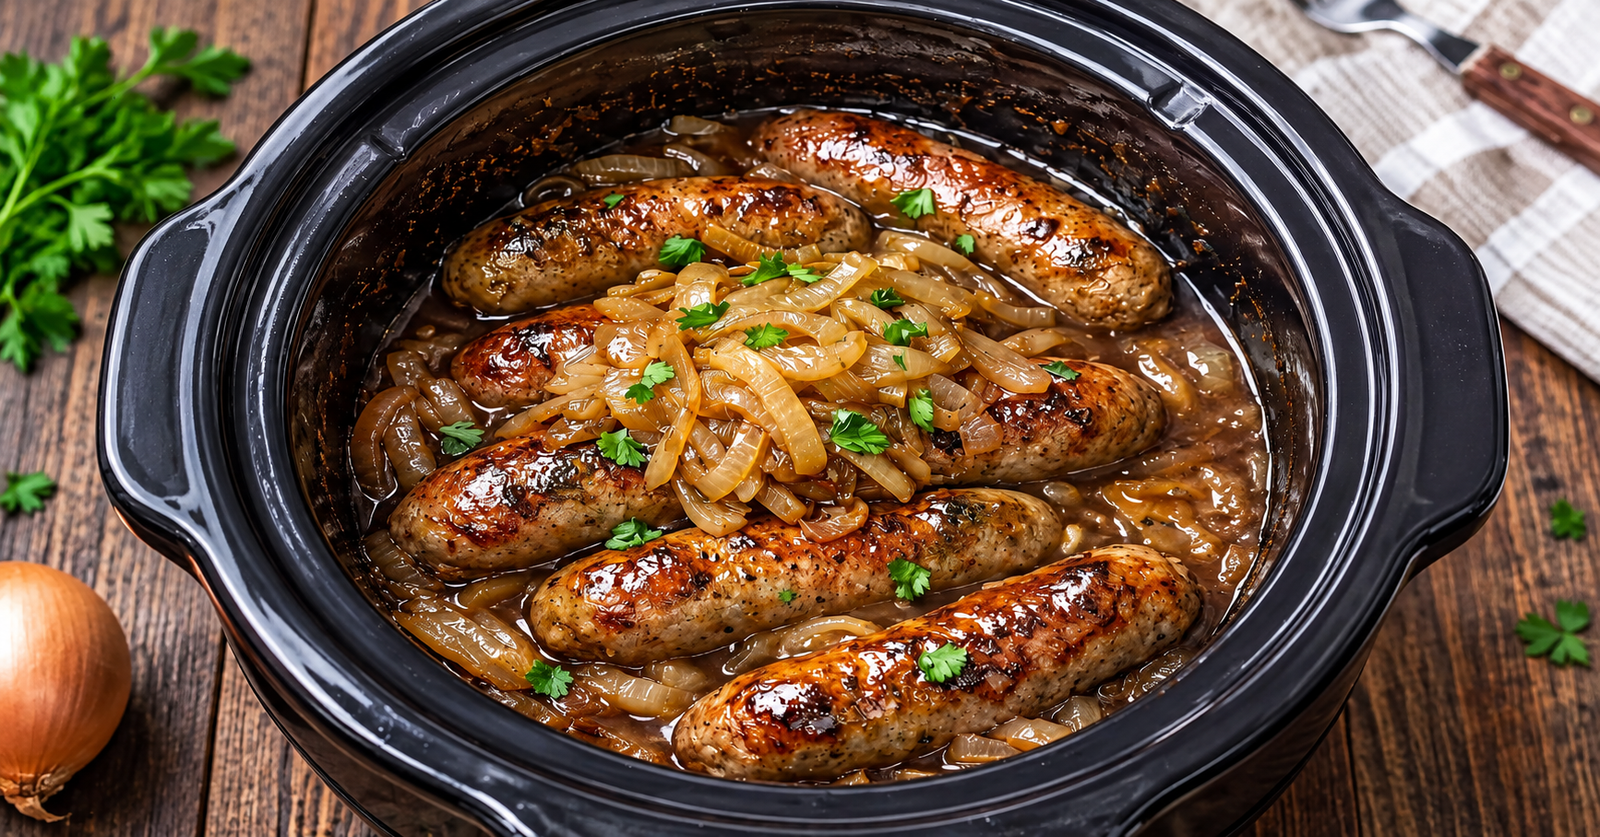
The photo above is the hard-earned victory sitting on my wooden counter: deeply browned, snappy pork sausages simmered in a rich, glossy, mahogany onion gravy, topped with jammy, butter-braised onions and fresh parsley.
Here is how you make foolproof, pub-quality sausages and onion gravy in your slow cooker without ending up with soggy, pale boiled meat.
Why “Dump-and-Go” Sausages Fail in a Slow Cooker
The slow cooker traps steam and heat, creating an environment that behaves more like a steam bath than a roasting pan. When cooking sausages and onions in that humid chamber, three major mistakes usually ruin the dish:
1. Skipping the Stovetop Sear (The Casing Nightmare)
Sausage casings (especially natural hog casings) need direct, dry contact with high heat to crisp up and tighten. If you drop pale, raw sausages directly into a cold slow cooker with liquid, the casing boils. Boiling leaves the casing chewy, rubbery, and prone to tearing. Giving your sausages a hard 3- to 4-minute skillet sear beforehand browns the exterior via the Maillard reaction and sets the casing so it stays snappy throughout the slow braise.
2. The Raw Onion Water Trap
Onions are roughly 89% water. When you add two pounds of raw sliced onions into an enclosed crock, that water releases, condenses on the lid, and dilutes your gravy into a soupy puddle. Slowly sweating and browning the onions in a hot pan with a pat of butter before they hit the crock cooks off that excess water, unlocking the sweet, jammy fructose that gives onion gravy its signature deep brown color and rich flavor.
3. Adding Thickener at the Wrong Time
If you whisk raw cornstarch or flour into cold liquid in the slow cooker, it often sinks to the bottom, scorches, or leaves a chalky aftertaste. Building a quick roux in your skillet using the rendered sausage and onion drippings—or stirring in a cornstarch slurry during the final 30 minutes on High—ensures the sauce thickens into a glossy, spoon-coating gravy that clings to every bite.
Ingredients & Tools You’ll Need
Essential Kitchen Gear
- 6-Quart Oval Slow Cooker: (An oval Crockpot, like the black ceramic model pictured, allows 5 to 6 large sausages to lay flat in a single layer rather than crowding together).
- 12-Inch Cast-Iron or Heavy Stainless-Steel Skillet: Critical for achieving that deep, blistered sear on the sausages and caramelizing the onions.
- Metal Tongs: For turning the sausages without puncturing the casings and losing valuable internal juices.
- Flat Wooden Spatula: For scraping up the fond from the bottom of your skillet.
The Ingredient Breakdown
| Component | Ingredient | Quantity | Practical Purpose |
| The Star | Fresh Pork Bratwurst, Bangers, or Mild Italian Sausages | 5 to 6 links (approx. 1.25 to 1.5 lbs) | High-quality links with natural casings hold their snap during braising. |
| The Sweet Bed | Large Sweet Vidalia or Yellow Onions | 3 large (halved and thinly sliced) | Melts into sweet, jammy, golden ribbons that form the gravy bulk. |
| Aromatic Backbone | Fresh Garlic | 4 cloves (minced) | Delivers robust, savory depth to the onion sauce. |
| Cooking Fat | Unsalted Butter & Neutral Oil | 2 tbsp butter, 1 tbsp oil (divided) | Oil handles high-heat sausage searing; butter enriches the onions. |
| The Flour Roux | All-Purpose Flour | 2.5 tbsp | Cooked in the onion butter to build a natural thickener for the gravy. |
| Deglazing Splash | Dry Red Wine, Dark Ale, or Beef Broth | ½ cup | Lifts browned fond from the skillet for rich pub-style color and depth. |
| The Braising Gravy | Low-Sodium Beef Bone Broth | 2.5 cups | Forms the savory foundation; low-sodium prevents over-salting as it reduces. |
| Savory Boosters | Worcestershire Sauce | 2 tbsp | Essential fermented umami; mimics traditional British pub gravy. |
| Savory Boosters | Dijon Mustard | 1 tbsp | Adds gentle acidity that cuts through the rich pork fat. |
| Richness Enhancer | Better Than Bouillon Roasted Beef Base | 1 tsp | Deepens the mahogany color and adds concentrated beefy backbone. |
| Herbal Lift | Fresh Thyme Leaves | 1 tbsp (or 1 tsp dried) | Classic woodsy herb that pairs naturally with onions and pork. |
| Seasoning | Coarse Kosher Salt & Black Pepper | 1 tsp salt, 1 tsp coarsely ground pepper | Balances the sweet caramelized onions with a peppery bite. |
| Finishing Touch | Fresh Flat-Leaf Italian Parsley | 2 tbsp (finely chopped) | Adds a pop of clean green over the warm sausages right before serving. |
Step-by-Step Cooking Instructions
Step 1: Sear the Sausages
Set your 12-inch skillet over medium-high heat with 1 tablespoon of high-smoke-point oil (like avocado or vegetable oil).
Once the pan is shimmering hot, lay the sausages in the pan with a little space between each link.
Sear untouched for 2 to 3 minutes per side.
Cook’s Real-Life Tip: Do not prick or poke the sausages with a fork! Piercing the casing releases the internal juices and fat that keep the meat juicy. Use tongs to gently roll them until all sides develop that blistered, deep golden-brown sear you see in the photo.
Transfer the seared sausages to a plate. They will not be cooked through yet, which is completely fine.
Do not wipe out the pan—those browned bits stuck to the skillet are liquid gold.
Step 2: Sweat and Caramelize the Onions
Turn the skillet heat down to medium-low.
Add the 2 tablespoons of butter right into the rendered sausage drippings.
Add your sliced onions, fresh thyme leaves, and a generous pinch of kosher salt.
Cook gently for 15 to 20 minutes, stirring every couple of minutes with a wooden spoon.
As the onions release their natural moisture, scrape up the savory browned fond from the sausages.
The onions will slowly soften, turn translucent, and shrink down into sweet, golden-amber ribbons.
Stir in the minced garlic during the final 2 minutes of cooking just until fragrant.
Step 3: Build the Skillet Roux
Sprinkle the 2.5 tablespoons of all-purpose flour evenly over the warm, caramelized onions in the skillet.
Stir constantly for 1 to 2 minutes to coat the onions in flour and cook out the raw flour taste.
The mixture will look like a thick, nutty onion paste.
Step 4: Deglaze and Form the Sauce
Pour your ½ cup of dark ale, dry red wine, or beef broth directly into the skillet with the floured onions.
Whisk or stir vigorously as it bubbles, scraping every last speck of flavor from the bottom of the pan.
Gradually pour in the 2.5 cups of beef bone broth, 2 tablespoons of Worcestershire sauce, 1 tablespoon of Dijon mustard, and 1 teaspoon of Better Than Bouillon beef base.
Stir until the bouillon dissolves and the sauce begins to simmer gently.
It will immediately start to thicken into a silky, savory onion gravy. Remove the skillet from the heat.
Step 5: Pack the Slow Cooker
Pour roughly two-thirds of the warm caramelized onions and gravy directly into the bottom of your 6-quart oval slow cooker, spreading them into an even, fragrant bed.
Arrange your seared sausages in a single layer on top of the onion bed.
Now, spoon the remaining caramelized onions and rich gravy directly over the center of the sausages, letting the golden onion ribbons nestle along the browned skins (exactly like the beautiful arrangement in the reference photo).
Step 6: The Low-and-Slow Braise
Clamp the slow cooker lid down securely.
- Low Setting (Strongly Recommended): Cook for 4 to 5 hours.
- High Setting: Cook for 2 to 2.5 hours.
The Secret to Snappy Sausages: Stick to the Low setting whenever you can. High heat causes the liquids inside the sausages to boil rapidly, which can rupture the casings and dry out the ground pork. Gentle radiant heat on Low lets the pork slowly cook through while the onions break down into jammy perfection, infusing the gravy with savory pan drippings.
Around hour 4, check internal doneness with a digital probe thermometer. The thickest center of a link should read at least 160°F (71°C).
Step 7: The Final Thickening & Rest
Uncover the slow cooker.
If you prefer your onion gravy extra thick, switch the slow cooker to HIGH, stir 1 tablespoon of cornstarch mixed with 1 tablespoon of cold water into the bubbling liquid, and let it simmer with the lid off for 10 to 12 minutes.
The sauce will concentrate into a glossy, mahogany lacquer that coats the back of a spoon.
Turn the cooker to “Warm”.
Scatter freshly chopped Italian parsley across the top for a bright herbal pop against the rich brown gravy.
Let the dish rest undisturbed in the crock for 5 minutes so the sausages settle before serving.
Practical Troubleshooting & Common Mistakes
- “My gravy turned out too thin and watery.”
This is the classic consequence of skipping the stovetop onion browning in Step 2. When onions aren’t pre-cooked, their moisture floods the slow cooker. If your gravy looks thin at the end, simply ladle some of the liquid into a small saucepan on your stove, whisk in a cornstarch slurry, and boil for 3 minutes until thick and glossy, then pour it back over the sausages. - “The sausage casings split open.”
Casings burst when exposed to sudden, violent heat or if cooked too long on the High setting. Avoid poking the links with forks, keep the skillet sear moderate, and braise on Low to keep the casings intact and snappy. - “The gravy tasted too salty.”
Sausages and bouillon cubes both contain salt. Always use low-sodium beef broth, and hold off on adding extra salt until the very end after you taste the finished gravy.
What to Serve with Sausages and Onion Gravy
This dish is comforting, hearty, and begging for sides that can catch every drop of that rich onion sauce:
- Creamy Garlic Mashed Potatoes (Bangers & Mash): The gold standard pairing. Mound a mountain of buttery Yukon Golds on your plate, set two hot sausages on top, and ladle spoonfuls of jammy onion gravy over everything.
- Buttered Egg Noodles or Polenta: Wide egg noodles or creamy polenta soak up the savory beef-onion jus beautifully.
- Crusty Sourdough Bread or Warm Dinner Rolls: Mandatory for wiping the bowl clean of every last trace of caramelized onion gravy.
- Steamed Sweet Peas or Braised Red Cabbage: Adds a sweet, vibrant green or purple crunch that cuts through the savory pork and rich gravy.
Leftovers & Next-Day Sandwiches
If you have leftover sausages and gravy, transfer them to an airtight glass container and store in the refrigerator for up to 4 days.
As the dish cools, the gelatin in the beef bone broth and natural pork collagen will cause the gravy to set into a thick jelly.
When reheating, transfer the sausages and gravy to a skillet over medium-low heat with a splash of broth or water. Cover with a lid and warm gently for 6 to 8 minutes until hot and bubbling; the gravy will melt back into a glossy, silky sauce.
For the ultimate next-day lunch, split a crusty French hoagie roll, toast it with a dab of butter, lay a sliced warm sausage inside, and pile a generous mound of the jammy slow-cooked onions and warm gravy over the top. Add a smear of coarse whole-grain mustard, and you have a hot sausage sandwich that rivals anything from a gourmet deli.