
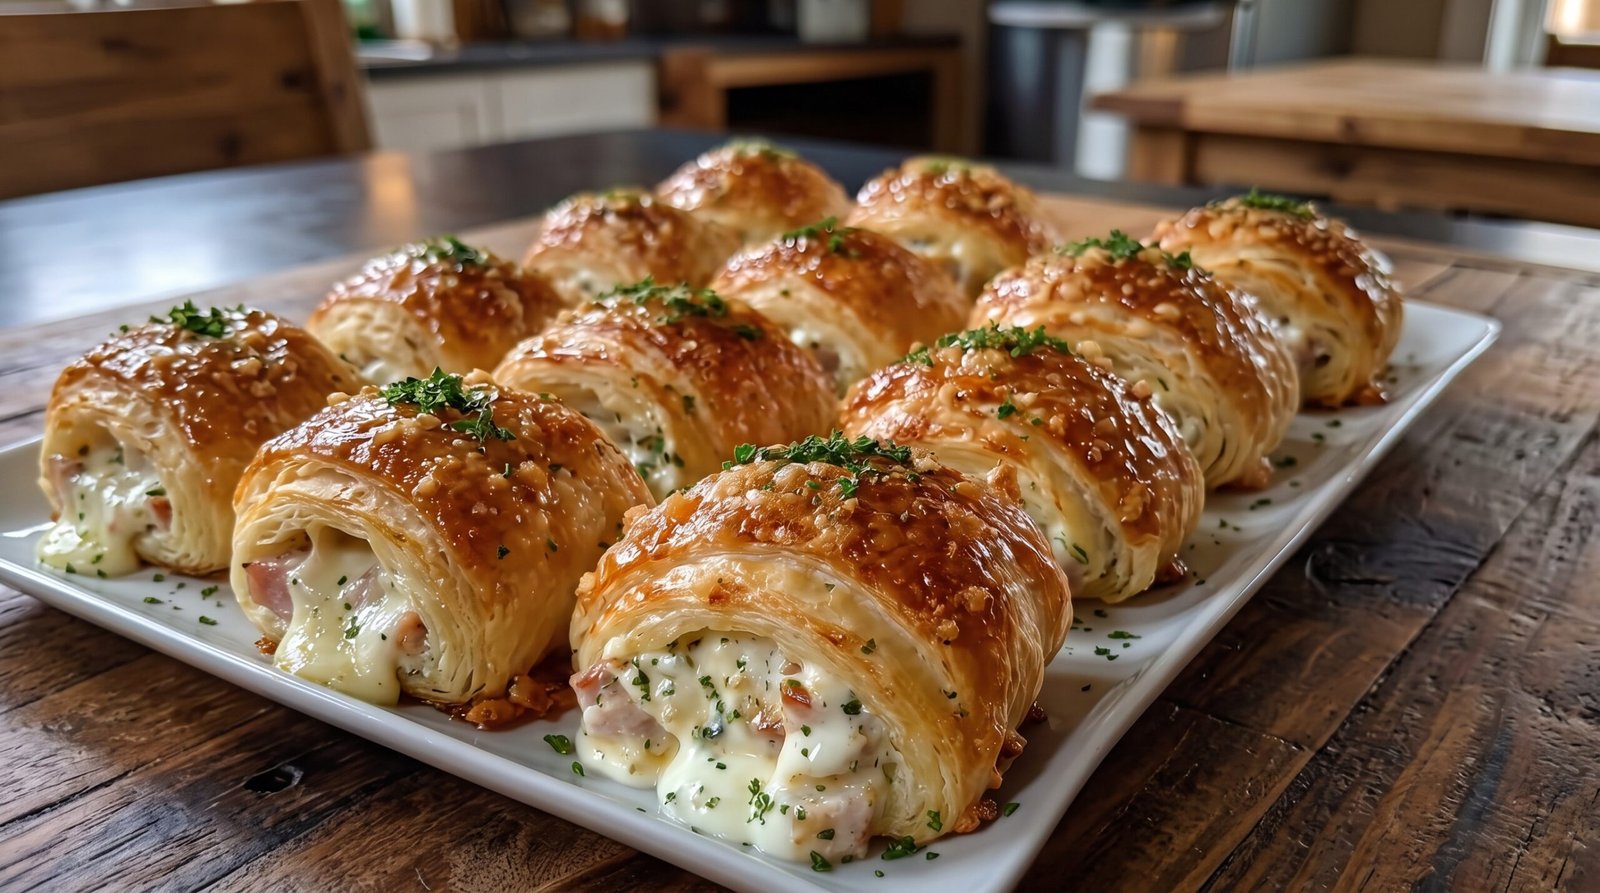
Sometimes when I get home after a long afternoon, I just want something warm and filling that does not require a ton of effort. I usually turn to my favorite go-to: ham and cheese puff pastry rolls. These bites are a lifesaver when I have people coming over on short notice or when I simply need a comforting snack while I catch up on emails. They rely on store-bought pastry, which keeps the process manageable, and they come together much faster than a full dinner. I have learned over the years that keeping a box of puff pastry in the freezer is one of the best habits a home cook can have. It turns basic deli ingredients into something that feels special and intentional. In this guide, I will share the exact way I make these rolls so they come out golden and satisfying every single time.
Why This Recipe Works
This recipe relies on a few core principles that make it reliable for any home cook. The primary reason it works is the contrast in textures. You get the buttery, delicate layers of the puff pastry which provide a foundation, paired with the salty, savory bite of the ham and the smooth, melted interior of the cheese. Unlike some recipes that use dense doughs, puff pastry keeps things light. When you bake these rolls at the right temperature, the butter in the dough expands, creating a lift that makes each bite feel airy rather than heavy.
Another reason this recipe is a staple in my kitchen is its adaptability. You can use whatever ham you have on hand, whether it is thinly sliced honey ham or a thicker cut that you chop yourself. The cheese follows the same logic. I prefer a mix that melts well, like Gruyere or a standard sharp white cheddar, but you can use Swiss or even fontina if you want a different flavor profile. The consistency remains the same regardless of the cheese type because they all soften and combine with the ham inside the roll.
Ease of preparation is the final factor. You do not need professional tools. A simple baking sheet, a knife, and a small brush for the egg wash are all that is required. Because the rolls are small, they cook quickly in a hot oven. This means you have less time waiting and more time eating. The visual appeal is a nice bonus. When they come out of the oven, they look like something you might pick up from a neighborhood bakery. It is a satisfying project that rewards you with hot, savory snacks in under forty minutes.
Ingredient Notes
The Pastry Base
You need a package of frozen puff pastry sheets. These are usually sold in boxes of two. Make sure you check your labels if you have specific dietary requirements, as some brands contain different types of fats. The key is to thaw the pastry according to the package instructions before you try to unroll it. If it is too cold, it will crack; if it is too warm, the butter starts to melt and you lose those flaky layers. Keep it in the fridge until you are ready to roll.
The Filling
For the ham, I suggest using something high-quality. If you buy sliced deli ham, make sure it is not too watery, as extra moisture can make the pastry soggy near the center. You can also use diced leftovers from a holiday ham. For the cheese, stick to something that melts reliably. Gruyere adds a nutty depth, but sharp cheddar is a classic for a reason. I find that grating the cheese yourself is better than using the pre-shredded bags, which often contain anti-caking agents that prevent a smooth melt.
The Finish
A simple egg wash is essential. Use one large egg and a teaspoon of water. This gives the pastry that deep golden sheen you want. I also like to finish them with a sprinkle of fresh parsley or dried herbs like thyme. If you want a little extra flavor, a light dusting of sea salt or cracked black pepper on top of the egg wash makes a big difference.
| Ingredient | Amount | Notes |
|---|---|---|
| Puff Pastry | 1 package | Two sheets, thawed |
| Sliced Ham | 8 ounces | Finely chopped or thin layers |
| Shredded Cheese | 1.5 cups | Gruyere or sharp white cheddar |
| Egg | 1 large | For the wash |
| Water | 1 teaspoon | To thin the egg |
| Fresh Parsley | 1 tablespoon | Minced for garnish |
The Recipe
- Prep Time: 15 minutes
- Cook Time: 20 minutes
- Total Time: 35 minutes
- Servings: 12 rolls
- Difficulty: Simple
Equipment needed: Large baking sheet, parchment paper, sharp kitchen knife, small mixing bowl, pastry brush.
Step-by-Step Instructions
Step 1: Prep the Oven and Pan
Before you do anything else, set your oven to 400°F (200°C). It is important that the oven is fully preheated before the rolls go inside. If the oven is not hot enough, the butter in the pastry will melt before the dough can puff up, resulting in a greasy, flat roll. Line your baking sheet with a piece of parchment paper. This prevents the melting cheese from sticking to the pan and makes cleanup much easier.
Step 2: Prepare the Pastry
Take your thawed puff pastry sheet and lay it out on a lightly floured surface. You do not need to roll it out much, just enough to smooth out the creases if they are deep. You want a rectangle that is roughly ten by twelve inches. Using a sharp knife, cut the rectangle into twelve even squares or rectangles, depending on the size of roll you prefer.
Step 3: Add the Filling
Place a small portion of the ham and a generous tablespoon of cheese in the center of each piece of pastry. Do not overfill them, or the cheese will leak out everywhere before the pastry is done. Fold the corners of the pastry toward the center or roll the sheet up tightly like a cylinder. Press the edges down slightly to seal them, but do not obsess over it. A little leakage is normal and adds to the rustic look.
Step 4: Egg Wash and Seasoning
Whisk your egg and water together in a small bowl until the mixture is uniform. Brush this over the tops of your assembled rolls. This layer is what creates that beautiful golden brown color once the heat hits the dough. If you are using herbs like parsley or thyme, sprinkle them on top of the egg wash now so they stick to the crust during the baking process.
Step 5: Bake
Slide the baking sheet into the center rack of your oven. Bake for 20 minutes. You are looking for the pastry to be puffed and a deep golden color. The cheese should be bubbling out of the sides. If your oven has a hot spot, rotate the pan halfway through the cooking time to ensure they brown evenly. Once they are done, take them out and let them sit for about five minutes before serving.
Mistakes I Made (So You Don't Have To)
Letting the Pastry Get Too Warm
Early on, I would leave the puff pastry sitting on the counter while I prepared the other ingredients. The butter would soften to the point where the dough became sticky and impossible to work with. The fix is simple: keep the pastry in the refrigerator until the exact moment you are ready to cut and fill it. If you feel it getting soft, pop it back in the fridge for ten minutes.
Using Wet Fillings
I once used some leftover ham that had a lot of liquid on it from the fridge. That moisture seeped into the pastry while it was in the oven, and the bottom turned into a gummy mess instead of staying crisp. Now, I always pat my ham dry with a paper towel before adding it to the dough. It makes a significant difference in the final texture of the bottom layer.
Overcrowding the Baking Sheet
I used to try to cram all the rolls onto one small pan so I could bake them all at once. This meant the air could not circulate properly, and the rolls ended up steaming each other rather than crisping up. Now, I leave about an inch of space between each roll on the tray. If they don't all fit, I bake in two batches. It is worth the extra time to get the right results.
Skipping the Rest Time
The first time I made these, I bit into one immediately after taking it out of the oven. The cheese filling was scorching hot, and it burned my tongue. Plus, the pastry structure needs a few minutes to settle so it does not collapse when you lift it. I now force myself to wait at least five minutes. This allows the filling to thicken slightly so it stays inside the roll when you take that first bite.
Variations and Tips
Add Some Dijon
If you want to cut through the richness of the cheese and the butter, spread a very thin layer of Dijon mustard on the pastry before you add the ham and cheese. The tanginess of the mustard works with the savory ham. Just be careful not to use too much, or the moisture will interfere with the crisping process.
Use Different Cheeses
I mentioned Gruyere, but you can really use whatever you like. Smoked provolone is an interesting choice if you want a deeper flavor, or you can mix in a little Parmesan for a salty punch. As long as the cheese is a good melter, it will work well. Avoid fresh mozzarella, as it releases too much water during baking.
Make-Ahead Strategy
You can assemble these rolls a few hours before you need them. Keep the tray in the refrigerator until you are ready to heat the oven. Do not put the egg wash on until just before baking, as the egg can soften the dough if it sits for too long. This makes hosting much easier because you can have the prep done in advance.
Savory Toppings
Instead of herbs, try a light dusting of poppy seeds or sesame seeds on the egg wash. They add a nice little crunch to the top of the roll. You can also sprinkle a little bit of grated parmesan on top of the egg wash in the last five minutes of baking for a sharper, crispier finish.
Storage and Reheating
If you have leftovers, they keep well for up to three days. Let them cool completely before putting them in an airtight container in the refrigerator. To reheat, do not use the microwave, as it will turn the pastry soft and chewy. Instead, place them in an oven or a toaster oven set to 350°F (175°C) for about 8 to 10 minutes. This brings back the crunch and ensures the cheese is melted and steaming hot. I generally do not recommend freezing the already baked rolls, as the texture of the pastry suffers once it is thawed and reheated. It is much better to bake only what you plan to eat.
Frequently Asked Questions
Can I use store-bought pizza dough instead of puff pastry?
You can, but it will not give you the same result. Pizza dough is meant to be chewy and bread-like, whereas puff pastry is intended to be light and flaky with many layers. If you use pizza dough, your rolls will be much denser and will not have that signature shattering crust. If you are in a pinch, it will taste okay, but it won't be the same experience.
Why did my pastry not puff up?
This usually happens because the oven temperature was too low or the pastry was not cold enough when it went into the oven. The expansion of the butter layers is what causes the lift. If the butter melts before the dough can set in the heat, the pastry stays flat. Always ensure your oven is fully preheated to 400°F (200°C) before sliding the tray in.
How do I know when they are done?
You are looking for a deep golden brown color on the top of the pastry. You should also see the cheese bubbling and potentially leaking slightly out of the sides. If you lift one up with a spatula, the bottom should feel firm and look slightly brown. If it still looks pale or feels soft, give it another two minutes.
Can I add vegetables to the filling?
You can, but you must be careful about moisture. Spinach is a popular choice, but you must squeeze out every drop of liquid after cooking it. If you add raw vegetables like peppers or onions, sauté them until they are soft and dry first. Any extra water will prevent the pastry from cooking through properly.
Are these safe to serve at room temperature?
They are best served warm, but they are safe to eat at room temperature for up to two hours. If you are serving them at a party, try to keep them in a spot where they won't be exposed to direct sunlight or drafts. If they have been sitting out longer than two hours, it is best to discard any leftovers for food safety reasons.
Final Thoughts
Making these ham and cheese rolls is one of those simple tasks that feels incredibly rewarding. It shows that you do not need hours of preparation to put together something that tastes like a professional snack. The flaky pastry combined with the savory filling is a classic combination that never really gets old.
Once you have the basic technique down, you will find yourself reaching for this recipe whenever you need a quick win in the kitchen. Whether it is for a weekend snack or a last-minute gathering, these rolls deliver every time. Keep them simple, keep them hot, and enjoy the process.