
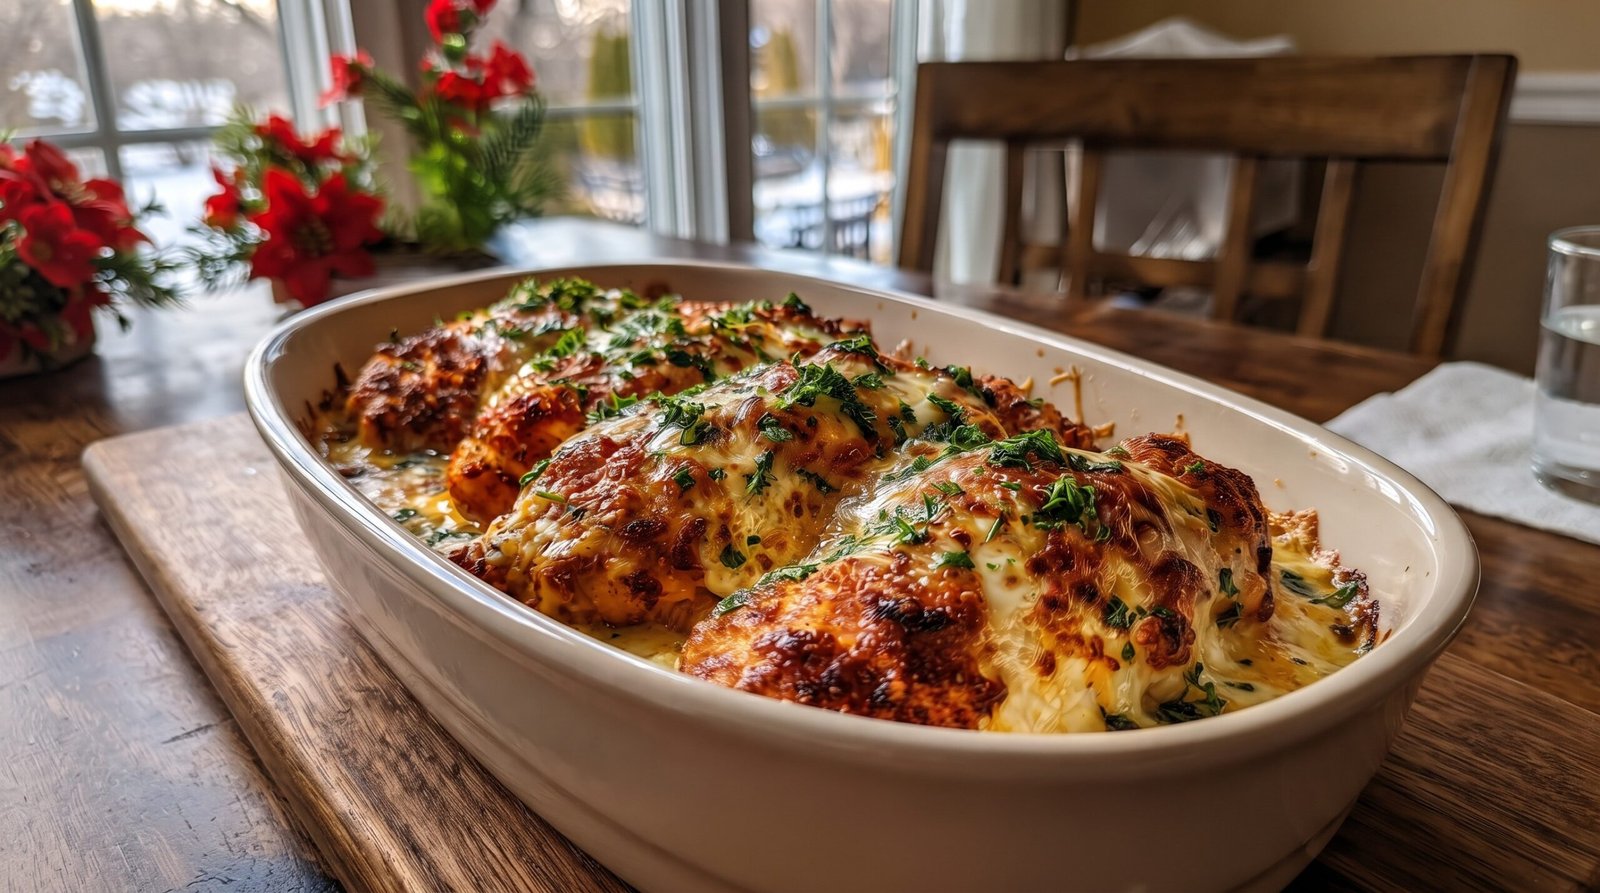
I often find myself standing in front of the refrigerator on a Tuesday evening, staring at a pack of chicken breasts and wondering how to make them interesting again. It is easy to fall into a rut of just grilling or pan-searing meat, but those methods can sometimes lead to dry results if you lose focus for even a minute. I needed something that would provide a lot of flavor without requiring me to stand over a hot stove for an hour. This creamy garlic herb baked chicken has become my go-to solution for those busy nights when I want a comforting meal that feels like a bit of a treat. It uses simple pantry staples to create a rich, savory coating that keeps the meat moist throughout the baking process. By using a combination of dairy and fresh aromatics, I found a way to turn basic ingredients into a restaurant-style dinner that works just as well for a solo meal as it does for guests.
Why This Recipe Works
The main reason I reach for this recipe so often is the balance of textures. When you bake chicken with a creamy, cheesy topping, the sauce protects the meat from drying out. The moisture trapped underneath the layer of cheese and herbs ensures that every slice remains tender and juicy. Unlike dry roasting, which can quickly pull too much moisture from the protein, this baking technique creates a humid environment within the dish that concentrates the flavors of the garlic and herbs directly onto the surface of the meat.
Another factor is the ease of preparation. You do not need any special equipment or advanced culinary techniques to get this right. Most of the work involves mixing a few ingredients in a bowl and spreading that mixture over your protein. Once it is in the oven, you are free to do other things, like prepare a salad, boil some pasta, or simply catch up on reading while the house fills with the smell of roasting garlic and melting cheese. This is a hands-off approach that feels much more involved than it actually is, which is the best kind of recipe for a regular weeknight.
The flavor profile is also very adaptable. I use a combination of garlic and herbs because these ingredients are versatile and complement almost any side dish. Because the sauce base is creamy and savory, it pairs well with everything from roasted potatoes to steamed broccoli or even a slice of crusty bread to soak up the juices. You get a deep, layered taste profile from the combination of fats and fresh aromatics that makes this dish feel complete without needing a complex ingredient list. It is a reliable dish that rarely misses the mark.
Ingredient Notes
The Poultry Base
I always suggest using boneless, skinless chicken breasts for this recipe. They cook evenly and are easy to portion out. If you buy larger breasts, it is best to slice them horizontally so they are about one inch thick. This ensures they cook through in the same amount of time as the creamy topping browns. If you prefer, you can use chicken thighs, though you will need to add about five to seven minutes to the total baking time because thighs are denser. Always check that your chicken is sourced from a reputable supplier and keep it refrigerated until the moment you are ready to prep.
The Creamy Layer
The base of the creamy topping is a mix of softened cream cheese and sour cream. The cream cheese provides the body and thickness, while the sour cream adds a slight tang that cuts through the richness. It is essential to let the cream cheese sit on the counter for about twenty minutes so it becomes soft enough to mix easily with the other ingredients. If it is too cold, you will end up with clumps in your sauce. You can substitute Greek yogurt for the sour cream if you prefer a slightly lighter texture, but stick to full-fat varieties for the best consistency.
Aromatics and Seasoning
Fresh garlic is non-negotiable here. I find that jarred, pre-minced garlic does not have the same punchy aroma that fresh cloves provide. I usually mince about four large cloves, but you can add more if you really love that sharp, pungent flavor. For the herbs, I prefer a mix of dried oregano and fresh chopped parsley. The oregano adds a woody, earthy note that blooms during the baking process, while the fresh parsley stirred in at the end adds a bright, clean finish. If you have fresh thyme, that works beautifully as well.
Cheese and Topping
I use a mix of shredded parmesan and mozzarella. The parmesan provides a salty, nutty bite that deepens the flavor, while the mozzarella ensures that nice, pull-apart melt that holds the topping together. Freshly shredded cheese is always better than the pre-bagged kind because it melts more smoothly. The pre-shredded stuff is coated in potato starch to prevent clumping, which can make your sauce slightly grainy. If you have time, grate a block of cheese yourself. It takes an extra minute but makes a noticeable difference in how the sauce sets.
| Ingredient | Amount | Notes |
|---|---|---|
| Chicken Breasts | 4 pieces | Boneless, skinless, pounded even |
| Cream Cheese | 4 ounces | Softened to room temperature |
| Sour Cream | 1/2 cup | Full fat is best |
| Parmesan Cheese | 1/2 cup | Freshly grated |
| Mozzarella Cheese | 1/2 cup | Freshly grated |
| Garlic | 4 cloves | Finely minced |
| Dried Oregano | 1 teaspoon | Adds earthy depth |
| Salt | 1/2 teaspoon | Adjust to taste |
| Black Pepper | 1/4 teaspoon | Freshly cracked |
| Fresh Parsley | 2 tablespoons | Chopped for garnish |
The Recipe
- Prep Time: 15 minutes
- Cook Time: 25 minutes
- Total Time: 40 minutes
- Servings: 4
- Difficulty: Easy
Equipment needed:
– Large mixing bowl
– Baking dish (9×13 inch size)
– Meat thermometer
– Chef's knife and cutting board
Step-by-Step Instructions
Step 1: Prep the Ingredients
Start by preheating your oven to 400 degrees Fahrenheit. While the oven heats, take your chicken breasts and pat them dry with paper towels. If they are uneven in thickness, place them between two sheets of plastic wrap and use a heavy skillet or meat mallet to gently pound them until they are uniform. This is crucial so that the chicken does not have thin ends that dry out before the thick center is cooked.
Once the chicken is prepped, place it into a 9×13 inch baking dish. I like to arrange them in a single layer so they are not crowded. This allows the heat to circulate around each piece, ensuring that the meat reaches a safe internal temperature of 165 degrees Fahrenheit without having to overcook the edges.
Step 2: Mix the Creamy Topping
In a large bowl, combine the softened cream cheese, sour cream, minced garlic, dried oregano, salt, and pepper. Use a sturdy spatula to stir these together until the mixture is uniform and smooth. The garlic needs to be distributed evenly throughout the cream base to ensure that every bite has the same level of flavor.
Add the parmesan cheese and half of the mozzarella to the bowl. Stir again until everything is fully incorporated. This creates a thick, flavorful paste that will act as a blanket over the chicken. If the mixture seems too stiff, you can add a tablespoon of milk to help it spread more easily, though the heat from the oven will naturally loosen it up once it starts baking.
Step 3: Apply the Topping
Spoon the creamy mixture onto each chicken breast. Use the back of your spoon to spread it out to the edges of the meat. You want to create a slightly thicker layer in the middle and thinner towards the edges so it does not all slide off during the cooking process. It should look like a thick, white coat covering the top of each piece.
Sprinkle the remaining mozzarella over the top of the coated chicken. This extra layer of cheese will bubble and turn a golden brown in the oven, creating a savory crust that holds the moisture in. Ensure you do not leave too much of the sauce on the bottom of the dish, as it can burn if it gets too thin and touches the hot pan surface.
Step 4: Bake to Perfection
Place the baking dish into the center rack of your preheated oven. Set a timer for 25 minutes. You want the chicken to reach an internal temperature of 165 degrees Fahrenheit. You can test this by inserting your meat thermometer into the thickest part of the breast. It should slide in without resistance and register the safe temperature immediately.
If the cheese has not started to turn a light golden color after 25 minutes, you can turn your oven to the broiler setting for 1 to 2 minutes. Watch it closely during this time. The cheese will brown very quickly under the broiler, and it can go from golden to burnt in a matter of seconds. Stay by the oven and pull the dish out the moment you see the desired color.
Step 5: Garnish and Rest
Once you remove the baking dish from the oven, let it rest for at least 5 minutes before serving. This rest period is essential because it allows the juices within the meat to redistribute. If you cut into the chicken immediately, the juices will run out onto the plate, leaving the meat less tender.
While the chicken rests, sprinkle the fresh, chopped parsley over the top. This adds a bright, herbaceous note that cuts through the rich cream sauce. The heat from the dish will release the aroma of the fresh herbs as you bring it to the table. Serve immediately while everything is steaming hot.
Mistakes I Made (So You Don't Have To)
Cold Ingredients
In my early attempts, I used cold cream cheese directly from the fridge. It did not mix well with the sour cream and herbs, leaving the topping lumpy and uneven. When it hit the hot oven, these lumps did not melt properly, leading to spots that were too salty or too garlicky while other parts were bland. The fix is simple: leave your cream cheese on the counter for at least twenty minutes before you start. It should be soft and spreadable, which makes the whole process faster and the result much smoother.
Overcrowding the Dish
I once tried to squeeze six chicken breasts into a smaller pan because I did not want to wash a second dish. The pieces touched, and the steam trapped between them prevented the edges from cooking evenly. The chicken in the middle was undercooked while the outer pieces were getting too dark. Always use a 9×13 inch pan for four pieces of chicken. If you are cooking for a crowd, use two separate dishes. Giving the chicken space allows for consistent heat flow, which is the secret to getting a uniform result every single time.
Using Pre-Shredded Cheese
I thought buying pre-shredded cheese would save me time, but it actually ruined the texture of my sauce. The anti-caking agent that is used on packaged cheese prevented it from melting into a cohesive, creamy layer. It stayed in little stringy bits that sat on top of the chicken rather than melting into a beautiful, bubbly crust. Now, I always take the extra two minutes to grate my own cheese from a block. The difference in how the sauce sets is significant, and the flavor of fresh, block-quality cheese is superior.
Skipping the Rest Time
Early on, I was so eager to eat that I sliced into the chicken the second it came out of the oven. All the juices poured out onto the plate, and the meat itself felt stringy and dry. I learned that letting the chicken rest for 5 minutes is non-negotiable. During this time, the proteins firm up slightly and the moisture stays inside the fibers. It is the difference between a dry, tough piece of poultry and one that is succulent and tender. Do not skip the rest, no matter how hungry you are.
Variations and Tips
Add Some Heat
If you enjoy a bit of a kick, add a half teaspoon of crushed red pepper flakes to your cream cheese mixture. It complements the garlic and herbs surprisingly well and adds a nice warmth that builds as you eat. You can also sprinkle a little paprika over the top before putting the dish in the oven for a touch of smoky flavor and a nice pop of color.
Spinach Variation
To make this a more complete meal, stir a half cup of well-drained, chopped frozen spinach into the cream cheese mixture. Make sure you squeeze as much water as possible out of the spinach before adding it, or your sauce will become runny in the oven. The spinach adds a nice earthiness that pairs perfectly with the parmesan and mozzarella cheeses, and it helps you get more greens onto the plate without any extra effort.
Make-Ahead Tip
You can assemble the entire dish ahead of time. Prep the chicken and the topping in the morning, cover the dish tightly with plastic wrap, and keep it in the refrigerator. When you are ready to cook, pull it out and let it sit on the counter for 15 minutes to take the chill off before placing it into the oven. This saves you from having to do all the prep work when you are tired after a long day. Just remember to add an extra 3 to 5 minutes to the baking time to account for the cold starting temperature of the dish.
Use Thighs Instead
If your family prefers dark meat, you can easily use boneless, skinless chicken thighs. They are much more forgiving than breasts and stay juicy even if they are slightly overcooked. The only change you need to make is the cooking time. Thighs are thicker and have more fat, so they take about 30 to 32 minutes at 400 degrees Fahrenheit. Use your meat thermometer to confirm they have reached 165 degrees Fahrenheit, as you would with breasts.
Storage and Reheating
If you have leftovers, do not let them sit out at room temperature for more than two hours. Transfer the chicken and any sauce to an airtight container and place it in the refrigerator. It will stay safe to eat for up to three days. Because this dish relies on a dairy-based sauce, I do not recommend freezing it. When dairy-heavy sauces are frozen and thawed, they tend to separate and become grainy, which ruins the texture of the dish.
To reheat, put the chicken in a baking dish and add a tiny splash of water or broth to the bottom to prevent it from sticking or drying out. Reheat it in a 350-degree oven until the internal temperature reaches 165 degrees Fahrenheit. You can also use a microwave, but use a low power setting to keep the chicken from becoming rubbery. Always check that the meat is steaming hot all the way through before serving again.
Frequently Asked Questions
Can I use chicken breasts with the skin on?
While you can use bone-in, skin-on chicken, it will significantly change the texture and cooking time. The skin will trap more moisture, and the fat will render into the cream sauce, which might make it too greasy. I strongly recommend sticking with boneless, skinless breasts for this specific recipe to ensure the creamy topping stays thick and adheres to the meat properly. If you use bone-in pieces, you will need to increase the cooking time by at least 15 minutes, which will likely cause the cheese topping to burn before the meat is cooked through.
Why is my sauce watery?
If your sauce turned out watery, it is usually because the chicken released too much moisture or you used ingredients with too much water content. Always pat your chicken very dry with paper towels before seasoning it. If you add spinach or other vegetables, make sure they are squeezed completely dry. Additionally, ensure you are not using low-fat versions of the dairy products, as they contain more water and less fat, which leads to a thinner, less stable sauce that separates easily during the baking process.
Can I use dried herbs instead of fresh?
You can definitely use dried herbs if that is what you have on hand. For the garnish, dried parsley does not provide the same fresh, bright flavor as fresh leaves, but it works fine for seasoning the sauce. If you use dried herbs instead of fresh, use about one-third of the amount called for in the recipe, as dried herbs are much more concentrated. Be sure to rub them between your fingers before adding them to the bowl to help release their oils and fragrance.
What should I serve with this chicken?
Since the chicken is rich and creamy, I prefer serving it with something that can soak up the extra sauce. Roasted root vegetables like carrots or potatoes are excellent choices because they stand up well to the intense flavor of the garlic. Steamed asparagus or sautéed green beans also provide a nice, crisp contrast to the softness of the chicken. If you want something simpler, a piece of crusty sourdough or a basic green salad with a light vinaigrette helps to balance the meal without being too heavy.
How do I know if the chicken is cooked through?
The most accurate way to check for doneness is to use an instant-read meat thermometer. Insert the probe into the thickest part of the largest chicken breast. It should read at least 165 degrees Fahrenheit. If you do not have a thermometer, you can cut into the thickest part of the meat; the juices should run clear, and the meat should be white throughout, with no pink remaining. However, a thermometer is the only way to be sure without drying the meat out by cutting into it prematurely.
Final Thoughts
Making this chicken has become a reliable part of my routine because it rewards a little effort with a dinner that feels substantial and comforting. It is one of those meals that proves you do not need to spend hours in the kitchen to produce something that tastes like it took all afternoon. The combination of garlic, herbs, and cheese creates a layer of flavor that turns a plain piece of poultry into a dinner that everyone looks forward to.
I hope this recipe finds a place in your weekly meal rotation just as it has in mine. Whether you are cooking for a quiet night at home or gathering people around the table, the simplicity and consistency of this dish make it a dependable choice. Just remember to keep an eye on your oven and use a thermometer, and you will have a delicious result every time.