
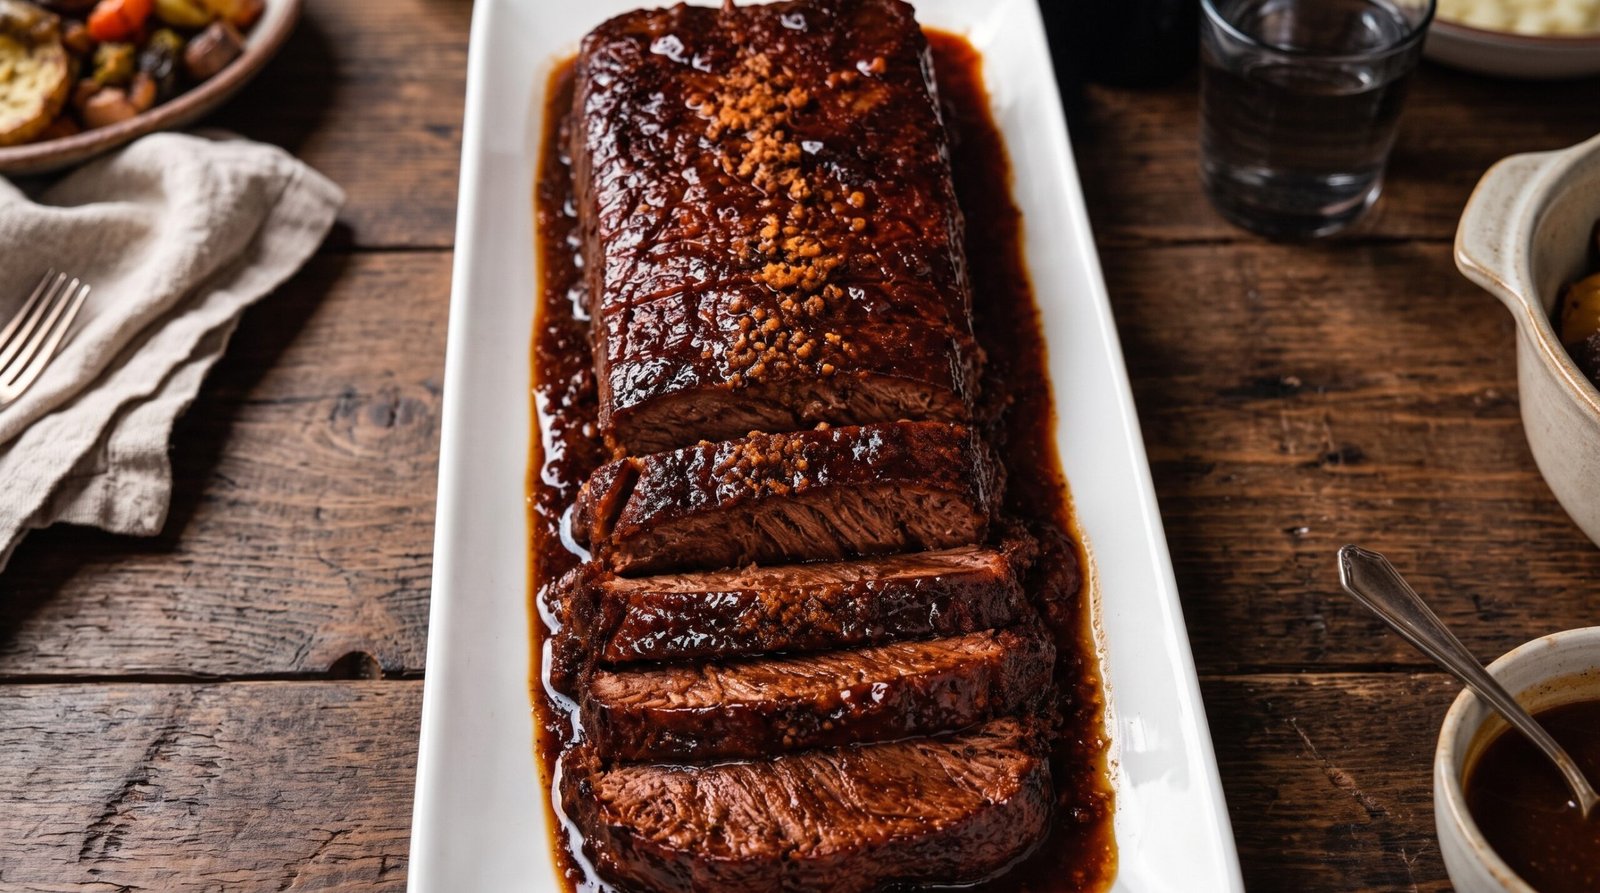
I remember the first time I tried to tackle a beef brisket at home. I was intimidated by the sheer size of the cut and the reputation it has for being a tough piece of meat that requires a professional pitmaster to handle properly. Most of the recipes I found online suggested twelve hours of smoking or complex braising techniques that simply didn't fit into my Tuesday night schedule. I wanted that deep, savory satisfaction of a dark, tender beef center without needing to buy a new backyard appliance.
After some trial and error, I found that you can achieve a truly tender result with a simple high-heat sear followed by a long, slow roast in the oven. This Oven Roasted Garlic Glazed Brisket has become my go-to for when I want a centerpiece meal that feels like a project but is actually quite straightforward. You get a rich, dark glaze that clings to the beef, and the meat becomes soft enough to slice neatly. It is a hearty, filling meal that leaves plenty of room for creative side dishes while keeping the main focus exactly where it belongs: on the beef.
Why This Recipe Works
This method relies on building layers of flavor while respecting the structure of the meat. Brisket is a hardworking muscle, which means it is full of connective tissue. When you cook it at a steady, moderate oven temperature, that tissue breaks down into gelatin, which keeps the meat moist even after it is sliced. I prefer this oven method because it is incredibly predictable. You do not have to worry about wind or temperature fluctuations that you might experience with an outdoor grill.
The glaze is the other secret here. By using a base of balsamic vinegar mixed with a touch of molasses or dark brown sugar, you create a reduction that becomes thick and dark during the final hour of cooking. When you brush this over the surface of the meat, it concentrates the sugars and acidity, creating a coating that holds up well against the heavy, beefy flavor of the roast. I find that this balance of savory and sweet really cuts through the natural fat of the brisket.
Finally, the focus on garlic adds a necessary punch. You are not just using a little garlic powder here. By using minced fresh garlic, you get these tiny bits that toast slightly in the glaze as the meat roasts. This creates a texture contrast where the outside has a bit of a bite and the inside is soft and yielding. It is a simple combination, but it works every single time. You do not need expensive ingredients to make this taste like it came from a high-end kitchen.
Ingredient Notes
The Beef
When you go to the store, look for a beef brisket flat. The flat is the leaner, more uniform part of the brisket, which makes it much easier to slice into those clean, neat pieces you see on the platter. Try to find one with a decent cap of fat on one side. You want about a quarter-inch layer of fat to help baste the meat while it cooks. Do not trim all of this away. If the fat cap is thicker than half an inch, you can trim it down slightly, but leave enough so the meat stays protected during the long roast. If you cannot find a flat, a whole packer brisket will work, but it will take longer to cook and the thickness will be uneven.
The Glaze Components
The glaze is where the flavor profile lives. I use a combination of balsamic vinegar, dark brown sugar, and soy sauce. The balsamic provides that necessary tang to balance the rich fat of the beef. The brown sugar helps with the color and the sticky, dark consistency of the glaze. As for the soy sauce, it provides the salt and depth. I also add a generous amount of minced garlic. Use fresh cloves for the best result. Jarred garlic often contains additives that can taste a bit harsh when they roast for extended periods. You can also add a pinch of smoked paprika if you want a hint of that wood-fired flavor, but it is not strictly necessary.
| Ingredient | Amount | Notes |
|---|---|---|
| Beef Brisket | 3 to 4 pounds | Preferably the flat cut |
| Kosher Salt | 1 tablespoon | For seasoning the meat |
| Black Pepper | 1 teaspoon | Freshly cracked is best |
| Garlic | 6 cloves | Finely minced |
| Balsamic Vinegar | 1/2 cup | Quality matters here |
| Brown Sugar | 1/3 cup | Packed firmly |
| Soy Sauce | 3 tablespoons | Low sodium works well |
| Vegetable Oil | 2 tablespoons | For the initial sear |
The Recipe
- Prep Time: 20 minutes
- Cook Time: 4 hours
- Total Time: 4 hours 20 minutes
- Servings: 6 to 8
- Difficulty: Intermediate
Equipment needed:
– Heavy roasting pan or Dutch oven
– Large skillet for searing
– Tongs
– Small saucepan for the glaze
– Meat thermometer
– Aluminum foil
Step-by-Step Instructions
Step 1: Prep and Season
Start by taking your brisket out of the refrigerator about 30 minutes before you are ready to cook. If you put cold meat into a hot pan, it will lose too much temperature, and you will end up steaming the meat rather than searing it. Pat the entire surface of the brisket dry with paper towels. Moisture is the enemy of a good sear, so make sure it is quite dry on all sides.
Combine your salt and pepper in a small bowl. Rub this mixture generously all over the beef. Do not forget the sides and the edges. You want to create a dry, seasoned surface that will react to the heat. While you do this, preheat your oven to 300 degrees Fahrenheit. Consistency is key here; do not start until the oven has reached that temperature to ensure the cook time remains accurate.
Step 2: Sear the Brisket
Heat the vegetable oil in a large skillet over medium-high heat. You want the oil to be shimmering, but not smoking. Once the pan is ready, carefully place the brisket in, fat side down first. You are looking for a deep brown color on the surface. Let it cook undisturbed for about 5 to 7 minutes. It will release from the pan naturally once the surface is sufficiently browned.
Flip the meat and sear the other side for another 5 minutes. You should see a dark, rich color developing on the exterior. This process does not cook the inside of the brisket; it just builds the foundation of flavor for the final roast. Once both sides are seared, remove the beef from the skillet and place it into your roasting pan or heavy-bottomed Dutch oven, fat side up.
Step 3: Make the Glaze
In a small saucepan, combine the balsamic vinegar, brown sugar, soy sauce, and the minced garlic. Bring this mixture to a gentle simmer over medium heat. You do not want a rolling boil because the sugars can burn quickly. Stir it occasionally until the sugar has completely dissolved and the glaze has thickened slightly.
Once the glaze coats the back of a spoon, turn off the heat. Do not let it reduce too much, as it needs to stay liquid enough to brush onto the meat. You should smell a rich, sweet, and acidic aroma. Keep this near the oven so you can easily reach it during the cooking process.
Step 4: Initial Roast
Pour about two tablespoons of the glaze over the top of the brisket in the roasting pan. Cover the pan tightly with aluminum foil. It is important to seal the edges well so that moisture stays inside the pan during the first half of the cooking. Place the pan in the oven and roast for 2 hours.
At this stage, the goal is to soften the connective tissues of the brisket. The internal temperature will be rising slowly. Because brisket is a tough cut, this slow heat is essential. Keep the oven door closed during these 2 hours to maintain a steady temperature.
Step 5: Glaze and Finish
After 2 hours, carefully remove the pan from the oven. Take off the foil and brush about half of the remaining glaze all over the top and sides of the meat. Place the pan back in the oven, uncovered, and continue to roast for another 1.5 to 2 hours.
During this time, the glaze will begin to concentrate and darken on the surface of the beef. Check the brisket with a meat thermometer. You are looking for an internal temperature of at least 195 degrees Fahrenheit. At this temperature, the beef will be tender enough to slice without falling apart into shreds. If it feels firm, give it another 15 minutes. The final result should be dark, sticky, and tender.
Step 6: Resting and Slicing
This is the most important step for the final texture. Once you pull the brisket from the oven, transfer it to a cutting board and tent it loosely with fresh aluminum foil. Let it rest for at least 20 to 30 minutes. If you cut into it too early, the juices will run out, and the meat will end up dry.
When you are ready to slice, look for the direction of the grain. The muscle fibers of a brisket run in one direction. You want to slice against the grain, which means cutting perpendicular to those lines. Slice the meat into thin strips, about a quarter-inch thick. Arrange the slices on a platter and spoon the extra glaze from the roasting pan over the top before serving.
Mistakes I Made (So You Don't Have To)
Slicing with the grain
The first time I cooked a brisket, I just cut it into chunks. I was so excited to eat that I didn't pay attention to the direction of the muscle fibers. The result was meat that felt chewy and tough, even though it had been cooked for hours. Always look at the meat before you start slicing. You want to see the lines of the muscle running across your blade. Slicing against these lines shortens the fibers, making the bite much more tender. If you realize you have started slicing the wrong way, just turn the piece of meat 90 degrees and start cutting in the other direction. It is an easy fix that makes a massive difference in the final texture.
Cutting the fat off too early
I used to think that removing all the fat before cooking would make the dish lighter. Instead, it made the meat dry out long before it was tender. Brisket needs that fat cap to self-baste during the long time it spends in the oven. Even if you don't want to eat the fat layer later, keep it on during the roasting process. It keeps the surface moist and prevents the meat from getting scorched by the dry oven heat. After it rests, you can easily slice off the thick fat cap if you prefer not to serve it, but keep it on until the very last second.
Using a pan that was too large
When I first tried this, I used a massive roasting pan that was far too big for the brisket. Because the pan was so large, the juices and the glaze spread out and evaporated too quickly, leaving me with a dry, burnt mess at the bottom of the pan. Use a pan that is only slightly larger than the brisket itself. This keeps the juices and the glaze concentrated right around the meat, which helps keep the environment inside the pan moist. If you do not have a small pan, you can create a smaller space in a larger pan by using foil to block off the extra area.
Not checking the temperature
I relied entirely on the clock for my first few attempts. I thought that if the recipe said 4 hours, it would be done at 4 hours. But ovens vary, and every piece of meat is a little different. One time, my brisket was still tough at 4 hours, but I pulled it out anyway because the timer went off. Using a meat thermometer is the only way to be sure. You really want to see that internal temperature hit the 195-degree mark. If it is only at 180, it will still be tough. A thermometer removes all the guesswork and ensures you get the right result every time.
Variations and Tips
Adding aromatics to the base
If you want to add another layer of flavor, consider adding some sliced shallots or a few sprigs of fresh thyme to the bottom of the roasting pan before you put the beef in. These won't necessarily penetrate deep into the meat, but they will infuse the pan juices with a wonderful scent. This makes the sauce that you drizzle over the finished slices taste even more complex. Just make sure to keep these aromatics under the meat so they don't burn while the top of the brisket is glazing.
The make-ahead advantage
Brisket actually tastes better the day after it is cooked. If you are planning a dinner, you can roast the meat the day before, let it cool completely, and then refrigerate it overnight in the fridge, wrapped tightly. The next day, you can slice the cold meat, which is much easier than slicing it hot. Put the slices into a baking dish, cover them with the reserved glaze, and heat them in the oven at 300 degrees Fahrenheit for about 20 minutes until the meat is steaming hot and the glaze is bubbly. This is a life-saver when you are hosting guests.
Using a quick brine
If you have time, you can dry-brine your brisket by salting it 24 hours before you plan to cook it. Keep it in the refrigerator uncovered. This helps the salt penetrate deeper into the muscle fibers, which really helps with tenderness. If you choose to do this, skip the salt in the initial rub step on the day of cooking, or you will end up with an overly salty dish. Just remember to pat it dry thoroughly before you begin the searing step, as a wet surface won't get that deep color we want.
Serving suggestions
This dish is rich and flavorful, so it pairs best with simple, clean sides. I love serving it with mashed potatoes or a basic green salad with a sharp vinaigrette. The starch helps soak up the extra glaze, and the greens provide a fresh crunch that balances the intensity of the beef. Avoid heavy, cheesy sides, as they can make the meal feel too greasy. Roasted carrots or steamed green beans are also excellent choices if you want to keep the oven space occupied with the main dish.
Storage and Reheating
If you have leftovers, store them in an airtight container in the refrigerator. They will stay good for up to 3 days. It is important to refrigerate the meat within 2 hours of taking it out of the oven to keep it food-safe. Since this is a dense piece of meat, I find it helps to store the slices in the extra glaze, as this keeps the meat from drying out while it sits in the fridge.
When you want to reheat the brisket, do not use the microwave if you can avoid it. Microwaves tend to cook the edges before the middle, which can make the lean parts of the brisket tough. Instead, place the slices in a small baking dish with a splash of water or extra beef broth, cover with foil, and heat in a 325-degree Fahrenheit oven for about 15 minutes. You want to make sure the meat reaches an internal temperature of 165 degrees Fahrenheit for safety.
Freezing is possible, but it does change the texture slightly. If you must freeze it, wrap the slices tightly in plastic wrap and then in a layer of heavy-duty aluminum foil. You can keep it frozen for up to one month. To thaw, move it to the refrigerator the night before you plan to eat it. Keep in mind that once it has been frozen and thawed, you should use it immediately and not try to freeze it again.
Frequently Asked Questions
Can I use a different cut of meat if I cannot find a brisket flat?
A chuck roast is the best substitute. It has a similar amount of connective tissue and fat, which means it responds well to this long, slow cooking method. The flavor is very similar, though it might be slightly more tender and easier to shred than a traditional brisket. Just look for a piece that is roughly the same thickness as a brisket flat so the timing remains consistent.
What should I do if my glaze is too thin at the end of the cooking?
If the glaze has not thickened to your liking after the final roasting step, you can remove the meat from the pan and place the pan directly on the stovetop over medium heat. Let the pan juices simmer for a few minutes until they thicken to the consistency you prefer. You can also whisk in a teaspoon of cornstarch mixed with a tablespoon of cold water if you need it to thicken quickly, but usually, just reducing it on the heat is enough.
Why is my brisket still tough after 4 hours?
The most likely reason is that the internal temperature never reached the necessary point to break down the collagen. Every piece of beef is different, and some briskets simply need more time. If you hit 4 hours and it still feels tough, cover the pan back up and put it in the oven for another 30 to 45 minutes. Do not try to rush it by increasing the oven temperature, as that will just dry out the outside of the meat.
Is it safe to eat if the meat is still a little pink in the middle?
Yes, as long as the internal temperature has reached at least 195 degrees Fahrenheit, the meat is safe. The color of the meat doesn't necessarily dictate safety; the temperature does. Sometimes, meat can retain a pinkish hue due to the curing process or the way the sugars in the glaze react with the surface of the meat. If your thermometer reads above 195 degrees, it is cooked through and safe to eat.
Can I make this in a Dutch oven?
Absolutely, a Dutch oven is one of the best tools for this recipe. It holds heat very well and has a tight-fitting lid that helps create a moist roasting environment. If you use a Dutch oven, you can do the searing right in the pot, which saves you from cleaning an extra skillet. Just follow the same steps, and ensure you keep the lid on tightly for the first 2 hours of cooking.
Final Thoughts
Making a restaurant-quality brisket at home does not have to be a stressful ordeal. By focusing on the fundamentals—the sear, the slow roast, and the patience to let the meat rest—you can produce a dinner that feels special. I hope this guide helps you feel more confident in your kitchen.
Remember that cooking is a learning process. If your first attempt is not exactly what you expected, take note of the timing and the heat levels, and adjust for next time. The most important thing is that you are enjoying the process of feeding yourself and those you love. Enjoy the meal.