
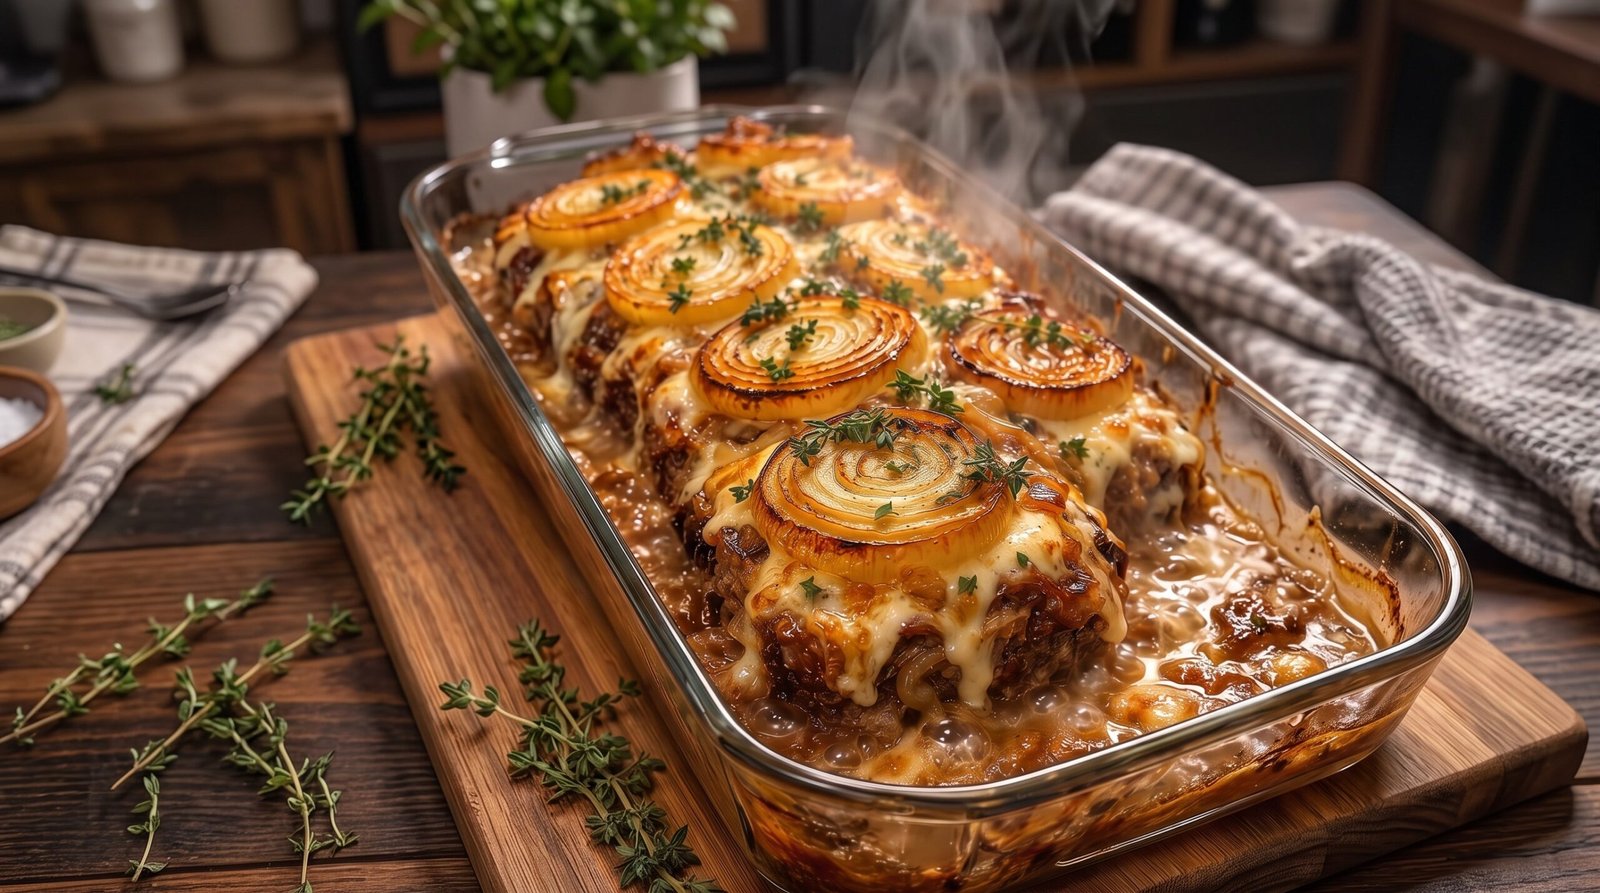
I often find myself standing in the kitchen after a long day, staring at the pantry and wondering how to turn a few simple basics into a meal that feels like a reward. Many of us fall back on the same rotation of dinners, and I am certainly no exception. That is when I turn to my French onion meatloaf. It captures the deep, savory essence of the classic soup but transforms it into a substantial dinner that brings everyone to the table. It is not just another way to prepare ground meat; it is a way to make that meat feel special without spending hours standing over the stove.
When you bring this dish out of the oven, you see the dark, rich edges of the meat mingling with tender, sweet circles of yellow onion. The cheese adds a layer that ties everything together. It is a hearty meal that leans on pantry staples like onions, beef, and breadcrumbs, making it as practical as it is satisfying. If you are looking for a way to upgrade your standard dinner menu, this preparation offers a balance of comfort and flavor that is hard to beat.
Why This Recipe Works
This meatloaf succeeds because it embraces the chemistry of slow-cooked onions. By layering thick, round slices of onion directly on top of the loaf, they soften and release their natural sugars into the meat as it bakes. This process creates a base that is naturally savory and slightly sweet. Unlike standard meatloaf recipes that might rely heavily on ketchup or heavy tomato sauces, this version lets the meat and the onions provide the primary depth of flavor. The beef benefits from the steam created by the onions, which helps keep the texture moist rather than dry.
The cheese is another key element. When you use a mild, melting variety, it forms a protective crust that keeps the top of the meatloaf from drying out while the oven does its work. This layer also catches the juices from the onions, creating a small pool of flavor that is quite satisfying. The texture of the meat itself is important. By using a mix of ground beef with a decent fat percentage, you ensure that the loaf stays tender after forty-five minutes of baking.
Simplicity is the final factor. You do not need any special equipment or hard-to-find ingredients to pull this together. It is essentially a one-pan wonder that handles itself once it goes into the oven. The cleanup is minimal, and the result is a cohesive, savory loaf that slices well and looks great on a serving platter. It is a reliable recipe that yields consistent results every time you prepare it, which is exactly what I look for during a busy week.
Ingredient Notes
The Protein Base
For the meat, I always choose ground beef with about 20 percent fat content. This amount of fat is necessary to ensure the loaf stays tender. If you use very lean meat, the loaf will likely turn out crumbly and dry, especially after the time it spends in the oven. I find that a simple mix of beef works best, but you could swap in a portion of ground pork if you prefer a slightly softer texture. Just keep the total weight around two pounds to ensure it fits comfortably in your baking dish.
The Flavor Aromatics
The onions are the star of this show, so quality matters. I suggest using large yellow onions because they provide a nice, sweet flavor that stands up well to the heat. You need to slice them into thick, even rounds to ensure they hold their shape while baking on top of the meat. If your onions are too thin, they will disintegrate too quickly. I also include fresh thyme leaves in the mix. The earthy aroma of thyme cuts through the richness of the beef and complements the sweetness of the onions perfectly.
The Binding Agents
To hold the loaf together, I use a combination of plain breadcrumbs and a single large egg. The breadcrumbs soak up the juices from the meat and the onions, which prevents the loaf from becoming dense. You can use standard dried breadcrumbs from the store, or if you have stale bread at home, toast it lightly and crumble it up. It does not need to be fancy; the goal is simply to create a texture that holds together once sliced.
| Ingredient | Amount | Notes |
|---|---|---|
| Ground beef | 2 pounds | 20 percent fat recommended |
| Yellow onions | 2 large | Sliced into 1/2 inch rounds |
| Breadcrumbs | 1 cup | Plain, unseasoned |
| Large egg | 1 | Beaten |
| Fresh thyme | 2 tablespoons | Leaves only |
| Shredded cheese | 1.5 cups | Mozzarella or Gruyere |
| Salt | 1 teaspoon | To taste |
| Black pepper | 1/2 teaspoon | Freshly cracked |
| Beef broth | 1/4 cup | Low sodium |
The Recipe
- Prep Time: 20 minutes
- Cook Time: 50 minutes
- Total Time: 1 hour 10 minutes
- Servings: 6 servings
- Difficulty: Easy
- Equipment Needed:
- Large mixing bowl
- 9×13 inch baking dish
- Knife and cutting board
- Measuring cups and spoons
Step-by-Step Instructions
Step 1: Prep the Ingredients
Start by preheating your oven to 375 degrees Fahrenheit. While the oven heats up, peel your large yellow onions and slice them into rings that are about a half-inch thick. You want them thick enough to handle the heat. Remove the leaves from your fresh thyme sprigs and chop them roughly. Ensure your beef is cold from the refrigerator, as this makes it much easier to mix without melting the fat prematurely.
Step 2: Mix the Meat
In a large mixing bowl, combine the ground beef, breadcrumbs, the beaten egg, half of the chopped thyme, the salt, and the black pepper. Use your hands to mix everything together, but try not to overwork the meat. You want the ingredients to be just incorporated. If you squeeze the meat too hard, the loaf will turn out dense and tough. Mix just until you see the crumbs and herbs evenly distributed through the beef.
Step 3: Form the Loaf
Place the mixture into your 9×13 inch baking dish. Shape it into a rectangular loaf that is roughly the same width as your onion rings. You want it to be about two inches high so it cooks through evenly. Flatten the top slightly so that the onion rings can sit securely on top without sliding off. If there are extra gaps in the dish, that is fine, as they will fill with the juices as the loaf bakes.
Step 4: Add the Onions
Place the onion rings in a single layer across the top of the meatloaf. They should cover most of the surface. Sprinkle the remaining thyme leaves over the onions. Pour the beef broth carefully into the bottom of the dish, around the sides of the meat. This liquid provides the moisture needed to keep the bottom of the loaf from sticking or burning during the 50 minutes of cooking.
Step 5: Bake and Top
Place the dish in the center rack of your oven. Bake for 40 minutes at 375 degrees Fahrenheit. After this time, remove the dish and carefully cover the onions and meat with the shredded cheese. Return the dish to the oven for another 10 minutes. The cheese should be melted and lightly browned on the edges. Check the internal temperature with a thermometer, which should read 160 degrees Fahrenheit to ensure the beef is safely cooked.
Step 6: Rest and Serve
Remove the dish from the oven and let it sit for at least 10 minutes before you try to slice it. This resting period is essential because it allows the juices to redistribute throughout the meat. If you cut into it too soon, the loaf will fall apart and the juices will run out onto the board. Once rested, use a serrated knife to slice through the onions and the meat, keeping the onion rings centered on each piece.
Mistakes I Made (So You Don't Have To)
Overworking the Mixture
Early on, I used to knead the meat mixture like I was making bread dough. This is a common error that ruins the final texture. When you mix the ground beef too aggressively, the proteins bind too tightly, resulting in a rubbery, tough meatloaf. The fix is to use your fingers to gently fold the ingredients together until they are just combined. Stop as soon as you see the breadcrumbs and herbs distributed evenly.
Skipping the Rest Time
I have definitely been in a rush before and cut into the meatloaf right after taking it out of the oven. Every time I did this, the loaf collapsed into a pile of crumbs on the plate. It is tempting to serve immediately because the smell is fantastic, but the resting period is non-negotiable. Giving it 10 minutes on the counter ensures the structure holds together, making for clean, beautiful slices every single time.
Using Lean Beef
I once tried to make this with a very lean ground beef, thinking it would be healthier. The result was a dry, crumbly loaf that lacked flavor. Fat is flavor, and in a long-cooking dish like meatloaf, it is also a structural component that keeps the meat moist. If you are worried about fat, stick to the 20 percent blend and simply drain any excess liquid from the pan before serving, rather than choosing a leaner, drier meat.
Slicing the Onions Too Thinly
If the onion rings are sliced too thin, they will burn or turn into mush before the meatloaf is fully cooked through. I learned the hard way that they need some body to survive the time in the oven. Aim for a solid half-inch thickness. This ensures that by the time the meat is safely at 160 degrees Fahrenheit, the onions are soft and tender but still hold their distinct ring shape on top of the loaf.
Variations and Tips
Adding Garlic
If you want an extra layer of depth, you can mince two or three cloves of fresh garlic and fold them into the meat mixture during step two. Garlic pairs perfectly with the onions and the thyme. Just ensure the garlic is minced finely so you do not get large, sharp chunks of raw garlic in your bite.
Swapping the Cheese
While mozzarella is my go-to for its mild flavor and reliable melt, you can experiment with other cheeses. Gruyere is a classic choice that adds a nutty, complex flavor, which really leans into the French onion theme. You can also mix in some parmesan for a slightly saltier, sharper kick. Just make sure the cheese you choose is a good melter.
Making it Ahead
This is a great meal to prepare in advance. You can assemble the entire raw meatloaf in the dish, cover it with plastic wrap, and keep it in the refrigerator for up to 24 hours. When you are ready to eat, just remove the plastic and put it straight into the oven. It might need an extra five minutes of cooking time if you put it in while it is still cold from the fridge.
Cooking Method Swap
While the oven is my preferred method for even cooking, you can technically use a heavy-bottomed skillet that is oven-safe. Sear the meatloaf on the stovetop first to get some color on the bottom, then arrange the onions on top, pour in the broth, and move the whole skillet into the oven to finish. This creates a slightly darker crust on the bottom of the meatloaf.
Storage and Reheating
If you have leftovers, they should be stored in the refrigerator within two hours of cooking. Place the slices in an airtight container. They will stay fresh and safe to eat for up to three days. I find that this meatloaf actually tastes even better the next day, as the flavors from the onions have more time to penetrate the meat.
To reheat, the best method is to use your oven or a toaster oven. Place the slices in a baking dish and add a tiny splash of water or broth to the pan. Cover with foil to keep the moisture in and heat at 350 degrees Fahrenheit until the internal temperature reaches 165 degrees Fahrenheit. This takes about 15 to 20 minutes. Avoid using a microwave if you want to keep the texture consistent, as it tends to make the meatloaf chewy.
I do not recommend freezing this finished dish. The texture of the onions and the cheese changes significantly after being frozen and thawed, often becoming watery or mushy. It is best enjoyed fresh or from the refrigerator within that three-day window.
Frequently Asked Questions
Why does my meatloaf fall apart when I slice it?
The most common cause is not letting it rest long enough after removing it from the oven. Ten minutes allows the internal juices to settle and the fats to firm up slightly. If you cut it too soon, the structure is still too loose. Also, ensure you are using enough binder like breadcrumbs and an egg, as these ingredients act like glue to hold the protein together.
Can I use a different type of meat?
You can use ground turkey or chicken, but you must be careful. These meats are much leaner than beef and can become dry very quickly. If you use poultry, I highly recommend adding a little more liquid, such as a splash of Worcestershire sauce or extra broth, into the meat mixture itself. Also, ensure you cook it to the correct safe temperature, which is 165 degrees Fahrenheit.
Should I cover the meatloaf with foil while it bakes?
I prefer to leave it uncovered for the first 40 minutes so the meat can develop a nice surface texture. If you notice the onions starting to get too dark, you can loosely tent a piece of foil over the top, but be careful not to let the foil touch the cheese. If the cheese is already added, avoid covering it, or the cheese will stick to the foil and pull away from the meat.
How do I know when the meat is done?
The only reliable way to know if your meatloaf is finished is by using a food thermometer. Insert it into the center of the loaf. For beef, you are looking for an internal temperature of 160 degrees Fahrenheit. Do not rely on color or timing alone, as ovens can vary in their actual heat output. Checking the temperature ensures it is safe to eat while keeping it from overcooking.
Can I add vegetables to the meat mixture?
Yes, you can finely grate carrots or celery and mix them into the beef. This adds extra moisture and a bit of sweetness. Just make sure to grate them very finely so they do not create pockets of liquid that weaken the structure of the loaf. This is a great way to use up bits and pieces of produce that are sitting in your vegetable drawer.
Final Thoughts
Making this French onion meatloaf has become a reliable way for me to serve a hearty, flavorful dinner without needing to spend all night in the kitchen. It is a dish that feels intentional and comforting, especially on days when the weather turns cold and you want something that warms you from the inside out.
The combination of the savory beef, the sweet, soft onions, and the melted cheese is a classic for a reason. Once you have the timing down for your specific oven, you will find yourself returning to this recipe whenever you want a dependable meal that always hits the mark.