
I will never forget the Friday movie night disaster that nearly drove me back into the Taco Bell drive-thru line for good.
My family was craving those iconic crispy, cheesy Mexican pizzas: two golden fried tortillas sandwiching savory ground beef and creamy refried beans, topped with tangy red sauce, bubbling melted cheese, and crisp diced tomatoes. I had this grand vision of making a huge batch from scratch so everyone could eat at the same time.
I grabbed a stack of store-bought flour tortillas, warmed them in the microwave for ten seconds, smeared on cold canned refried beans and saucy taco meat, stacked another soft tortilla on top, dumped a carton of red salsa and a bag of pre-shredded cheese over each one, and shoved the entire sheet pan into a 400°F oven.
Fifteen minutes later, I pulled out a soggy, mushy tragedy.
The moisture from the sauce and beans had completely waterlogged the tortillas. Instead of shatteringly crisp shells, they had turned into rubbery, chewy dough disks that tore the moment you touched them. Worse, when my partner tried to lift one with a spatula, the bottom layer stuck to the pan, the wet center sloughed off, and a messy pile of greasy cheese and tomato water pooled across their plate. We ended up eating the filling with forks like a sad casserole and ditching the limp tortillas altogether.
That flop bothered me for weeks. A proper Mexican pizza is the holy grail of homemade fast-food cravings. The magic lies entirely in the contrast: that shatteringly loud crunch of a blistered, toasted shell meeting rich, savory beef, earthy refried beans, sweet-tangy enchilada sauce, and molten, gooey Colby Jack and cheddar.
It took me four rounds of testing to figure out the texture chemistry. You cannot use soft raw tortillas, you cannot use high-moisture flour tortillas, and you cannot pile heavy sauce on top of un-toasted starches. You have to use corn or hybrid corn-flour tortillas, fry or par-bake them in hot oil until rigid and blistered, seal the bean layer with spices, and bake on a parchment-lined baking sheet in two distinct stages.
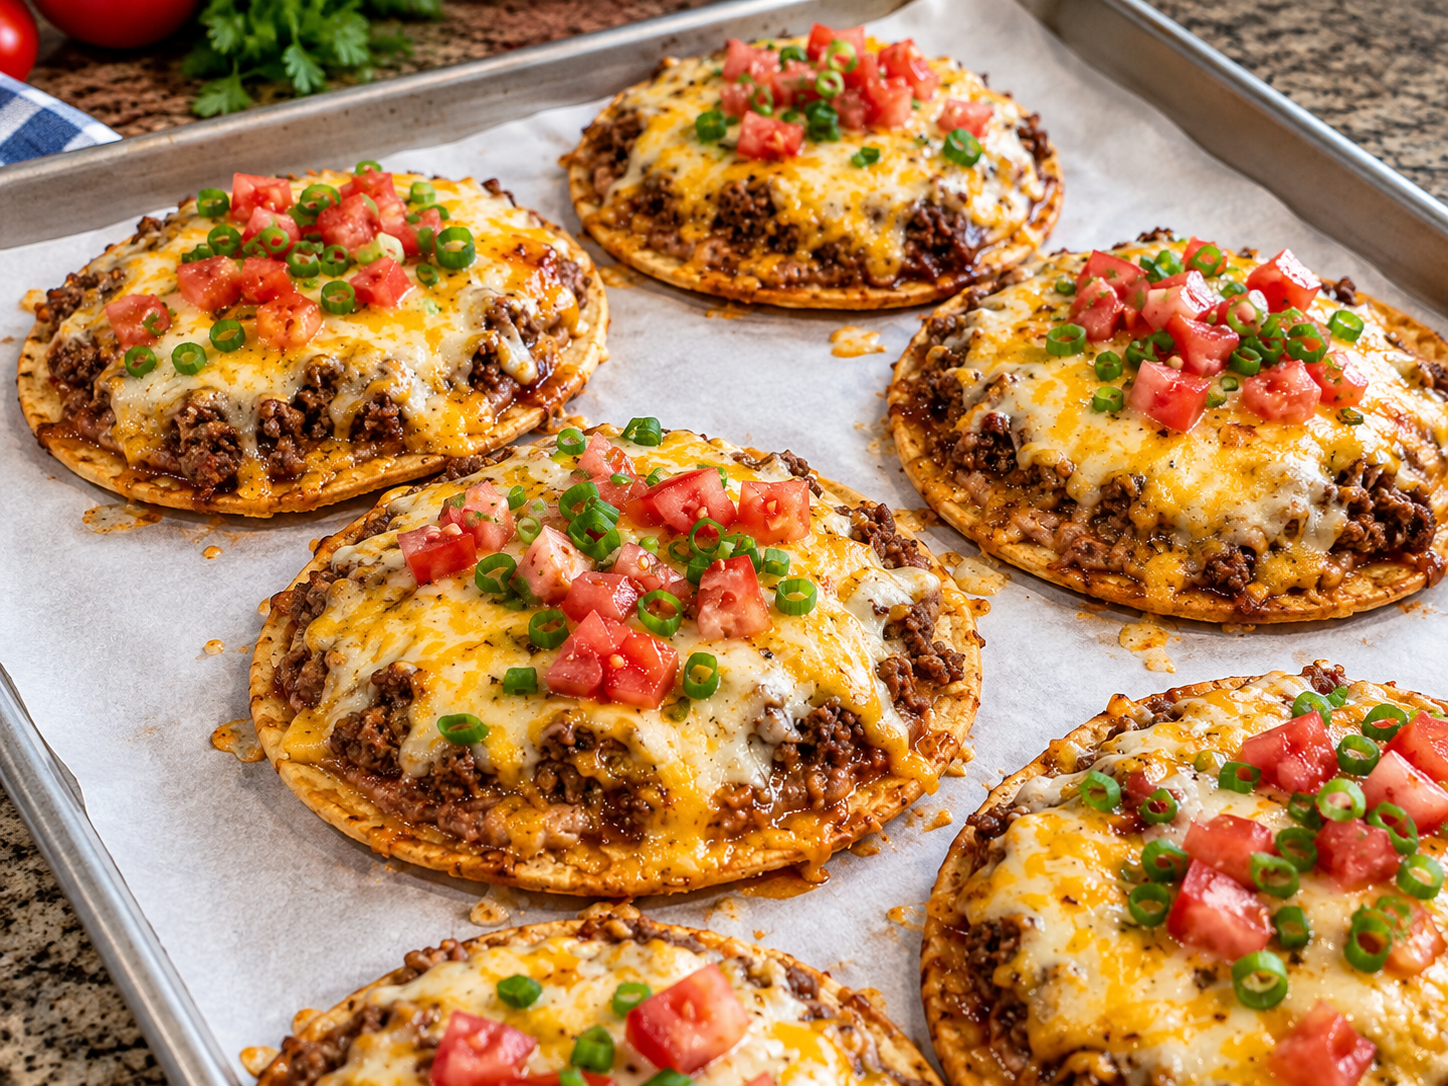
The photo above is the hard-won outcome on my counter: parchment-lined sheet pan holding six golden, blistered Mexican pizzas, loaded with seasoned beef crumbles and refried beans, blanketed in a bubbling mantle of melted cheese, and garnished with fresh diced Roma tomatoes and green onions.
Here is how you recreate these crispy, restaurant-quality Mexican pizzas at home without a single drop of soggy dough.
Why Homemade Mexican Pizzas Turn to Mush (The Starch Science)
A Mexican pizza is a multi-layered sandwich of contrasting textures. When moisture is introduced between flat starches inside a hot oven, standard culinary traps will ruin your shells:
1. The Flour Tortilla Moisture Sponge
Standard soft flour tortillas are packed with gluten and moisture. When heated with wet beans and tomato sauce, flour tortillas absorb liquid rapidly, transforming into gummy, steamed bread. Traditional Mexican pizzas rely on yellow corn tortillas (or thin corn-flour blend tortillas). Corn starches fry up far crisper and form a dense, glassy crust that repels water, keeping every bite snappy and rigid even under hot meat and melted cheese.
2. Skipping the Shallow Oil Fry (Par-Crisping)
You cannot bake raw or warmed tortillas in the oven and expect them to develop that signature fast-food crunch. A quick 30- to 45-second shallow fry in hot vegetable or avocado oil creates tiny, airy surface blisters. This flash-frying dehydrates the shell’s exterior and creates a protective barrier of hot fat that stops the refried beans and sauce from soaking through the crumb.
3. Wet Canned Salsas vs. Thick Enchilada Sauce
Dumping chunky jarred salsa or watery crushed tomatoes on top of the upper shell is an instant ticket to soggy town. Salsa releases free water as it heats. Using a thickened, smooth red enchilada sauce mixed with a touch of tomato paste gives you that authentic tangy, chili-spiced tomato glaze that coats the shell without dumping water into the layers.
Ingredients & Tools You’ll Need
Essential Kitchen Gear
- Large Half-Sheet Rimmed Baking Pan: Lined with parchment paper so the melted cheese edges lift off cleanly without sticking.
- 10- or 12-Inch Cast-Iron or Heavy Skillet: For shallow-frying the tortillas until golden and rigid.
- Metal Tongs & Paper-Towel-Lined Trays: For safely flipping and draining the fried shells.
- Meat Chopper or Sturdy Spatula: Essential for mincing ground beef into fine, even crumbles.
- Box Grater: For shredding blocks of cheddar and Monterey Jack so they melt into that smooth, velvety blanket.
The Ingredient Breakdown
| Component | Ingredient | Quantity | Practical Role |
| The Crispy Base | Yellow Corn Tortillas (6-inch) | 12 total (2 per pizza) | Frys into rigid, blistered, shatteringly crisp shells. |
| The Frying Fat | High-Smoke-Point Oil (Avocado or Canola) | ½ cup (for shallow frying) | Blisters the tortillas and creates a moisture-resistant seal. |
| The Savory Meat | 85/15 Ground Chuck or Lean Beef | 1 lb (450g) | Delivers classic seasoned taco beef flavor without pooling grease. |
| Aromatic Core | Sweet Yellow Onion | ½ medium (finely minced) | Cooked with the beef to add natural sweetness and texture. |
| Aromatic Core | Fresh Garlic | 3 cloves (minced) | Delivers robust, savory depth to the taco filling. |
| The Seasoning | Taco Seasoning (Chili, Cumin, Garlic) | 2 tbsp | Traditional Mexican-American spice profile. |
| The Base Mortar | Traditional Refried Beans | 1 can (16 oz, warmed) | Creamy foundation that glues the bottom shell to the meat. |
| The Tangy Sauce | Red Enchilada Sauce | ¾ cup (thick style) | Smooth, chili-forward sauce that glazes the top shell. |
| Sauce Thickener | Tomato Paste | 1.5 tbsp | Whisked into the enchilada sauce to prevent it from turning runny. |
| The Molten Crown | Sharp Cheddar & Monterey Jack Cheese | 2.5 cups (freshly shredded, mixed) | Melts into a gooey, bubbly, golden-yellow mantle. |
| Fresh Topping | Fresh Roma Tomatoes | 2 medium (seeded and finely diced) | Crisp, juicy red bite scattered across the melted cheese. |
| Fresh Topping | Green Onions (Scallions) | 3 stalks (thinly sliced) | Mild, sharp onion bite for color and fresh contrast. |
| Base Seasoning | Coarse Kosher Salt & Black Pepper | 1 tsp salt, ½ tsp pepper | Essential seasoning across the meat and bean layers. |
Step-by-Step Assembly Instructions
Step 1: Crisp and Blister the Tortillas (The Crunch Foundation)
Pour ½ cup of high-smoke-point oil into your skillet over medium-high heat until it shimmers (around 350°F / 175°C).
Using metal tongs, slide one yellow corn tortilla into the hot oil.
Fry for 30 to 45 seconds on the first side.
You should see active, tiny bubbles rushing around the edges as the surface blisters into pale gold pockets.
Flip and fry the second side for another 30 seconds until the tortilla feels completely rigid and crisp like a flat tostada shell.
Transfer the fried shell onto a large plate lined with paper towels to drain.
Lightly dust with a tiny pinch of salt while hot.
Repeat with all 12 tortillas.
Cook’s Real-Life Tip: If you want to skip frying in oil, brush both sides of each corn tortilla generously with avocado oil, spread them flat across two large baking sheets, and bake at 400°F (200°C) for 5 to 6 minutes per side until stiff and crisp. Frying in a pan, however, yields that authentic, blistered restaurant texture.
Step 2: Brown the Taco Beef
Set a clean skillet over medium-high heat.
Add the 1 pound of ground chuck and finely minced yellow onion.
Use your meat chopper to break the beef into tiny, uniform crumbles.
Cook for 5 to 6 minutes until the beef is browned and no pink remains.
Stir in the minced garlic and cook for 60 seconds just until fragrant.
Tilt the skillet and carefully spoon out all the excess rendered grease.
Sprinkle the 2 tablespoons of taco seasoning, kosher salt, and black pepper over the meat.
Add ¼ cup of water, stir well, and let it simmer on low for 2 to 3 minutes until the liquid evaporates, leaving the beef glossy, rich, and tightly seasoned.
Remove from heat.
Step 3: Prep the Sauces and Beans
Preheat your oven to 400°F (200°C).
Line a large rimmed half-sheet baking pan with parchment paper.
In a small bowl, whisk together the ¾ cup of red enchilada sauce with the 1.5 tablespoons of tomato paste.
This creates a rich, thick chili-tomato glaze that clings to the shell without weeping moisture into the crust.
Empty the can of refried beans into a small microwave-safe bowl and heat for 60 seconds, stirring until smooth and spreadable.
Spreading cold, stiff beans onto a crisp tortilla will crack the shell; warm beans glide across the surface like butter.
Step 4: The Strategic Layered Build
Arrange 6 fried crispy tortillas flat on your prepared parchment-lined baking sheet, leaving an inch of space between each disk.
- The Bean Seal: Spread roughly 2 tablespoons of warm refried beans in an even layer across the entire surface of each bottom tortilla.
- The Beef Layer: Spoon a generous layer of seasoned ground beef crumbles directly over the refried beans. Press down gently with the back of the spoon to nestle the meat into the beans.
- The Cheese Anchor: Sprinkle a light pinch of shredded cheddar and jack cheese over the beef. This melts and glues the upper shell in place.
- The Top Shell: Place a second crispy fried tortilla gently over the beef and bean filling, pressing lightly to seat it.
- The Pizza Glaze: Spoon roughly 1.5 to 2 tablespoons of your thickened red enchilada sauce across the center of the top tortilla, spreading it out toward the edges with the back of your spoon.
- The Molten Crown: Generously mound your freshly shredded sharp cheddar and Monterey Jack cheese over the sauce, letting bits of cheese cascade slightly over the rim onto the parchment paper (which creates those irresistible crispy cheese skirts seen in the photo).
Step 5: Bake and Broil to Golden Perfection
Slide the loaded sheet pan into your preheated 400°F (200°C) oven on the middle rack.
Bake for 8 to 10 minutes.
The interior beans and beef will heat to piping-hot, while the cheese melts into a smooth, bubbling blanket.
Now, switch the oven setting to BROIL (High) for 1.5 to 2 minutes.
Watch closely through the oven window.
The direct broiler heat will cause the melted cheese to bubble aggressively and brown into toasted, golden-caramelized spots, while the exposed edges of the corn tortillas turn extra crispy and deep amber.
Pull the baking sheet out the second the cheese looks molten and blistered.
Step 6: Garnish, Rest, and Slice
Set the hot baking sheet on a heatproof board or counter.
Immediately scatter your finely diced fresh Roma tomatoes and sliced green onions across the hot, melted cheese on each pizza (exactly like the vibrant, mouth-watering presentation in the photo).
The Non-Negotiable Rule: Do not cut into these pizzas right away!
Straight out of the oven, the melted cheese is molten liquid, and the interior bean layer is hot and loose.
Let the pizzas rest undisturbed on the sheet pan for 3 to 4 full minutes.
During this short pause:
- The melted cheese sets just enough to hold the diced tomatoes and green onions securely in place.
- The bean and meat layers stabilize so the filling doesn’t squish out the sides when you bite in.
- The fried tortilla layers settle into a sturdy, shatteringly crisp crust.
Use a rolling pizza cutter or a large chef’s knife to slice each Mexican pizza cleanly into quarters.
Listen for that clean, loud crunch as the blade cuts through both crispy shells.
Serve warm with a flat metal spatula.
Practical Troubleshooting & Common Mistakes
- “My tortillas turned chewy instead of crispy.”
This happens if you used soft flour tortillas or didn’t fry the corn tortillas long enough. Make sure your frying oil is around 350°F (175°C) and let each tortilla fry until it holds its flat shape like a rigid chip before assembling. - “The pizza fell apart when I cut it.”
If the filling gushes out the sides, the pizzas were sliced while blazing hot. Give them that crucial 3- to 4-minute rest on the counter so the cheese can set into a cohesive binder. - “There is grease pooling on the cheese.”
Always drain the cooked ground beef on paper towels, and always grate whole block cheese by hand. Pre-shredded cheese from a bag contains anti-caking starches that cause dairy fats to break into an oily slick under high heat.
Delicious Upgrades & Variations
While seasoned ground beef is the classic drive-thru standard, this sheet-pan setup is endlessly adaptable:
- The Shredded Salsa Chicken Pizza: Swap the ground beef for shredded rotisserie chicken tossed in salsa verde or chipotle seasoning.
- The Vegetarian Black Bean & Corn Version: Replace the beef with a hearty mix of seasoned black beans, sweet fire-roasted corn, and diced green chilies.
- The Fiery Jalapeño Kick: Scatter thinly sliced fresh or pickled jalapeños over the enchilada sauce before piling on the cheese for a spicy, bold punch.
What to Serve with Homemade Mexican Pizzas
These crispy, cheesy pizzas are rich, savory, and satisfying, making them the ultimate centerpiece for game-day gatherings or Friday family dinners:
- Chunky Guacamole and Sour Cream: Serve cold dollops of sour cream and fresh guacamole on the side for dipping hot, crispy pizza wedges.
- Mexican Street Corn (Elote): Charred sweet corn tossed with cotija cheese, chili powder, and lime juice provides a sweet, smoky counterpoint.
- Crisp Shredded Lettuce Salad: A simple side salad of shredded iceberg lettuce, sliced radishes, and a squeeze of fresh lime juice cleanses the palate between rich, cheesy bites.
Handling Leftovers & The Air-Fryer Reheat Trick
Mexican pizzas are undeniably best enjoyed fresh off the baking sheet while the shells are shatteringly crisp.
However, if you have leftover slices, store them in a single layer inside an airtight container in the refrigerator for up to 2 days.
Never reheat a Mexican pizza in the microwave!
The microwave will turn the crispy corn shells into limp, soggy rubber in twenty seconds.
Instead, use your Air Fryer or Toaster Oven:
- Preheat your air fryer to 375°F (190°C).
- Place a leftover Mexican pizza slice in the air fryer basket.
- Heat for 3 to 4 minutes.
The circulating dry convection heat will instantly re-crisp the outer corn shells back to their original crunchy glory while melting the cheese into gooey perfection once again.