
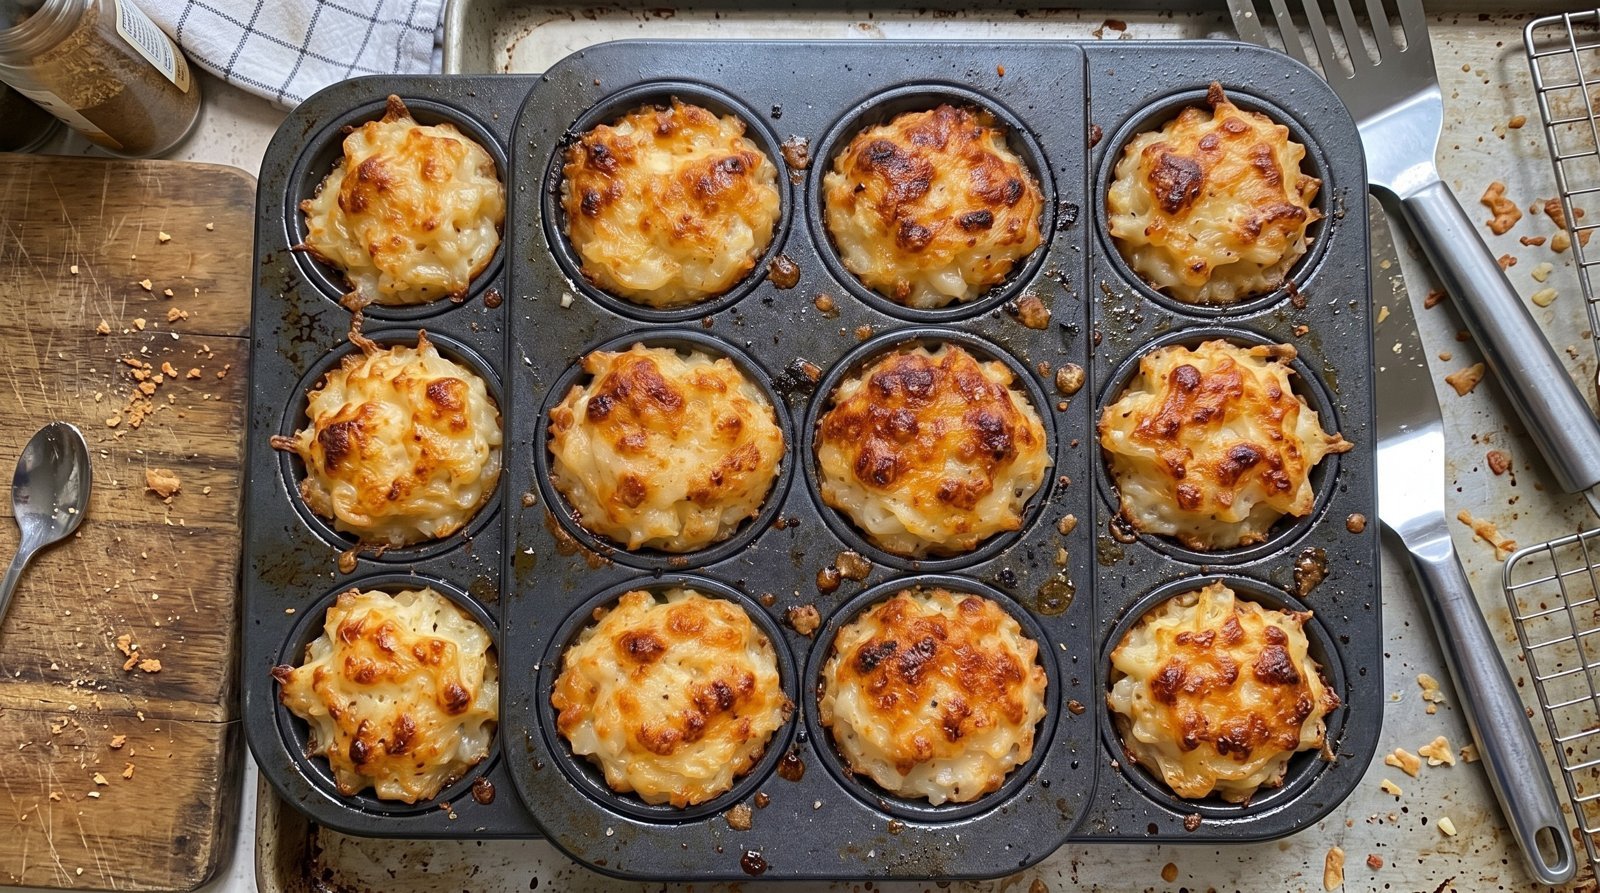
It is Tuesday night, the fridge is looking a bit sparse, and I am staring at a bag of frozen shredded potatoes wondering how to make them more interesting than just a plain side dish. Usually, I toss them in a pan, but sometimes they end up greasy or falling apart. I realized that using a muffin tin to bake them into individual portions keeps them contained and makes for a much neater serving. By adding some cheese and binding ingredients, these little cups come out with a soft center and edges that get lightly browned from the direct heat of the pan. It is a simple way to serve potatoes that feels a bit more special than standard hash browns. If you have ever struggled with getting your potatoes to hold together without using a deep fryer, this method is going to be your new go-to. You get a consistent result every time without needing to watch a skillet for twenty minutes.
Why This Recipe Works
These hash brown cups work because they rely on the starch naturally present in the potatoes to help form a cohesive structure, while the cheese provides a rich, savory flavor that pairs well with the neutral base of the potato. Using a muffin pan is the key here. The metal cups transfer heat directly to the sides and bottom of the potato mixture, which helps create a contrast between the outer edges and the middle of each cup. Unlike frying, where you have to flip everything and risk breaking it, this baking method is hands-off. Once you mix the ingredients and scoop them into the tin, the oven does all the work.
The texture is another reason this is a staple in my rotation. You get a soft, tender interior that feels almost like a potato pancake, but with a firm exterior that holds its shape when you lift it out of the tray. Because the portion size is consistent, each cup cooks at the same rate, meaning you do not have to worry about one side burning while another remains raw. It is a very forgiving dish. Even if you are not a seasoned cook, you can achieve a result that looks impressive on the plate. The cleanup is also minimal compared to cleaning a greasy stovetop skillet. You just wash the muffin tin, and you are done. It is practical for busy days when you need something reliable that delivers flavor without a complex process or a long list of niche tools.
Ingredient Notes
The Base Ingredients
The foundation of this dish is, of course, the shredded potatoes. I always buy the frozen bags labeled as shredded hash browns. If you use fresh potatoes, you need to peel them, grate them, and most importantly, squeeze out every drop of moisture using a clean kitchen towel. If there is too much water left, the cups will be mushy instead of firm.
The Binder and Flavor
To keep everything together, I use an egg, which acts as the glue. You also need a bit of cheese. I prefer a sharp cheddar because it stands up well to the heat and adds a nice saltiness. You can use mild cheddar, Monterey Jack, or even a mix of Gruyere if you want something a bit different, but stick to a hard or semi-hard cheese that melts well.
| Ingredient | Amount | Notes |
|---|---|---|
| Shredded hash browns | 4 cups | Thawed and patted dry |
| Large eggs | 2 units | Whisked until smooth |
| Sharp cheddar cheese | 1.5 cups | Shredded yourself for better melting |
| Melted butter | 3 tablespoons | Unsalted works best here |
| Salt | 0.5 teaspoon | Adjust based on saltiness of cheese |
| Black pepper | 0.25 teaspoon | Freshly cracked is preferred |
| Garlic powder | 0.5 teaspoon | Adds depth to the potato base |
Optional Additions
If you want to pack in more flavor, you can add finely diced chives or green onions to the mix. Just make sure they are cut very small so they do not disrupt the structure of the cup. I have tried adding finely diced cooked bacon bits, which adds a smoky element, but be sure the bacon is already cooked before you mix it in, as the baking time is not long enough to render the fat from raw pork.
The Recipe
- Prep Time: 10 minutes
- Cook Time: 30 minutes
- Total Time: 40 minutes
- Servings: 12 standard muffin cups
- Difficulty: Easy
Equipment needed:
– 12-cup standard muffin tin
– Large mixing bowl
– Measuring cups and spoons
– Whisk
– Spatula or spoon
Step-by-Step Instructions
Step 1: Prep the Oven and Pan
Start by preheating your oven to 400 degrees Fahrenheit. It is important to let the oven come fully up to temperature before you put the tray in, as the initial blast of heat is what helps the edges of the hash browns get color. While the oven heats, take a moment to grease your 12-cup muffin tin. I use a little bit of olive oil or non-stick cooking spray, making sure to get into the corners and up the sides of each cup. This prevents the cheese from sticking, which would make them hard to remove.
Step 2: Prepare the Hash Brown Mixture
In a large bowl, combine your thawed, dried hash browns with the whisked eggs, melted butter, shredded cheddar cheese, salt, pepper, and garlic powder. You want to make sure the egg is evenly distributed, as it coats the potato shreds and ensures that when the protein sets in the heat, everything holds together as a single unit. Use a spatula to fold the ingredients together gently; you do not want to break down the potato shreds too much, just mix until everything looks uniform.
Step 3: Fill the Muffin Tin
Scoop the mixture into the prepared muffin tin, filling each cup until it is nearly full. Do not pack the mixture down with too much force, but use the back of your spoon to lightly press it so it sits flat in the cup. If you have gaps on the sides, the potato won't get that consistent color, so aim for a mostly even layer. It should look like a small, loose mound in each hole.
Step 4: The Baking Process
Place the tin in the center rack of your oven and bake for 30 minutes. You will know they are ready when the tops are golden brown and the edges have pulled away slightly from the sides of the metal cups. The cheese will have melted and toasted a bit on the surface, creating a nice contrast to the soft potato center. Since these do not contain meat, you do not need to check an internal temperature for safety, but you want to see that the eggs are fully set and the potatoes are tender.
Step 5: Cooling and Removing
Remove the tin from the oven and let it sit for about 5 minutes before you try to remove the cups. This resting period is crucial because it allows the structure of the egg and starch to firm up. If you try to pull them out immediately, they might fall apart. Use a thin butter knife or a small offset spatula to run around the edge of each cup, then gently lift them out and place them on a cooling rack or directly onto a serving plate.
Mistakes I Made (So You Don't Have To)
Mistake 1: Leaving too much moisture in the potatoes
Early on, I would just pull the hash browns out of the freezer and throw them straight into the mix. This resulted in a pool of water at the bottom of the muffin tin, leading to soggy, soft centers that never really got hot enough. The fix is simple: thaw them completely and squeeze the liquid out with a clean cloth. It takes an extra two minutes, but it changes the final result from mushy to firm.
Mistake 2: Forgetting to grease the tin
The first time I made these, I thought the fat from the cheese and butter would be enough to keep them from sticking. I was wrong. Half of the cups stuck to the metal, and I had to scrape them out with a spoon, leaving me with a pile of potato shreds rather than neat cups. Always use a generous amount of non-stick spray or melted butter on the muffin tin, even if the recipe seems rich enough.
Mistake 3: Over-mixing the ingredients
I used to stir the mixture like I was making a cake batter, thinking it needed to be smooth. All this did was break the potato shreds into tiny, mushy pieces, which took away the texture that makes hash browns enjoyable. Now, I fold the ingredients together just until they are combined. You want the shreds to remain distinct so they can cook properly and provide that nice bite.
Mistake 4: Taking them out too soon
I used to get impatient and try to lift them out of the tin as soon as the timer went off. Because they were still very hot and soft, they would just crumble apart in my hands. I learned that letting them sit in the tin for 5 minutes allows the proteins to set. It is the hardest part of the process, but waiting makes the difference between a pretty presentation and a kitchen disaster.
Variations and Tips
Add Some Heat
If you like a bit of spice, add a teaspoon of finely diced jalapeños to the potato mix. The heat of the peppers pairs well with the sharp cheddar cheese. Just make sure to remove the seeds if you want a milder kick. You could also stir in a dash of hot sauce, but avoid adding too much liquid, or you will have to increase the amount of potato slightly to keep the structure.
Herb Infusion
Fresh herbs are a great way to elevate this simple dish. Finely chopped rosemary or thyme works wonderfully with potatoes. Add about a teaspoon of fresh herbs during the mixing stage. If you only have dried herbs, use about a quarter teaspoon, as dried herbs are much more potent than fresh ones. Fresh parsley also adds a nice pop of color if you sprinkle it on top just before serving.
The Make-Ahead Strategy
You can prepare the mixture the night before and store it in the fridge in an airtight container. When you are ready to cook, just give it a quick stir to make sure the ingredients are still well-distributed, then scoop into the tin and bake as directed. I find that the cold mixture might need an extra 2 or 3 minutes in the oven, so just keep an eye on them until the tops look appropriately browned.
Storage and Reheating
If you have leftovers, place them in a sealed container and keep them in the fridge for up to 3 days. To reheat, I prefer using a toaster oven or a regular oven at 350 degrees Fahrenheit for about 10 minutes until they are steaming hot throughout. You can use the microwave if you are in a rush, but they will lose that nice texture and end up soft. Do not freeze these, as the potato texture becomes very mealy and unpleasant once thawed and reheated.
Storage and Reheating
If you find yourself with extra cups, wait until they are completely cool before putting them away. If you put them in a container while they are still warm, the steam will condense, making them soggy. Once they are cold, place them in an airtight container or a heavy-duty plastic bag. They will stay fresh in the refrigerator for up to 3 days.
When you want to eat them again, avoid the microwave if you want them to stay firm. Place the cups on a baking sheet and heat them in an oven preheated to 350 degrees Fahrenheit. It usually takes about 10 minutes for them to get hot all the way through. If you check with a food thermometer, the internal temperature should reach at least 165 degrees Fahrenheit. This method helps restore some of the texture they had when they were first pulled from the oven.
Frequently Asked Questions
Can I use sweet potatoes instead of regular hash browns?
You can, but sweet potatoes have a higher sugar content and a different texture. They tend to cook a bit faster, so watch them closely after the 25-minute mark. Also, they are softer, so you might need to add a bit more egg or even a tablespoon of flour to help them hold their shape.
Do I have to thaw the frozen potatoes first?
Yes, it is highly recommended. If you use frozen potatoes, the center will stay cold while the outside gets dark, and the excess water released during the thawing process in the oven will prevent the cups from firming up. It is best to let them sit on the counter for about 20 minutes before mixing.
Can I make these in a mini-muffin tin?
You absolutely can. They make for great bite-sized snacks that way. Just reduce the baking time to about 15 to 20 minutes, as they will cook much faster in smaller cups. Watch the color closely; they should still look golden brown when they are done.
What should I serve these with?
These go well with a variety of things. I like serving them alongside a simple green salad or as part of a larger brunch spread. They also make a great side for grilled steaks or roasted vegetables. Because they are fairly rich, pairing them with something acidic or fresh is usually the best approach.
My cheese burned on top before the potatoes were done. What happened?
If your cheese is browning too fast, your oven might be running a little hot. You can try covering the muffin tin loosely with a piece of aluminum foil for the first 20 minutes of baking, then remove the foil for the final 10 minutes to allow the tops to brown nicely without scorching the cheese.
Final Thoughts
Making these cheesy hash brown cups is one of those simple routines that makes a weekday meal feel a bit more organized. It is satisfying to take a few basic ingredients and turn them into something that looks neat and tastes exactly how you want it to. I hope this becomes a regular feature in your kitchen whenever you need a reliable side dish.
Remember that cooking is meant to be flexible. If you want to change up the cheese or add your favorite herbs, go for it. The best part of this recipe is how well it holds up to small adjustments. Once you get the hang of the timing, you will see how easy it is to keep things consistent every time you pull the tin out of the oven.