
Introduction: When Taco Night Completely Falls Apart
Picture this: It was a chaotic Friday evening after a brutal week at work. My friends had come over unannounced for a casual hangout, and everyone was suddenly starving. I threw my hands up and declared, “Taco night! I’ve got this covered!”
I grabbed a box of store-bought, pre-formed hard corn taco shells from the back of the pantry, browned some ground beef with a packet of generic seasoning, and laid out the fixings.
Within five minutes of serving, disaster struck. The second anyone bit into a taco, the brittle, stale shells shattered into a million jagged pieces, dumping all the beef, cheese, and salsa straight into their laps. Half the shells were broken right out of the box anyway. By the end of dinner, we were eating taco salad off paper plates with plastic forks while laughing about my monumental hosting failure.
I vowed right then and there to never buy those sad, cardboard-tasting boxed shells ever again.
That little kitchen failure launched a multi-week obsession with perfecting the ultimate homemade taco. I experimented with homemade tortillas, soft-shell grills, and various baking techniques until I stumbled upon the holy grail of taco engineering: cheese-crusted, crispy-shell tacos loaded with seasoned beef and a rich, creamy sauce.
Today, I am sharing the exact, foolproof method I use for our weekend taco nights. No more shattered shells, no more bland meat, and no more kitchen stress. Grab a skillet and let’s dive into how to make tacos that will blow your friends away.
The Reality Check: Why Traditional Hard Shells Fail Us
Before we get to the fun part of cooking, let’s talk about why making tacos at home can sometimes feel frustrating.
Have you ever opened a box of store-bought hard taco shells, only to find that half of them are already cracked in half? Or worse, have you bitten into one, only for it to taste stale, cardboard-like, and instantly disintegrate?
Commercial hard shells are often fried months in advance, packaged with preservatives, and shipped across the country, which strips away any fresh flavor or structural integrity.
When you make your own crispy shells using real cheese directly in a hot pan—or carefully fry fresh corn tortillas until they hold their shape—everything changes. You get a shell that has structural strength, a deep savory crunch from toasted cheese, and a fresh flavor profile that store-bought boxes simply cannot touch.
Plus, let’s talk about the filling. A great taco isn’t just about throwing cooked meat into a shell; it’s about building layers of moisture, flavor, and a creamy, decadent sauce that ties every single bite together.
Before we fire up the stove, let’s look at what you need to stock your kitchen with.
The Ingredient List
For a meal that looks and tastes like it came from an upscale modern taqueria, the ingredient list is surprisingly straightforward. You can pick up everything you need from your local grocery store.
| Category | Item | Quantity / Notes |
| The Meat Filling | Ground Beef | 1.5 lbs (80/20 lean-to-fat ratio provides the best flavor and juiciness without excessive grease). |
| Yellow Onion & Garlic | 1 medium onion (finely diced) + 4 cloves garlic (minced fresh). | |
| Taco Seasoning | 2 tablespoons (homemade blend of chili powder, cumin, garlic powder, onion powder, oregano, salt, and pepper). | |
| Beef Broth or Tomato Sauce | 1/2 cup. Keeps the meat juicy and creates a rich pan reduction. | |
| The Cheese Shells | Shredded Cheddar & Monterey Jack Cheese | 2.5 cups, freshly shredded. (Crucial: do not use pre-bagged shredded cheese, as anti-caking agents prevent it from melting into a crisp lace!). |
| The Creamy Sauce & Toppings | Sour Cream or Mexican Crema | 1/2 cup. Provides the creamy base for our drizzle sauce. |
| Salsa or Hot Sauce | 3 tablespoons. Blended into the cream sauce for a vibrant kick. | |
| Fresh Tomatoes & Cilantro | Diced fresh tomatoes and chopped cilantro for garnish. | |
| Cooking Fat | 1 tablespoon olive oil or avocado oil for the beef pan. |
Step-by-Step Guidance: Building Your Masterpiece
Ready to get to work? Make sure you have a heavy skillet and a spatula ready. Let’s walk through the cooking process step by step, from browning the beef to building those incredible cheese-crusted shells.
Step 1: Brown and Season the Ground Beef
- Place a large skillet over medium-high heat and add your tablespoon of olive oil.
- Toss in your diced yellow onions and cook for 3 to 4 minutes until they start turning translucent and soft.
- Add your ground beef, breaking it apart with a wooden spoon. Cook until the meat is thoroughly browned and no pink remains. Drain off any excess grease if necessary, but leave a tiny bit behind for flavor.
- Stir in your freshly minced garlic, homemade taco seasoning, and your 1/2 cup of beef broth or tomato sauce. Reduce the heat to medium-low and let it simmer for 5 to 7 minutes until the liquid reduces and coats the meat in a rich, savory glaze. Set aside and keep warm.
Step 2: Crafting the Cheese-Crusted Shells
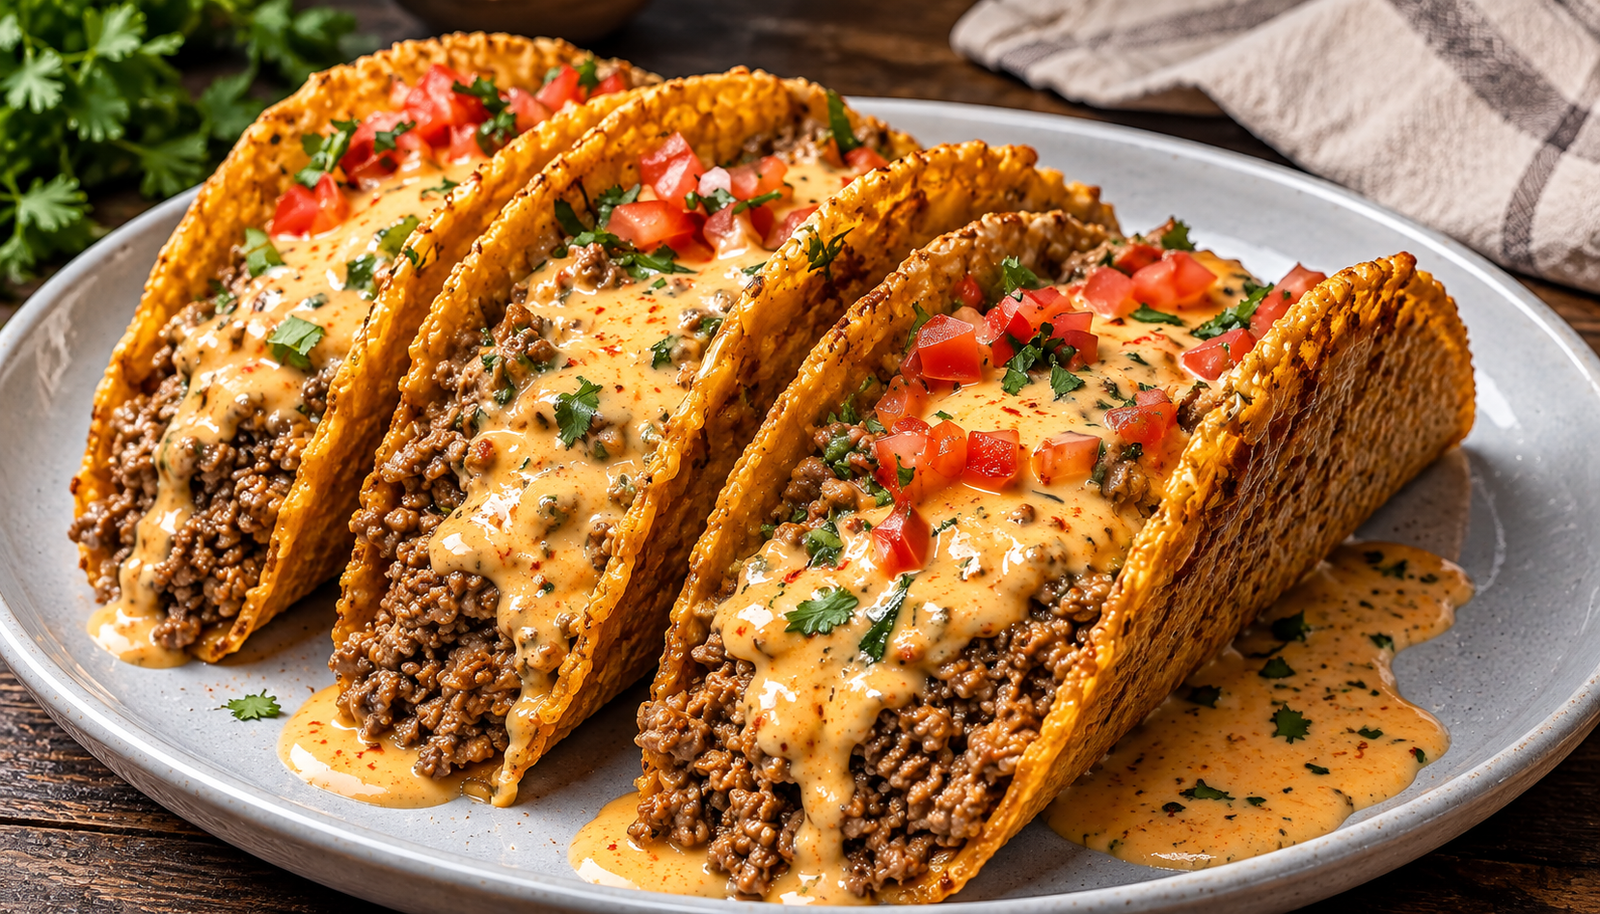
If you want that gorgeous, golden, lace-like crispy cheese crust featured in our reference image, this is where the magic happens:
- Heat a clean, non-stick skillet or cast-iron pan over medium heat. Do not add oil or butter; the cheese will release its own natural fats as it melts.
- Sprinkle about 1/3 cup of your freshly shredded cheddar and Monterey Jack cheese directly into the hot pan in a flat, even circle or oval shape.
- Let it cook undisturbed for about 1 to 2 minutes. The edges will melt, bubble, and start turning a deep golden-brown as the cheese crisps up into a frico (a crisp cheese wafer).
- Carefully slide a thin spatula underneath the warm cheese round. While it is still pliable and hot out of the pan, drape it over a wooden spoon handle resting between two bowls, or fold it gently like a taco shell. Hold it in place for 30 seconds until it cools and hardens into a sturdy, ultra-crispy cheese shell!
Step 3: Whip Up the Creamy Taco Sauce
- In a small mixing bowl, whisk together your sour cream (or Mexican crema), your favorite salsa or hot sauce, a pinch of salt, and a squeeze of fresh lime juice.
- Taste it and adjust the heat level to your liking. This sauce adds a rich, velvety moisture that balances the savory crunch of the beef and cheese shell.
Step 4: Assembly and Presentation
- Line up your freshly made crispy cheese shells on a large serving platter.
- Spoon your warm, seasoned ground beef generously into each shell.
- Drizzle your creamy taco sauce all over the top of the beef so it drips down the sides in a gorgeous, appetizing fashion.
- Garnish heavily with freshly diced tomatoes, chopped cilantro, and green onions for that bright, colorful pop of freshness.
Real Examples, Use Cases, and Life Lessons
Even seasoned home cooks run into roadblocks. Here are a few practical scenarios and common traps to keep in mind so your taco night goes off without a hitch:
- The Pre-Bagged Cheese Trap: The single biggest mistake people make when trying to make cheese-crusted taco shells is buying pre-shredded cheese from the grocery store. Those bags are coated with cellulose and potato starch to keep the shreds from clumping. Unfortunately, those exact powders prevent the cheese from melting together into a smooth, crisp sheet. Always grate your own cheese from a solid block!
- Folding the Shell Too Late: When making cheese frico shells, timing is everything. You have to fold the cheese round the exact second it comes out of the hot pan while it’s still pliable. If you wait thirty seconds for it to cool down on the counter, it will snap in half like a potato chip instead of folding into a taco shape.
- Overstuffing the Tacos: It’s tempting to pile the ground beef high, but overstuffing can cause your custom cheese shells to crack under the weight. Keep portions balanced so every bite is manageable and structurally sound.
As for real-world use cases? This is my absolute go-to recipe for Friday night hangouts, game days, or casual family dinners when I want to impress guests with something unique. Pair these tacos with a side of seasoned black beans, Mexican street corn (elote), and a cold drink, and you have an unbeatable meal.
Common Mistakes to Avoid Summary
To ensure your homemade crispy tacos turn out incredible on your very first try, keep these quick checkpoints handy:
- Don’t use pre-shredded cheese: Grate your own blocks of cheddar and Monterey Jack to ensure proper melting and crisping.
- Don’t let the cheese cool before folding: Shape your warm cheese wafers immediately after pulling them from the pan so they don’t snap.
- Don’t skip the moisture in the meat: Simmering your ground beef with a splash of broth prevents it from drying out inside the shell.
Final Thoughts
That disastrous taco night feels like a distant memory now. Making incredible, restaurant-quality Mexican food at home isn’t about buying expensive gadgets or cutting corners with processed box kits; it’s about taking a little extra time to master simple techniques like grating your own cheese and building flavor from scratch.
Next time you want to elevate your weekend dinner plans, skip the boring store-bought shells and spend twenty minutes making these Cheese-Crusted Ground Beef Tacos.
Take your time, keep the skillet at the right heat, and enjoy every single crunchy, savory bite. Happy cooking!