
I will never forget the freezing, sleet-filled Sunday evening a few years back that nearly made me pack up my slow cooker and banish it to the garage forever.
I had been daydreaming all afternoon about a bowl of deep, mahogany, pub-style beef stew: big, succulent, fall-apart tender chunks of beef chuck swimming alongside creamy, golden potato chunks in an ultra-rich, glossy, spoon-coating brown gravy.
I thought slow cookers were magical boxes where you simply dump ingredients and walk away. So I bought a standard styrofoam pack of pre-cut “beef stew meat” from the supermarket, dumped the pale, cold raw cubes straight into the bottom of the black ceramic insert, tossed in chunks of russet potatoes, poured a whole carton of beef broth over everything, clamped the glass lid shut, and set it to low for eight hours.
When 6:00 PM rolled around and my family gathered around the kitchen island with crusty bread in hand, dinner was an unmitigated disaster.
The liquid hadn’t thickened into a velvety gravy at all; it was a murky, greyish-brown broth with a greasy layer of yellow tallow floating across the top.
Worse yet, the pre-cut stew meat had contracted into dry, fibrous, chalky nuggets that felt like chewing wet cardboard. And the russet potatoes? Their high-starch cell walls had dissolved completely, turning the broth gritty and leaving behind ragged, waterlogged mush. My partner politely fished out three bites of meat, quietly set their spoon down, and made peanut butter toast. I ended up dumping half the crock into the compost, completely defeated.
That flop bugged me because classic slow-cooked beef stew is supposed to be the ultimate cold-weather comfort meal.
The issue wasn’t the slow cooker itself; it was a total disregard for the chemistry of beef chuck, gelatin conversion, potato variety, and liquid reduction. A slow cooker does not evaporate liquid. If you dump raw, watery ingredients inside, you are effectively boiling your dinner in its own expelled moisture.
Once I learned to avoid mystery “stew meat” packs, give whole beef chuck a blisteringly hard skillet sear, choose waxy Yukon Gold potatoes that never crumble, and use a red-wine-and-bouillon deglazing reduction, the entire game changed.
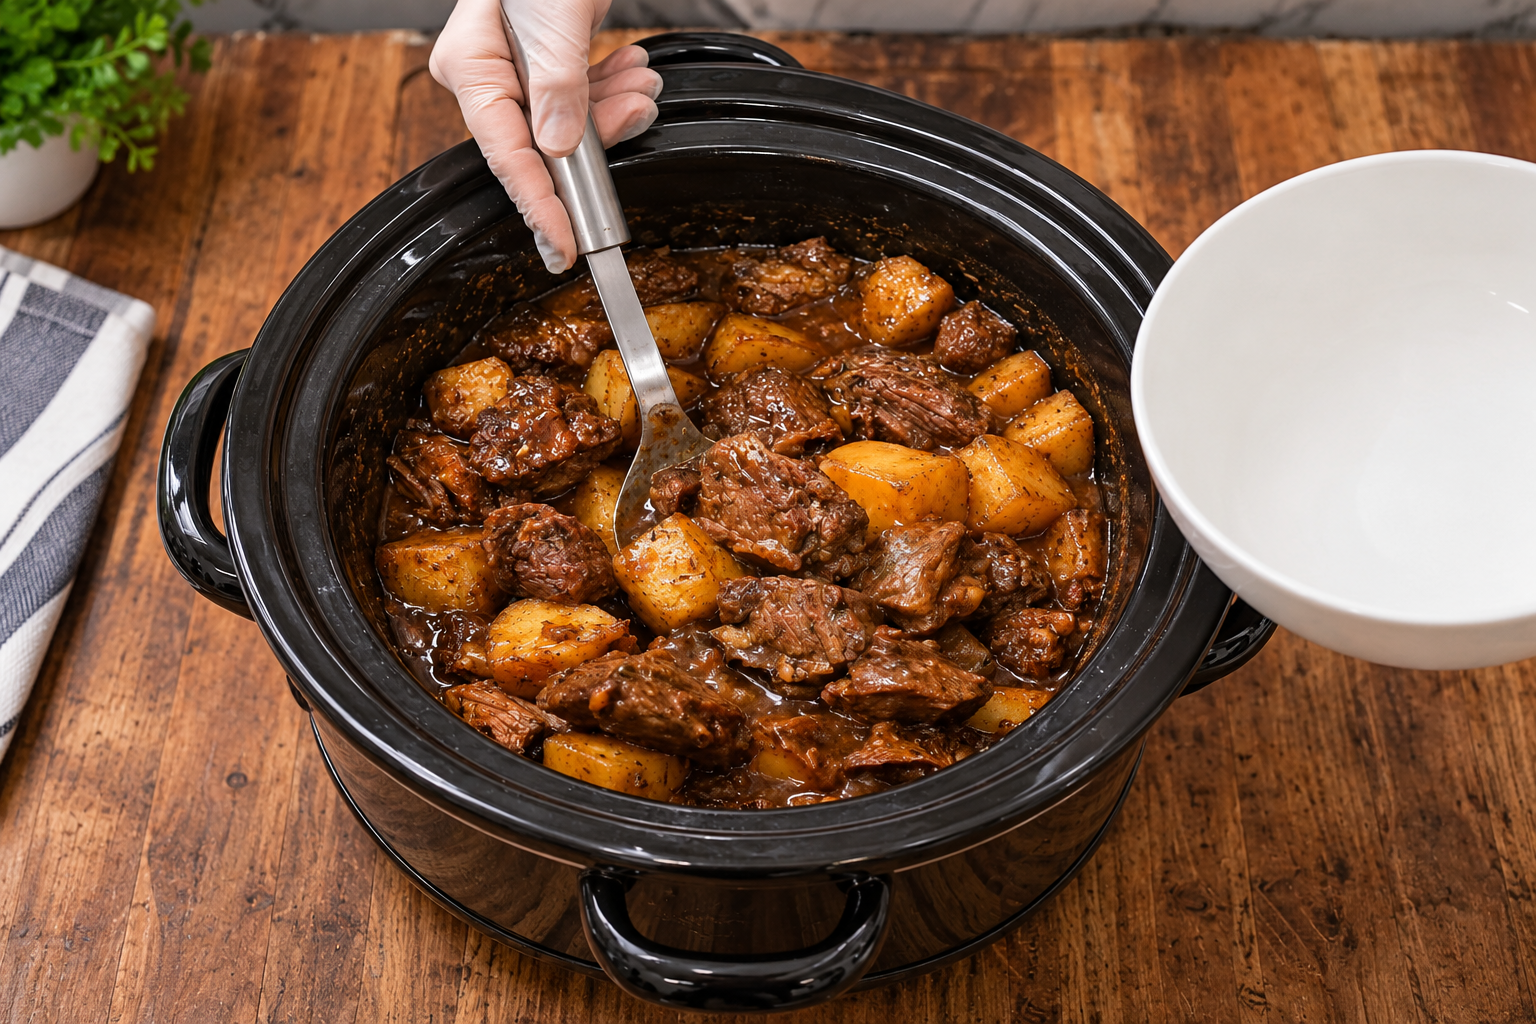
The photo above is the hard-won standard sitting on my wooden butcher block: a deep black oval slow cooker packed to the brim with glossy, fork-tender beef chuck cubes, sturdy golden potato wedges, and an ultra-rich, dark mahogany gravy being ladled into a clean white bowl.
Here is how you make this soul-warming, pub-quality Slow Cooker Beef and Potato Stew at home without ending up with tough meat or watery broth.
Why Slow-Cooker Beef Stew Goes Wrong (The Collagen & Starch Science)
Braised beef requires patience, but it also requires an understanding of how heat, fat, and starch interact inside a sealed, high-humidity crock:
1. The Pre-Cut “Stew Meat” Trap
Never buy pre-cut packs labeled “Beef Stew Meat” at the grocery store. Those trays are usually leftover butcher trim from various cuts—some round, some sirloin, some chuck. Sirloin and round are far too lean; they contain very little intramuscular collagen and dry out rapidly during an 8-hour braise. Always buy a whole, well-marbled boneless beef chuck roast and cut it into generous 1.5- to 2-inch cubes yourself. Chuck is loaded with connective collagen that melts into luscious gelatin around the 6-hour mark, basting the beef from within until it becomes melt-in-your-mouth tender.
2. Skipping the Cast-Iron Maillard Sear
Raw beef dumped directly into a slow cooker will never reach browning temperatures. The Maillard reaction—which creates hundreds of rich, savory, umami flavor compounds—only occurs above 300°F (150°C) in a dry environment. Searing flour-dusted beef cubes in a smoking-hot skillet first creates that deep brown crust that transforms the cooking juices into a mahogany gravy. Leaving those browned pan drippings behind is throwing away eighty percent of your stew’s flavor.
3. Choosing the Wrong Potato (Russet vs. Yukon Gold)
Russet (Idaho) potatoes are high-starch, low-moisture tubers with loose cell walls. In an 8-hour slow cooker braise, russets absorb excess liquid, break apart around the edges, and disintegrate into the broth, turning your stew chalky. Yukon Gold or yellow potatoes are medium-starch, waxy tubers. Their cell walls hold tight under extended heat, giving you soft, buttery, intact potato wedges with clean, defined edges (exactly like the gorgeous potato chunks pictured in the reference photo).
Ingredients & Tools You’ll Need
Essential Kitchen Gear
- 6- to 7-Quart Oval Slow Cooker: (A ceramic slow cooker, like the black oval unit in the photo, provides the wide footprint needed so the beef cubes and potato chunks braise evenly without steaming each other).
- 12-Inch Heavy Cast-Iron or Stainless Skillet: Mandatory for getting a blisteringly hot, dark sear on the beef before braising.
- Large Metal Tongs & Slotted Spoon: For lifting and turning the beef cubes without puncturing the meat.
- Flat Wooden Spatula: Essential for scraping the flavorful fond off the skillet during deglazing.
- Heavy Soup Ladle: (Like the stainless-steel ladle shown in the action shot, for scooping generous portions of beef, potatoes, and gravy).
The Ingredient Breakdown
| Component | Ingredient | Quantity | Practical Role |
| The Star Beef | Boneless Beef Chuck Roast (well-marbled) | 2.5 to 3 lbs (cut into 1.5- to 2-inch cubes) | Connective collagen melts into succulent gelatin over low heat. |
| The Potato Base | Yukon Gold or Dutch Yellow Potatoes | 1.5 lbs (halved or quartered into 1.5-inch wedges) | Holds its shape; develops a buttery, melt-in-your-mouth bite. |
| The Crust Dredge | All-Purpose Flour | ⅓ cup | Coats the beef cubes to build a crust and naturally thickens gravy. |
| The Searing Fat | High-Smoke-Point Oil & Butter | 2 tbsp avocado/canola oil, 1 tbsp unsalted butter | Oil allows high-heat browning; butter enriches pan drippings. |
| Aromatic Base | Sweet Yellow Onion | 1 large (thickly diced) | Melts into the braising liquid, building sweet savory depth. |
| Aromatic Depth | Fresh Garlic Cloves | 5 to 6 cloves (smashed and minced) | Delivers pungent, warm aromatics throughout the gravy. |
| The Deglazer | Dry Red Wine (Cabernet, Merlot, or Pinot Noir) | 1 cup | Dissolves the caramelized skillet fond and cuts heavy beef fat. |
| The Liquid Base | Low-Sodium Beef Bone Broth | 2.5 cups | Forms the rich, savory foundation without making the stew salty. |
| Umami Engine | Better Than Bouillon Roasted Beef Base | 1.5 tbsp | The secret weapon for deep, dark, steakhouse-level broth color. |
| Tomato Body | Tomato Paste | 2 tbsp | Concentrated tomato umami that cuts through the beef richness. |
| Savory Booster | Worcestershire Sauce | 2 tbsp | Fermented umami backbone that elevates the slow-cooked beef. |
| Savory Booster | Dijon Mustard | 1 tsp | Mild emulsifier that ties the gravy liquids together smoothly. |
| Herbal Backbone | Fresh Thyme & Dried Rosemary | 4 sprigs fresh thyme, 1 tsp dried rosemary (crushed) | Traditional rustic woodsy herbs that perfume the braise. |
| Herbal Accent | Bay Leaves | 2 whole leaves | Imparts a subtle, herbal depth as the stew simmers. |
| Base Seasoning | Coarse Kosher Salt & Black Pepper | 1.5 tbsp salt, 1 tbsp coarse cracked black pepper | Crucial seasoning across the flour dredge and braising liquid. |
| The Gravy Slurry | Cornstarch (Optional thickener) | 2 tbsp (mixed with 2 tbsp cold water) | Used at the very end to give the gravy that glossy, spoonable sheen. |
Step-by-Step Cooking Instructions
Step 1: Prep and Dredge the Beef Chuck
Take your boneless beef chuck roast out of the refrigerator 20 to 30 minutes before cooking to take the deep chill off.
Trim away any hard, rubbery white gristle or thick excess fat caps, but leave the internal ribbons of marbling intact.
Using a sharp chef’s knife, cut the chuck into large, uniform 1.5- to 2-inch cubes.
Cook’s Real-Life Tip: Cut the beef bigger than you think you need! Meat naturally shrinks by roughly 25% as moisture and fat render out. If you start with tiny 1-inch cubes, you will end up with shriveled, dry meat bits instead of the hearty, succulent chunks seen in the photo.
Pat the beef cubes completely bone-dry with paper towels.
In a wide, shallow bowl, whisk together the ⅓ cup of all-purpose flour, 1 tablespoon of coarse kosher salt, and 1 teaspoon of freshly cracked black pepper.
Toss the beef cubes in the seasoned flour until lightly coated on all sides.
Shake off any excess flour so you have a thin, even dusting.
Step 2: The Blistering Skillet Sear (The Flavor Core)
Place your 12-inch heavy skillet over medium-high heat on the stovetop.
Add 2 tablespoons of oil and 1 tablespoon of butter.
Once the butter is melted, foaming, and shimmering hot, lay half of the floured beef cubes into the skillet.
Do not crowd the pan! If you dump all the meat in at once, the beef will trap steam and boil in its own juices, turning grey and rubbery.
Sear untouched for 2 to 3 minutes on the first side until a dark, mahogany crust forms.
Use your metal tongs to flip the cubes, searing all sides for another 3 to 4 minutes.
Transfer the browned beef cubes directly into your 6-quart oval slow cooker insert.
Add another drizzle of oil to the skillet and sear the second batch of beef, transferring it into the slow cooker once golden and crusted.
Step 3: Deglaze the Pan and Build the Sauce Base
Turn the skillet heat down to medium.
Dump your thickly diced yellow onions into the remaining pan drippings with a pinch of kosher salt.
Cook for 3 to 4 minutes, stirring with a flat wooden spatula until the onions soften.
Stir in the minced fresh garlic and 2 tablespoons of tomato paste.
Cook the paste directly against the hot metal for 90 seconds until it darkens to a deep brick-red color.
Now, pour the 1 cup of dry red wine directly into the hot skillet.
The liquid will hiss and bubble violently.
Use your flat wooden spatula to scrape firmly along the bottom of the pan, loosening all the flavorful, caramelized browned bits (fond) left behind by the beef.
Let the wine simmer vigorously for 2 to 3 minutes until it reduces by half and the alcohol aroma cooks off.
Stir in the 2.5 cups of low-sodium beef bone broth, 1.5 tablespoons of Better Than Bouillon beef base, 2 tablespoons of Worcestershire sauce, and 1 teaspoon of Dijon mustard.
Bring the liquid to a simmer, stirring until the bouillon dissolves completely into a dark, fragrant sauce base.
Remove the skillet from the heat.
Step 4: Layer and Load the Slow Cooker
Rinse and scrub your 1.5 pounds of Yukon Gold potatoes.
Leave the skins on (the golden skins add rustic color, texture, and keep the potato flesh from softening too quickly).
Cut the potatoes into large, sturdy 1.5-inch wedges or quarters.
Toss the raw potato wedges directly into the slow cooker on top of and around the seared beef cubes.
Pour the hot, wine-and-broth mixture from the skillet directly over the beef and potatoes in the slow cooker.
Tuck the 4 fresh thyme sprigs, crushed dried rosemary, and 2 whole bay leaves deep into the liquid between the meat chunks.
Crucial Observation: The liquid should come roughly two-thirds of the way up the beef and potatoes—it should not drown or completely submerge them. As the beef cooks, it will render its own juices, creating plenty of rich, concentrated gravy.
Step 5: The Low-and-Slow Braise
Clamp the heavy lid onto the slow cooker.
- Low Setting (The Golden Standard): Cook for 7 to 8 hours.
- High Setting: Cook for 4 to 5 hours (use Low if you have the time; gentle heat breaks down chuck collagen far better).
The Non-Negotiable Rule: Keep the lid on! For the first six hours, resist the urge to open the slow cooker to stir or smell. Every time you lift the lid, you dump trapped steam and drop the internal temperature, adding 20 minutes to your cook time.
Around hour 7 on Low, slide the tip of a paring knife into a large beef cube: it should slide in effortlessly with zero resistance, yielding like soft, warm butter.
Pierce a potato wedge: it should be tender through to the core while maintaining its clean, distinct edges.
Step 6: The Gravy Glaze Finish
Turn the slow cooker setting to HIGH.
Fish out and discard the woody thyme stems and the two bay leaves.
Look at the consistency of your cooking liquid:
- If you prefer a lighter, rustic broth, it is ready to serve right now!
- If you want that ultra-glossy, rich, spoon-coating pub-style gravy seen in the photo, do this quick move:
In a small cup, whisk together 2 tablespoons of cornstarch with 2 tablespoons of cold water until smooth.
Gently pour the slurry into the slow cooker, stirring carefully with a wooden spoon so you don’t crush the tender potato wedges.
Leave the slow cooker uncovered on High for 10 to 15 minutes.
The liquid will bubble, and the cornstarch will activate, turning the broth into a dark, luxurious, mahogany gravy that clings tightly to every piece of meat and potato.
Turn the slow cooker to “WARM”.
Step 7: The Mandatory 5-Minute Rest & Table Serving
Let the slow cooker sit on “Warm” with the lid off for 5 full minutes before ladling into bowls.
This short rest allows the boiling bubbles to settle and lets the rendered beef juices settle back into the tender meat fibers.
Set your slow cooker right onto a wooden butcher block or heatproof board at the table.
Using a large stainless-steel ladle (exactly as seen in the action shot), scoop deep into the pot, lifting generous portions of dark, glistening beef chuck, golden Yukon potato wedges, and that rich, herb-flecked brown gravy into wide, shallow ceramic bowls.
Grind extra coarse black pepper over the top and serve steaming hot!
Practical Troubleshooting & Common Mistakes
- “My beef turned out tough and chewy.”
This almost always means the stew hasn’t cooked long enough! Beef chuck is tough until its internal temperature sits above 195°F for a sustained period, at which point the collagen converts into soft gelatin. If your beef feels chewy at hour 6, do not panic—clamp the lid back on and let it cook for another hour on Low. - “The potatoes dissolved into mush.”
This happens if you used starchy russet potatoes or cut your potato chunks too small. Stick strictly to medium-starch Yukon Gold potatoes, and cut them into large, sturdy 1.5-inch pieces so they can withstand an 8-hour braise without crumbling. - “The gravy looks greasy on top.”
Chuck roast naturally renders fat as it cooks. If an oily yellow slick forms on top of your stew at the end, simply take a wide metal spoon or a folded paper towel and gently skim the surface fat off the top of the pot before stirring in the cornstarch slurry.
Delicious Upgrades & Variations
While this classic beef-and-potato combination is unbeatable comfort food, you can easily customize the pot to match what is in your crisper:
- The Root Vegetable Garden: Add 2 large carrots sliced into 1-inch coins and 1 peeled parsnip along with the potatoes in Step 4 for an earthy, sweet balance.
- The Sautéed Button Mushroom Boost: Sauté 8 ounces of halved cremini mushrooms in butter until browned, and fold them into the slow cooker during the final two hours of cooking.
- The Stout Beer Twist: Swap the 1 cup of dry red wine for a bottle of dark Irish stout (like Guinness). The malty, roasted-barley notes create an incredible, deep, traditional Dublin-style pub stew.
What to Serve with Slow Cooker Beef Stew
This one-pot meal is hearty, rich, and provides protein, starch, and savory gravy all in a single ladle, but it shines brightest with simple rustic sides:
- Warm Crusty Sourdough or French Baguette: Non-negotiable! You need thick, crusty bread with plenty of soft crumb to wipe the bottom of your bowl clean of every last drop of rich mahogany gravy.
- Flaky Buttermilk Biscuits: Split a warm, buttery biscuit in half and ladle the steaming beef and potatoes directly over the open halves.
- A Crisp, Peppery Arugula Salad: Baby arugula, thinly sliced radishes, and shaved parmesan tossed in a sharp lemon-dijon vinaigrette provide a bright, acidic crunch that cuts through the deep, rich beef fat.
- A Full-Bodied Red Wine: Pour a glass of Cabernet Sauvignon, Syrah, or Malbec. The bold tannins in the wine pair naturally with the rich braised beef chuck and garlic-herb gravy.
Storing and Reheating Leftovers (The Next-Day Magic)
Here is the honest truth about homemade beef stew: it tastes even better the next day.
As the stew rests in the refrigerator overnight, the starches in the potatoes stabilize, and the beef chuck absorbs even more of the red wine, garlic, and thyme from the gravy.
Transfer any leftovers to an airtight glass container and store in the refrigerator for up to 4 days.
How to Reheat Properly:
Never blast cold beef stew in the microwave on high power! The rapid, uneven radiation will heat the exterior while leaving the center of the dense beef cubes cold, and can turn tender beef rubbery.
Instead, use the gentle stovetop method:
- Scoop your desired portion into a small saucepan over medium-low heat.
- Splash in 2 to 3 tablespoons of water or beef broth to loosen the chilled, gelatinized gravy.
- Cover with a lid and heat gently for 6 to 8 minutes, stirring occasionally, until the beef is piping hot and the gravy turns silky and glossy once again.
Ladle into your bowl, grab a slice of crusty bread, and enjoy an effortless, pub-quality comfort meal that tastes just as incredible as the night it came out of the slow cooker!