
Introduction: When a Fancy Weeknight Dinner Turns Into Cardboard
Let me take you back to a chilly Thursday evening a few months ago. I wanted to make something that looked impressive for dinner without spending hours in the kitchen. I spotted a nice, neat pork tenderloin sitting in the meat aisle and figured, Hey, pork is easy. Just roast it in the oven until it’s done.
What followed was a culinary tragedy.
I threw the raw pork tenderloin straight from the fridge onto a baking sheet, rubbed a random spice blend on it, and cranked the oven up to high. Without a meat thermometer or any kind of glaze, I let it roast for nearly an hour.
When I pulled it out, it looked like a sad, shriveled piece of driftwood.
When I sliced into it, every drop of moisture was entirely gone. The meat was grey, tough, and tasted like dry cardboard. My husband took one polite bite, chewed for what felt like an eternity, and gently asked if we had any leftover barbecue sauce to help lubricate it.
That kitchen catastrophe bruised my ego, but it also made me obsessed. I refused to let pork tenderloin defeat me. I spent the next few weeks testing, tweaking, and completely redesigning how to sear, roast, and glaze pork tenderloin so it stays melt-in-your-mouth tender.
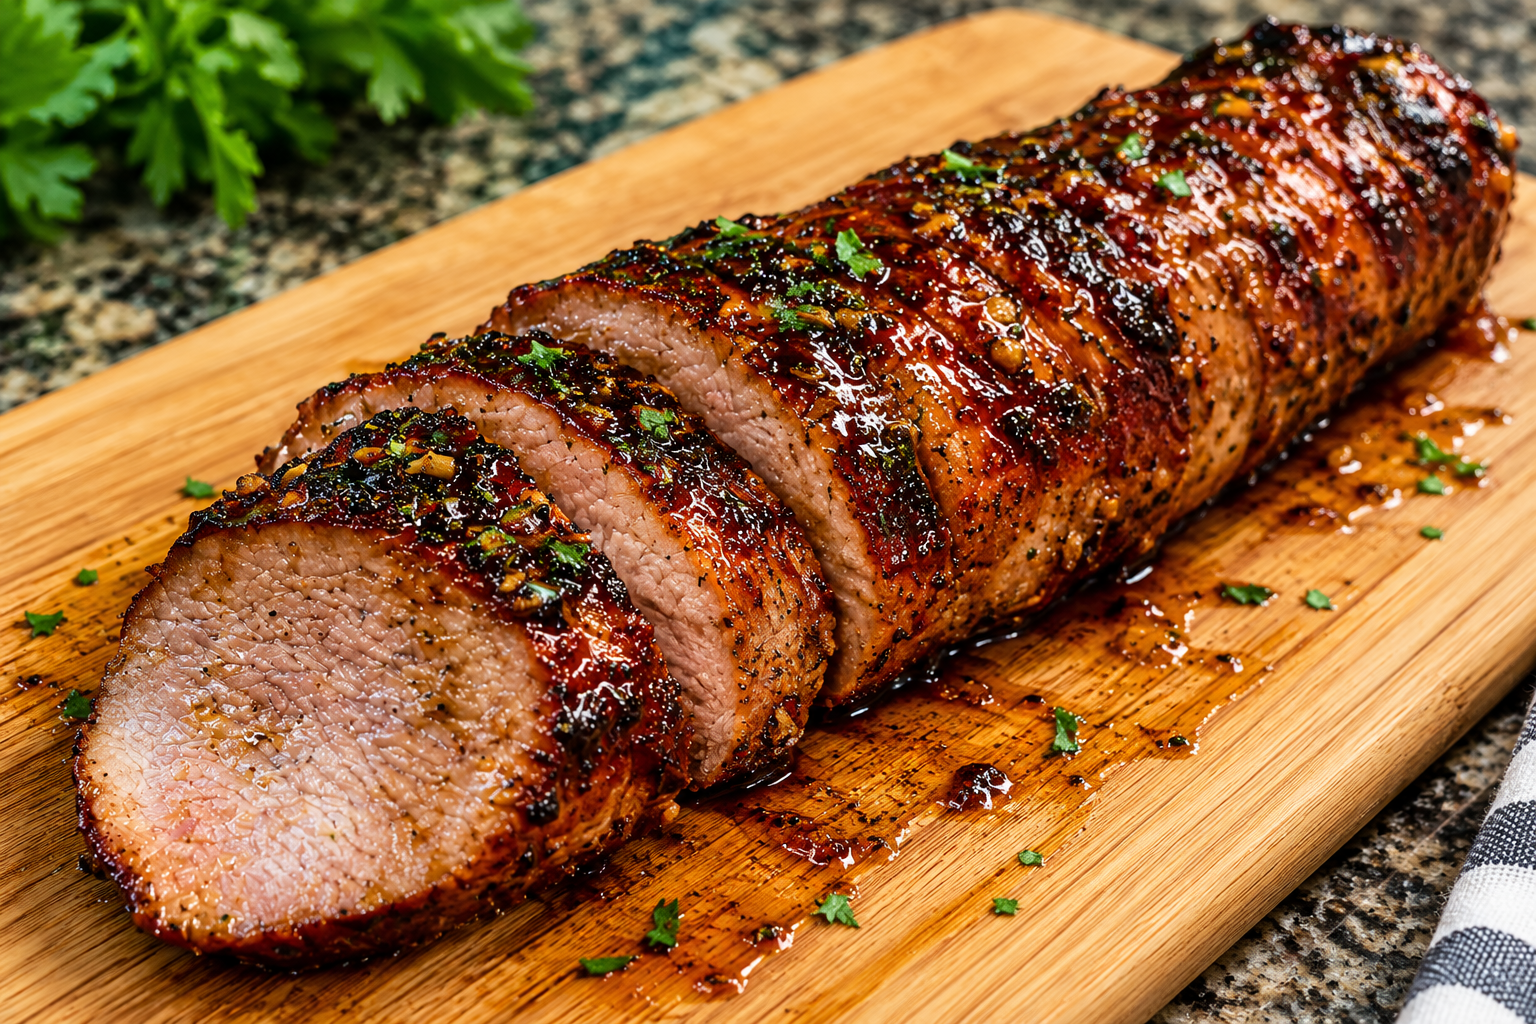
Today, I am sharing the glorious result of that journey: my absolute favorite Honey Garlic Glazed Pork Tenderloin. It has a gorgeous caramelized crust, a juicy pink center, and a sticky sweet-savory glaze that will blow your mind. Grab a heavy skillet and let’s dive in.
The Reality Check: Why Most Homemade Pork Tenderloins Turn Out Dry
Before we get to the fun part of cooking, we need to talk about why making pork tenderloin at home can feel like walking through a minefield.
Have you ever roasted a pork tenderloin, only to find that it turns out dry, tough, and flavorless? Or have you watched your glaze burn into bitter charcoal before the meat is cooked through?
I made every single one of those mistakes so you don’t have to repeat them. Here are the three golden rules I learned the hard way:
- Do not overcook it. Pork tenderloin is an extremely lean cut of meat with almost no internal fat. If you cook it past 145°F, it dries out instantly. Using a digital meat thermometer is non-negotiable!
- Sear before you roast. Getting a quick, beautiful sear on the stovetop locks in the juices and creates an incredible flavor crust before the meat even touches the oven.
- Apply your sweet glaze at the end. Honey and brown sugar burn very easily under high heat. Brushing your glaze on during the final minutes of cooking prevents scorching and creates a sticky, glossy lacquer.
With those hard-earned lessons tucked under our aprons, let’s look at what you need to stock your kitchen counter with.
The Ingredient List
For a meal that tastes like an upscale restaurant dish, the ingredient list is surprisingly straightforward. You can find everything easily at your local grocery store.
| Category | Item | Quantity / Notes |
| The Meat | Pork Tenderloin | 1.5 to 2 lbs (look for an evenly thick cut; remove any silvery connective tissue/silverskin). |
| The Rub & Sear | Olive Oil or Avocado Oil | 1 tablespoon (for searing in the pan). |
| Kosher Salt & Black Pepper | 1 tsp salt + 1/2 tsp black pepper. | |
| Garlic Powder & Onion Powder | 1 tsp garlic powder + 1 tsp onion powder. | |
| Smoked Paprika | 1 teaspoon (adds a wonderful earthy, smoky depth). | |
| The Honey Garlic Glaze | Honey | 1/3 cup (provides the natural sticky sweetness). |
| Soy Sauce | 3 tablespoons (adds savory umami to balance the honey). | |
| Apple Cider Vinegar | 1 tablespoon (cuts through the sweetness with a bright tang). | |
| Fresh Garlic & Ginger | 4 cloves garlic (minced) + 1 tsp fresh ginger (minced). |
Step-by-Step Guidance: Building Your Masterpiece
Ready to get to work? Make sure you have an oven-safe heavy skillet (like a cast-iron pan) ready. Let’s walk through the process step by step.
Step 1: Prep and Season the Pork
- Trim the Silverskin: Take your pork tenderloin out of the fridge 15 minutes before cooking. Use a sharp knife to trim off any tough, silvery connective tissue (silverskin) so the meat stays tender as it cooks.
- Season Generously: Pat the tenderloin completely dry with paper towels. Rub it all over with a touch of olive oil, then season evenly with your salt, pepper, garlic powder, onion powder, and smoked paprika.
Step 2: Sear on the Stovetop
- Preheat your oven to 400°F (200°C).
- Place your oven-safe heavy skillet over medium-high heat and add your tablespoon of oil.
- Once shimmering, place the tenderloin into the hot pan. Sear it for 2 to 3 minutes on all sides, rolling it gently until the entire exterior develops a rich, golden-brown crust.
Step 3: Whisk the Glaze and Roast
- In a small bowl, whisk together your honey, soy sauce, apple cider vinegar, minced garlic, and minced ginger.
- Pour about half of the honey garlic glaze directly over the seared pork tenderloin in the skillet.
- Transfer the entire skillet straight into your preheated oven. Roast for 12 to 18 minutes, brushing the remaining glaze over the pork halfway through, until a digital meat thermometer inserted into the thickest part reads 140°F to 145°F (60°C to 63°C).
Step 4: Rest and Slice
- Remove the skillet from the oven. Transfer the pork tenderloin to a clean cutting board.
- Crucial Step: Tent the pork loosely with aluminum foil and let it rest undisturbed for 10 minutes. This allows the internal juices to redistribute.
- Slice the tenderloin into thick, juicy medallions (just like the gorgeous presentation in our reference photo), and spoon any remaining pan juices and sticky glaze over the top.
Real Examples, Use Cases, and Life Lessons
Even seasoned home cooks run into roadblocks. Here are a few practical scenarios and common traps to keep in mind so your dinner goes off without a hitch:
- The Dry Meat Trap: Overcooking is the number one enemy of pork tenderloin. Invest in a cheap digital meat thermometer and pull the pork at 140°F–145°F. Carryover cooking will bring it to perfection while it rests.
- Choosing the Right Cut: Make sure you are buying a pork tenderloin, which is long, thin, and very tender, rather than a pork loin, which is much larger, thicker, and requires a different cooking time.
- Leftovers and Reheating: Leftover sliced pork tenderloin makes incredible sandwiches or salad toppings the next day. Reheat gentle slices in a skillet with a splash of chicken broth so they don’t dry out.
As for serving suggestions? Serve these gorgeous, glossy glazed pork medallions alongside creamy mashed potatoes, roasted asparagus, or garlic butter noodles. Spoon that extra pan sauce generously over everything!
Common Mistakes to Avoid Summary
To ensure your Honey Garlic Glazed Pork Tenderloin turns out juicy, tender, and flavorful on your very first try, keep these quick checkpoints handy:
- Don’t overcook the meat: Use a meat thermometer and pull the pork at 145°F to maintain maximum juiciness.
- Don’t skip the rest time: Let the tenderloin rest for 10 minutes after roasting so the juices stay inside the meat.
- Don’t burn your glaze: Add your honey-based sauce during the searing and roasting phase so the sugars caramelize without scorching into bitterness.
Final Thoughts
That dry, grey wood-like disaster feels like a lifetime ago now. Making an incredible, restaurant-quality pork dinner at home isn’t about guesswork; it’s about monitoring your internal temperature and layering rich, sticky flavors.
Next time you need an impressive weeknight dinner that will wow your family, skip the stress and spend 25 minutes making this Honey Garlic Glazed Pork Tenderloin.
Take your time, check your temperatures, and enjoy every single juicy, sweet-and-savory bite. Happy cooking!