
I used to have an unspoken rule in my house: meatloaf was strictly a backup meal, the kind you make when the fridge is bare and expectations are low.
Growing up, meatloaf meant a dense, grey brick baked in a narrow metal tin, drowning in a layer of burnt, sugary ketchup, and so dry you practically needed a glass of water for every two bites. When I first tried making an “elevated” version a few years back, I figured I would get fancy and try a French-onion-inspired spin.
My early attempt was a complete, embarrassing disaster.
I took extra-lean ground sirloin, tossed raw, crunchy onions and dry breadcrumbs straight into the bowl, packed the meat as tight as wet cement into a bread pan, dumped a cup of pre-shredded Swiss cheese on top right at minute zero, and cranked the oven to 400°F.
The result? The raw onions sweated out water as they heated, essentially boiling the interior of the beef into a pale, spongy sponge. The pre-shredded cheese burned into a rubbery brown hide before the center of the meat was even close to safe doneness. And when I tried to pull it out, grease sloshed over the sides of the tin, nearly lighting a fire in my oven. My partner smiled politely, sawed off a slice, and smothered it in hot sauce just to get it down.
I was humbled, but I couldn’t shake the vision. When you bring together the sweet, jammy umami of caramelized onions, savory beef, and a bubbling, golden blanket of melted Gruyère and provolone, it shouldn’t taste like dry cafeteria food—it should taste like a cozy Parisian bistro on a rainy evening.
After testing meat ratios, ditching the bread tin, and mastering the two-stage broiler finish, I cracked the code.
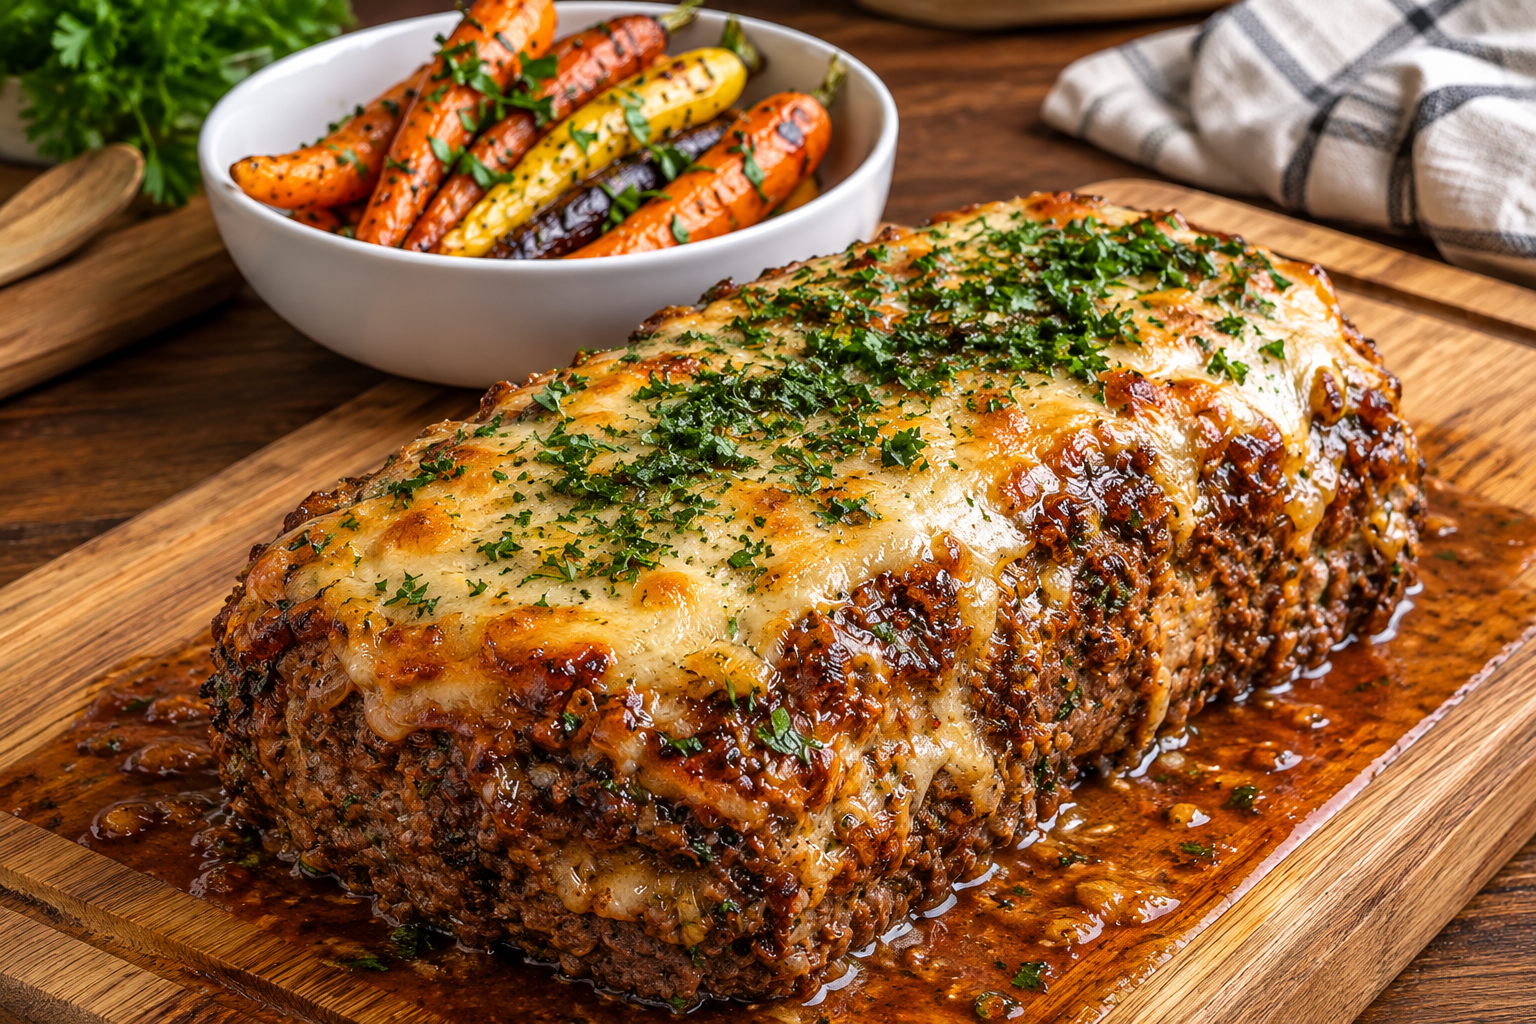
The photo above shows the glorious reality: a tender, juicy loaf resting on a carved wooden board, bathed in rich onion jus, and crowned with a thick, golden, herb-flecked blanket of blistered cheese that holds its shape from the first slice to the last.
Here is how you make it at home without turning dinner into an oily, dry disappointment.
The Chemistry of a Juicier, Cheese-Crowned Loaf
Before you fire up the stove, understanding why classic meatloaf dries out—and why stuffing or topping it with dairy can go wrong—will save your dinner:
1. The Lean Beef Mistake
Lean ground beef (like 90/10 or 93/7) tightens up like a fist as it cooks, squeezing out every drop of natural moisture. An 80/20 ground chuck provides the right balance of rich beef flavor and rendering fat. Blending in a small amount of ground pork introduces finer fat globules that keep the crumb tender and fork-sliceable.
2. The Hydrated Panade (Ditch Dry Breadcrumbs)
Dumping dry breadcrumbs into raw ground beef acts like tiny desiccant packets, sucking natural meat juices right out of the meat fibers. A traditional panade—soaking light panko breadcrumbs in rich beef bone broth—creates a protective, gelatinous cushion throughout the meat matrix. It insulates the proteins from heat and locks moisture inside the loaf.
3. Sauté Your Onions First (Never Raw)
Raw onions release massive amounts of steam as their cell walls burst in the oven. That trapped steam will turn your meatloaf soggy and cause fissures that break the loaf apart. Slowly caramelizing sweet onions in butter first evaporates that unwanted water and concentrates their natural sugars into rich, jammy sweetness.
4. Ditch the Metal Loaf Pan
Shoving ground meat into a deep loaf pan forces the meat to sit in a pool of rendered fat and steam, boiling the bottom half while turning the sides grey. Forming the loaf freehand on a flat, rimmed baking sheet lets the hot dry air circulate around all four sides, building a deep, savory Maillard crust while excess fat drains away naturally.
Ingredients & Kitchen Tools
Essential Gear
- Rimmed Half-Sheet Pan or Baking Tray: Lined with heavy-duty aluminum foil for easy cleanup and 360-degree airflow.
- 12-Inch Cast-Iron or Stainless-Steel Skillet: Gives the sliced onions plenty of surface area to caramelize without crowding.
- Digital Instant-Read Thermometer: (A ThermoWorks ThermoPop or similar digital probe is essential; taking the beef out at 155°F to 160°F guarantees juicy results).
- Carving Board with a Juice Groove: Catches the flavorful onion-butter pan drippings when you rest and slice the loaf.
The Ingredient Breakdown
| Component | Ingredient | Quantity | Practical Role |
| The Meat Base | 80/20 Ground Chuck | 1.5 lbs (680g) | Primary beefy backbone with necessary fat for tenderness. |
| The Meat Base | Ground Pork | 0.5 lb (225g) | Keeps the meat texture velvety and prevents dense tightening. |
| The Panade | Plain Panko Breadcrumbs | ¾ cup | Light, airy texture that won’t make the loaf heavy. |
| The Panade | Rich Beef Bone Broth | ½ cup | Hydrates the crumbs with concentrated French onion soup flavor. |
| The Binders | Large Eggs | 2 whole | Lightly beaten to hold the loaf together structurally. |
| Aromatic Sweetness | Yellow or Vidalia Onions | 2 large (thinly sliced) | Cooked down until sweet, jammy, and golden-brown. |
| Aromatic Depth | Fresh Garlic | 4 cloves (minced) | Classic savory steakhouse backbone. |
| Caramelizing Fat | Unsalted Butter | 2 tbsp | Sweetens and enriches the onions as they cook down. |
| Savory Boosters | Worcestershire Sauce | 2 tbsp | Deep fermented umami that pairs naturally with roasted beef. |
| Savory Boosters | Better Than Bouillon Beef Base | 1 tbsp | The secret weapon for deep, bistro-style onion soup depth. |
| Savory Boosters | Dijon Mustard | 1 tbsp | Balances the rich cheese and beef with pleasant acidity. |
| Herbal Lift | Fresh Thyme Leaves | 1 tbsp (chopped) | The unmistakable signature herb of French onion soup. |
| Seasoning | Coarse Kosher Salt & Cracked Pepper | 1.5 tsp salt, 1 tsp coarse pepper | Crucial seasoning across the meat, onions, and crust. |
| The Cheesy Crown | Block Gruyère & Provolone Cheese | 1.5 cups (freshly shredded) | Gruyère brings nutty depth; provolone adds a creamy, stretchy melt. |
| Garnish | Fresh Flat-Leaf Parsley | 2 tbsp (finely chopped) | Adds a pop of clean green over the toasted cheese crust. |
Step-by-Step Cooking Instructions
Step 1: Slow-Caramelize the Onions
Melt 2 tablespoons of butter in your large skillet over medium-low heat.
Add the thinly sliced yellow onions with a generous pinch of kosher salt and half of the fresh chopped thyme.
Cook slowly for 20 to 25 minutes, stirring every few minutes. You want them soft, sweet, and deep golden-brown, not scorched on the edges. If the pan looks dry, splash in a tablespoon of beef broth or water to pick up the browned bits from the bottom.
Stir in the minced garlic during the final 2 minutes.
Remove from heat. Scoop out half of the caramelized onions onto a plate and let them cool for 5 minutes (these will go inside the meat mixture). Leave the remaining half in the pan to crown the loaf later.
Step 2: Build the Savory Panade
In a large mixing bowl, combine the ¾ cup of panko breadcrumbs with the ½ cup of beef broth and 1 tablespoon of Better Than Bouillon beef base.
Stir with a fork and let it sit on your counter for 5 to 7 minutes until the breadcrumbs absorb all the broth, forming a thick, savory paste.
Step 3: Whisk the Flavor Binders
Into that same bowl with the softened breadcrumbs, crack the 2 eggs.
Add the Worcestershire sauce, Dijon mustard, the remaining chopped fresh thyme, 1.5 teaspoons kosher salt, 1 teaspoon coarse black pepper, and the cooled portion of caramelized onions.
Whisk everything thoroughly with a fork until you have a uniform paste.
Blending all the salt, binders, and aromatics beforehand means you won’t have to overwork the raw meat trying to distribute seasoning later.
Step 4: Combine with a Light Hand
Add the ground chuck and ground pork to the bowl with your flavor paste.
Take off any rings, wash your hands, and spread your fingers like open rakes. Gently fold and toss the meat with the seasoning paste just until no dry pockets of meat remain.
Stop mixing the second it comes together.
Cook’s Mistake to Avoid: Never squeeze, knead, or compress ground beef like bread dough! Overworking the meat breaks down the delicate muscle strands, resulting in a dense, rubbery loaf instead of a tender, crumbly bite.
Step 5: Shape for Maximum Airflow
Preheat your oven to 375°F (190°C). Line a rimmed baking sheet with heavy-duty aluminum foil and lightly mist it with oil.
Turn the meat mixture out onto the center of the pan.
Using damp hands (which keeps the meat from sticking to your skin), shape the beef into an oblong loaf roughly 9 inches long, 5 inches wide, and about 2.5 inches tall.
Pat the top so it forms a level, slightly flattened platform rather than a steep, pointy dome. A flat top keeps your caramelized onions and melted cheese from sliding off into the pan drippings later.
Step 6: The Initial Roast
Slide the uncovered baking sheet onto the middle rack of your preheated 375°F (190°C) oven.
Bake untouched for 40 to 45 minutes.
During this initial roast, the loaf develops a savory outer crust, rendering out excess fat while the interior panade sets into a tender matrix.
Step 7: Check the Internal Temperature
Slide the probe of your digital instant-read thermometer into the thickest center of the loaf.
You want a reading of 150°F to 155°F (65°C to 68°C). (It will finish coming up to the safe 160°F mark under the broiler and during the resting period).
Carefully pull the baking sheet out of the oven. If there is a pool of rendered fat around the base of the loaf, use a bulb baster or large spoon to remove a few tablespoons so the dish isn’t swimming in oil.
Step 8: Crown with Onions and Cheese
Switch your oven setting to BROIL (High).
Spread your reserved caramelized onions across the top of the hot loaf in an even layer.
Now, blanket the onions and meat with the freshly shredded Gruyère and provolone cheese, letting generous layers cascade naturally down the long sides of the loaf.
Step 9: The Blistered Broiler Finish
Return the baking sheet to the upper-middle rack of the oven, roughly 6 inches away from the broiler heating element.
Watch it through the oven door continuously for 3 to 4 minutes.
You want the cheese fully liquefied, bubbling aggressively, and toasted into deep, golden-brown blisters with charred edges. Remove the pan immediately once the crust matches the deep, caramelized finish in the photo.
Step 10: The Mandatory 12-Minute Rest (The True Secret)
Do not try to carve the meatloaf right now!
If you slice into it while it’s blistering hot, the internal juices will rush straight out onto the pan, leaving the interior dry, and the molten cheese will slide right off the meat.
Let the loaf rest undisturbed in the warm baking dish for 10 to 12 minutes.
During this rest, the muscle fibers relax and pull the savory juices back into the meat, while the bubbling cheese firms up just enough to form an unctuous, sliceable blanket that clings to every cut.
Transfer the rested meatloaf to a wooden carving board using two wide spatulas. Spoon the rich, onion-scented pan juices collected on the tray right over the top and around the base. Scatter finely chopped fresh parsley across the blistered cheese, then carve into thick, generous slices with a sharp chef’s knife.
Practical Troubleshooting & Common Mistakes
- “My cheese turned greasy and separated instead of blistered.”
This happens when home cooks use pre-shredded bagged cheese from a plastic pouch. Bagged cheese is dusted with potato starch and cellulose anti-caking agents that ruin smooth melting. Always buy a solid wedge of real Gruyère and a block of whole-milk provolone and grate them yourself on a box grater. - “The bottom of the meatloaf was soggy.”
This is the classic consequence of pressing meat into a deep loaf pan. The loaf pan traps rendered water and beef fat, boiling the bottom half of the meat. Free-form shaping on a flat rimmed baking sheet lets air circulate around all four sides, creating a savory outer crust while grease drains away naturally. - “The meatloaf crumbled when I tried to serve it.”
This usually means the loaf was sliced blazing hot, or you skipped the panade. The breadcrumb-broth paste is the glue that cushions the meat fibers. Give the loaf its full 12-minute rest on the counter before slicing so the structure stabilizes.
What to Serve with It & Handling Leftovers
A rich, French-onion-style centerpiece pairs naturally with comforting sides that can catch all those flavorful cheese and onion pan drippings:
- Herb-Roasted Carrots: Toss whole carrots in olive oil, thyme, and salt, and roast them on the rack alongside the meatloaf (just like the bowl pictured in the background).
- Garlic Butter Mashed Potatoes: Spoon the savory onion pan juices directly over a steaming mound of Yukon Golds.
- A Crisp Green Salad: Romaine or arugula tossed in a sharp Dijon vinaigrette brings a refreshing, acidic counterpoint to the rich beef and cheese.
If you have leftover slices, wrap them securely in foil and keep them in the refrigerator for up to 4 days.
Cold slices firm up beautifully overnight. For an unforgettable next-day lunch, toast two thick slices of artisan sourdough, warm a slice of meatloaf in a buttered skillet until the cheese gets stretchy again, and slide it between the bread with a smear of coarse Dijon mustard. It tastes like a French dip sandwich and a gourmet patty melt had a baby.