
I still remember the anniversary dinner that nearly drove me to tears over a cast-iron skillet.
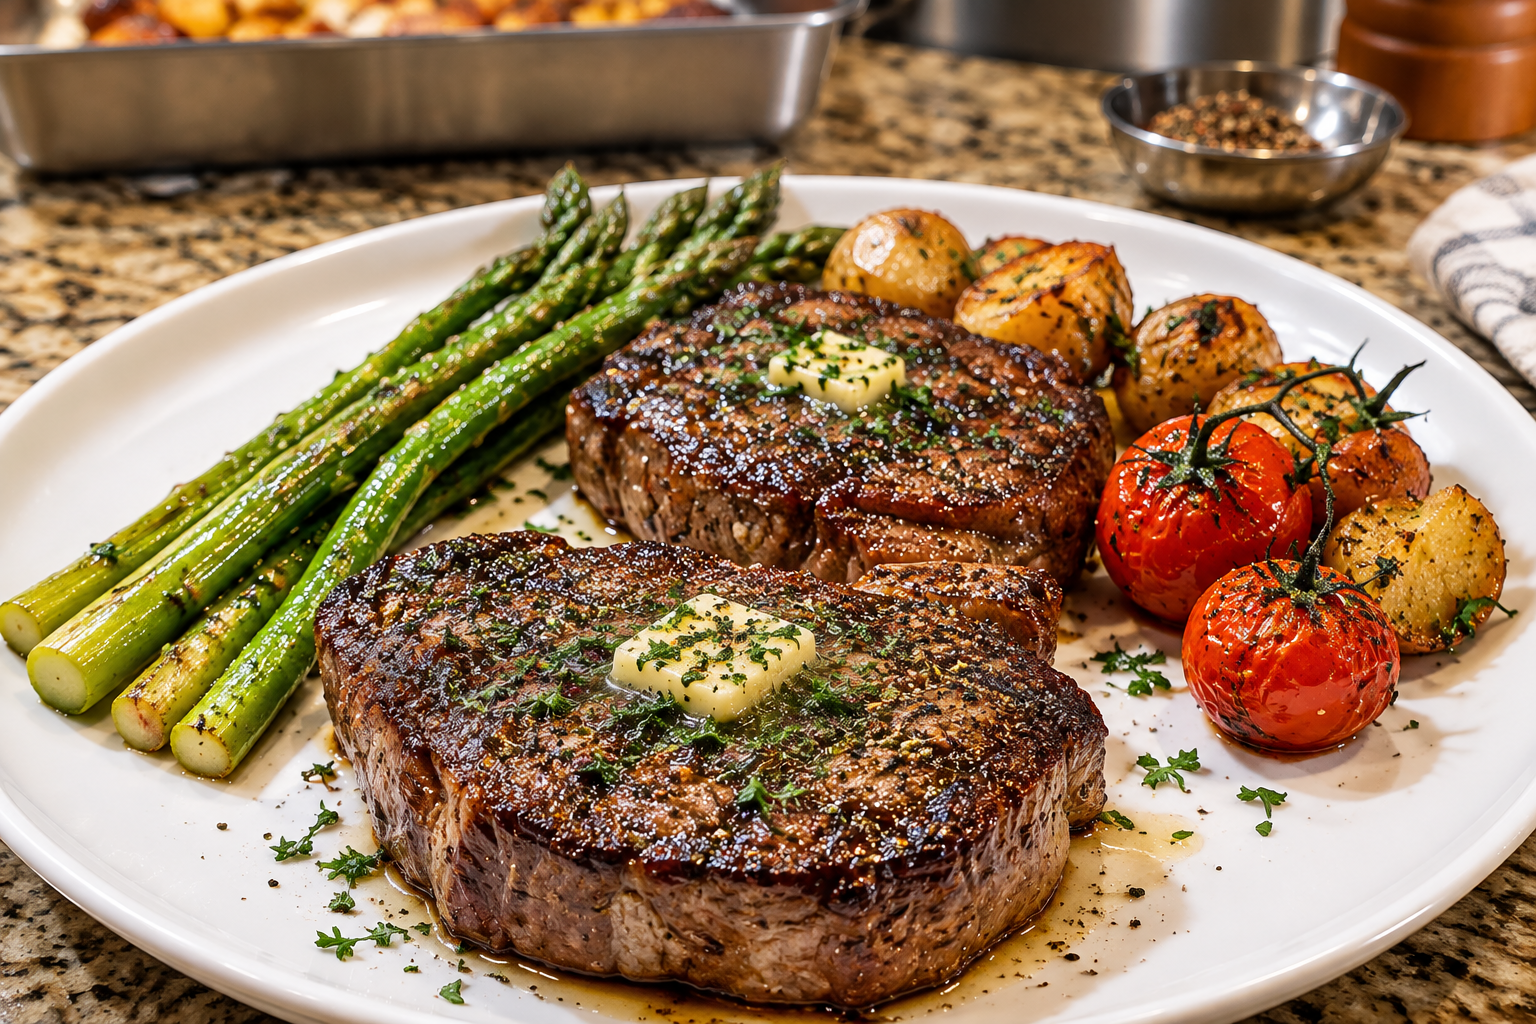
I had dropped a small fortune at our local butcher for two thick-cut, prime boneless ribeyes. I had this picture in my head: deep, cross-hatched sear marks on the outside, a buttery pat of herb compound butter melting lazily over the crust, and an interior that yielded like warm velvet, flanked by bright blistered tomatoes and tender roasted asparagus.
Instead, I set off every smoke detector in our apartment within four minutes.
I had cranked a dry pan to infernal temperatures and dropped fridge-cold steaks straight into it. The olive oil I tossed in immediately scorched into acrid black grease. To avoid burning the outside to charcoal, I panicked, pulled the steaks early, and plated them.
When we sliced into them, it was an absolute tragedy: a thick, chewy grey band of overcooked meat nearly an inch wide around the perimeter, encircling a completely raw, cold, gelatinous purple center that hadn’t rendered an ounce of fat. We ended up microwaving the slices just to make them chewable. I was utterly mortified.
It took me dozens of steaks, extensive experimentation with temperature gradients, and a complete rethink of surface moisture to learn the science of steakhouse perfection.
The photo above is the hard-won outcome: a thick, plump, edge-to-edge medium-rare steak crowned with a melting pat of herb butter, diamond grill marks, tender roasted asparagus, blistered campari tomatoes, and buttery roasted potatoes.
Here is how you make this high-end steakhouse meal at home without turning your kitchen into a smokehouse or ruining expensive beef.
Why Great Steaks Go Wrong at Home
A thick-cut steak is an exercise in heat transfer. Here are the three traps that ruin most home cooks’ efforts:
1. Cooking Meat Straight from the Fridge
Dropping a 38°F (3°C) steak into a hot pan or onto a grill grate causes the surface to seize instantly. The cold interior drags down the pan’s temperature, meaning you end up steaming the meat in its own expelled moisture rather than getting an immediate sear. Tempering the meat on your counter for 45 minutes before it touches heat is essential for even cooking.
2. Moisture on the Surface (The Maillard Killer)
Water boils at 212°F (100°C), while the Maillard browning reaction—the process responsible for that savory, caramelized steak crust—happens between 300°F and 350°F (150°C to 175°C). If your steak has even a microscopic film of surface brine when it hits the heat, the energy goes toward boiling away that liquid instead of searing the meat. A thorough pat-down with paper towels (or an overnight dry-brine in the fridge) is mandatory.
3. High Direct Heat the Entire Time
Blasting a 1.5-inch thick cut with continuous high heat creates the dreaded “bullseye effect”: charred on the outside, a wide ring of overcooked grey meat, and an undercooked core. The solution for thick cuts is the reverse sear or two-zone cooking method: gently bring the interior up to temperature with low, indirect heat, then finish with a blisteringly fast 90-second sear to build that mahogany crust and deep grill marks.
Ingredients & Kitchen Tools
Essential Gear
- Cast-Iron Grill Pan or Outdoor Grill: (A heavy cast-iron grill pan or gas/charcoal grill with clean, preheated grates yields those clean cross-hatched marks seen on the steaks).
- Digital Instant-Read Probe Thermometer: (A ThermoWorks ThermoPop or Dot is non-negotiable; never guess steak doneness by poking it with your finger).
- Baking Sheet with Wire Cooling Rack: For dry-brining and resting the steaks.
- Heavy Tongs: For flipping thick steaks without puncturing the meat fibers and releasing juices.
The Ingredient Breakdown
| Component | Ingredient | Quantity | Practical Role |
| The Star | Thick-Cut Ribeye or NY Strip Steaks | 2 steaks (14 to 16 oz each, 1.5 inches thick) | Thick cuts are mandatory so the center stays pink while the crust chars. |
| Seasoning | Coarse Kosher Salt (Diamond Crystal) | 1.5 tsp per steak | Coarse grains dissolve slowly into the muscle fibers, tenderizing the meat. |
| Seasoning | Coarse Freshly Ground Black Pepper | 1 tsp per steak | Provides a peppery bark that toasts against the hot iron grates. |
| Sear Fat | Beef Tallow, Ghee, or Avocado Oil | 1 to 2 tbsp | High smoke point fats that won’t burn into bitter soot during the sear. |
| Compound Butter | Unsalted Butter (softened) | 4 tbsp (half a stick) | Melts luxuriously into the hot steak crevices right before serving. |
| Compound Butter | Fresh Garlic | 1 clove (finely grated on a microplane) | Infuses the melting butter with fragrant, mellow garlic notes. |
| Compound Butter | Fresh Rosemary & Thyme | 1 tsp each (finely minced) | Herbal steakhouse aromatics that perfume the melted butter pool. |
| Steakhouse Side | Fresh Asparagus | 1 bunch (woody ends snapped) | Plump, tender-crisp vegetable balance tossed in oil and salt. |
| Steakhouse Side | Vine-Ripened Cherry or Campari Tomatoes | 4 to 6 whole on the vine | Roasted until skins blister and sweet juices burst. |
| Steakhouse Side | Baby Dutch Yellow Potatoes | 8 to 10 small (halved or whole) | Roasted until golden-brown and creamy inside. |
Step-by-Step Cooking Instructions
Step 1: Dry-Brine and Temper the Steaks
Take your thick-cut ribeyes out of their packaging.
Use paper towels to pat every single surface completely bone-dry.
Season both sides and the fatty edges generously with coarse kosher salt.
Place the salted steaks on a wire rack set inside a rimmed baking sheet.
Pro-Tip from Experience: If you have time, leave the steaks on this wire rack uncovered in your refrigerator for 4 to 12 hours. The salt dissolves, draws out moisture, penetrates deep into the muscle fibers, and the cold refrigerator air dries out the exterior surface until it looks dark and matte. That dry surface produces an instantaneous, shatteringly crisp sear. If you are short on time, let the salted steaks sit on your kitchen counter for 45 minutes to lose their refrigerator chill.
Step 2: Mix the Garlic Herb Compound Butter
While the steaks temper, make the finishing butter.
In a small bowl, combine the 4 tablespoons of softened unsalted butter with the finely grated garlic clove, minced fresh rosemary, minced thyme, and a pinch of flaky salt.
Mash with a fork until smooth and uniform.
Spoon the butter onto a small sheet of parchment paper or plastic wrap, roll it into a neat log, and twist the ends. Pop it in the fridge for 15 minutes to firm up so you can slice neat circular medallions later.
Step 3: Roast the Potatoes and Veggies
Preheat your oven to 400°F (200°C).
Toss the baby potatoes in a tablespoon of oil with salt and pepper, and roast on a small rimmed pan for 20 minutes until tender and golden.
During the last 10 minutes of potato roasting, add the trimmed asparagus spears and the whole vine tomatoes to the pan. Drizzle with olive oil, salt, and pepper.
Roast until the asparagus is bright green with tender-crisp tips, and the tomato skins split and blister into sweet, jammy pockets. Keep warm.
Step 4: The Low-Heat Oven Rise (Reverse Sear Base)
If your steaks are thick (1.5 inches or more), place the seasoned, room-temperature steaks on a wire rack over a baking sheet and slide them into a 250°F (120°C) oven.
Let them gently warm for 20 to 25 minutes.
Use your digital instant-read thermometer to check the thickest core:
- Target core temp before searing:105°F to 110°F (40°C to 43°C) for a medium-rare finish.
Pull them out immediately. The steaks will look dull and grey on the outside—do not panic! This low-and-slow warmup ensures edge-to-edge pink perfection with zero grey band.
Step 5: The Screaming-Hot Sear & Grill Marks
Now, get your cast-iron grill pan or outdoor grill screaming hot over high heat.
Lightly brush the exterior of the warmed steaks with a high-smoke-point fat (like avocado oil or beef tallow), and season with coarse cracked black pepper.
Lay the steak firmly across the hot grill ridges at a 45-degree angle.
Press down gently with a flat spatula for 5 seconds to guarantee solid contact with the hot iron ridges.
Sear untouched for 60 to 75 seconds.
Using tongs, lift the steak slightly, rotate it 90 degrees on the same side, and set it back down. Sear for another 60 seconds. This rotation is what creates those sharp, diamond-patterned steakhouse cross-hatch marks seen in the reference shot.
Flip the steak over and repeat the exact process on the second side for another 2 minutes total.
Use tongs to hold the steak vertically on its side for 30 seconds to render and crisp the outer strip of white fat.
Step 6: Verify Temperature with Precision
Insert your digital probe thermometer into the dead center of the thickest part of the steak:
- Rare: Pull at 120°F (49°C)
- Medium-Rare (Recommended for Ribeye): Pull at 130°F (54°C)
- Medium: Pull at 140°F (60°C)
Pull the steaks off the heat the second your probe hits 130°F. Carryover heat will gently glide the internal temperature up to that ideal 135°F mark as it rests on the plate.
Step 7: The Herb Butter Crown & Rest
Transfer the steaks onto your warm serving plates or a wooden carving board.
Immediately place a thick slice of your chilled garlic-herb compound butter directly onto the center of each sizzling steak.
Now, step away and let them rest undisturbed for 6 to 8 minutes.
This resting window is critical:
- The internal muscle fibers relax, reabsorbing all the trapped pink juices rather than dumping them across the plate when sliced.
- The residual surface heat melts the compound butter into a rich, glossy pool of garlic and herb fat that cascades over the charred grill marks.
Arrange the roasted asparagus spears, blistered vine tomatoes, and roasted potatoes neatly alongside the resting steaks. Sprinkle a pinch of flaky Maldon sea salt and fresh thyme over the melting butter, and serve immediately.
Practical Troubleshooting & Common Mistakes
- “My grill marks turned into wide, bitter black char.”
This happens when home cooks leave steaks sitting in one spot for three minutes on high heat, or use extra virgin olive oil for searing. Extra virgin olive oil burns at 375°F into bitter smoke. Always use avocado oil, clarified butter (ghee), or beef tallow, and keep your sear intervals to 60–75 seconds per position. - “The center of my ribeye fat cap was chewy and white.”
Ribeyes have a central pocket of fat called the kernel. If you cook a ribeye to rare (under 125°F), that intramuscular fat doesn’t get hot enough to render. A ribeye is always best enjoyed at medium-rare (132°F to 135°F), which gives the marbling enough warmth to melt into buttery tenderness. - “The butter melted and washed off all the crust.”
Never add butter to a searing-hot pan when using the high-heat grill-pan method; the butter solids will scorch black. Add your compound butter only after the steak is on the resting plate so it gently melts down into the crust rather than burning in the pan.
The Perfect Pairing & Handling Leftovers
A steak of this caliber deserves sides that highlight its richness:
- A Bold, Dry Red Wine: A full-bodied Cabernet Sauvignon, Malbec, or Bordeaux cuts right through the rich beef fat and herb butter.
- Warm Sourdough Bread: Perfect for dipping directly into the pool of melted garlic-herb butter and steak juices on the plate.
- Horseradish Cream Sauce: Sour cream mixed with prepared horseradish, Dijon mustard, and chives provides a clean, spicy punch on the side.
If you have leftover steak, wrap it loosely in foil and keep it chilled for up to 3 days.
Never reheat a good steak in the microwave—it will turn the meat grey and rubbery in twenty seconds. Instead, slice the cold steak against the grain into thin ribbons. Enjoy it chilled over a bed of baby arugula with shaved parmesan and lemon juice, or toss the slices into a warm buttered skillet for 60 seconds just to take the chill off before folding into breakfast tacos with scrambled eggs.