
We’ve all had that frantic 6:00 PM moment when the entire household is asking what’s for dinner, you’re staring at a package of ground beef, and the idea of dirtying three pots, a strainer, and a cutting board makes you want to crawl under the covers.
A few years back, on a chaotic Wednesday night, I decided to tackle a “one-pot taco rice skillet.” The recipe video made it look so effortless: brown your meat, dump in uncooked white rice, pour in some broth and salsa, slap a lid on, and walk away for twenty minutes.
It sounded like weeknight salvation.
Instead, it turned into an absolute dinner disaster.
The heat was too high, the pan was too shallow, and the liquid ratio was completely off. Ten minutes in, my smoke alarm started screeching because the rice at the bottom had scorched into an impenetrable, blackened carbon crust welded to the metal.
Meanwhile, when I pulled the lid off, the rice sitting on top was still chalky, raw, and floating in a pool of greasy orange water. My partner tried to be a hero, took a bite, bit directly into an uncooked grain of rice, and quietly pulled out the takeout menus. We ended up eating cold delivery burritos while I soaked my favorite pan in soapy water for two days.
I was furious, but the core promise of a loaded, cheesy Mexican beef and rice skillet was too good to give up on. Who doesn’t want fluffy rice infused with cumin, garlic, and tomato, studded with seasoned ground beef and sweet corn, blanketed in molten, stretchy cheese, and served family-style with cold guacamole, fresh pico de gallo, and sour cream right on the counter?
After dozens of trial runs, tweaking rice-to-liquid ratios, and learning how starch and steam behave in a wide skillet, I cracked the code.
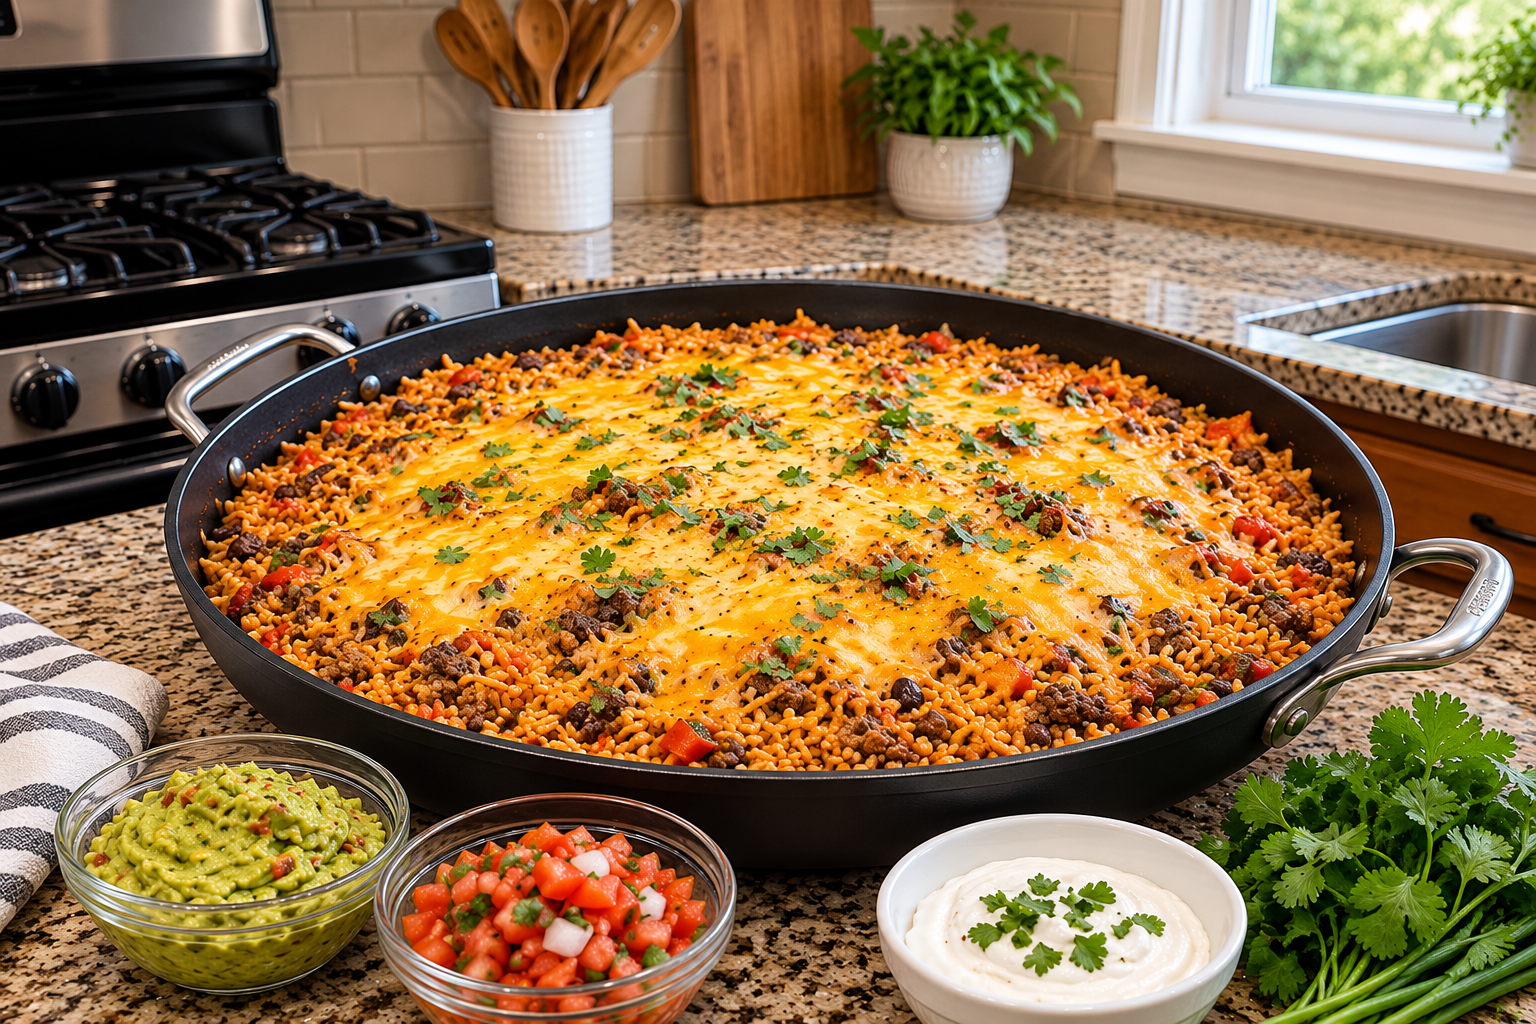
The photo above is the weekly reality in my kitchen: a massive, steaming skillet of perfectly tender, savory taco rice with an edge-to-edge melted cheddar-jack blanket that scoops like a dream, with zero burnt bits on the bottom.
Here is how you make it at home without turning dinner into crunchy baby food or setting off your smoke detector.
Why One-Pot Rice Skillets Go Wrong (The Real Kitchen Physics)
Cooking raw rice directly in a skillet with meat is wildly different from boiling rice in a deep saucepan. If your one-pot rice dishes fail, it’s almost always due to these three culprits:
1. The Evaporation Surface Area Trap
A standard saucepan has a small diameter, meaning steam stays concentrated and forces its way through the grains. A wide 12- or 14-inch skillet has a massive surface area. If your lid doesn’t fit tight, steam escapes rapidly, the liquid boils away prematurely, and the rice on top never gets enough moisture to soften. You need slightly more liquid than a standard rice pot, and a tight-fitting lid (or a sheet of foil clamped beneath the lid) to trap that precious steam.
2. High Direct Heat Scorches Rice Starch
Rice starches are heavy and naturally sink to the bottom of the pan. If you keep your burner at medium or medium-high after adding the rice, those heavy starches caramelize and scorch against the hot metal in minutes. Once you bring the broth to a boil, you must drop the burner to the absolute lowest flame your stove can manage. The pan should be gently whispering, not violently boiling.
3. Untamed Beef Grease
If you use 70/30 or 80/20 ground beef and don’t drain the rendered fat before adding the rice, that grease coats every single grain of dry rice. Fat creates a waterproof barrier that prevents the grains from absorbing water and tomato broth. The result? Greasy, hard, undercooked rice grains. Browning the beef and draining the rendered fat is completely non-negotiable.
Ingredients & Tools You’ll Need
Essential Gear
- 12- to 14-Inch Deep Nonstick Skillet or Everyday Pan: (A wide, deep skillet with dual loop handles, like the one pictured on the stovetop, gives the rice enough room to expand in an even layer without piling too high).
- Tight-Fitting Lid (or Heavy-Duty Aluminum Foil): Essential to lock in steam so the top layer of rice cooks through.
- Meat Chopper or Wooden Spoon: For breaking the ground beef into fine, even crumbles.
- Small Serving Bowls: For setting out your cold toppings—guacamole, fresh pico de gallo, and sour cream.
The Ingredient Breakdown
| Component | Ingredient | Quantity | Practical Purpose |
| The Protein | 85/15 Ground Chuck or Lean Ground Beef | 1.5 lbs (700g) | Great beefy flavor without drowning the pan in rendered oil. |
| The Grain | Long-Grain White Rice (Jasmine or Basmati) | 1.5 cups (uncooked, rinsed) | Stays distinct and fluffy without turning gummy or pasty. |
| Aromatic Base | Yellow Onion | 1 medium (finely diced) | Adds natural sweetness and moisture throughout the beef. |
| Aromatic Base | Fresh Garlic | 4 cloves (minced) | Delivers that savory, aromatic Mexican restaurant backbone. |
| The Spices | Ground Cumin & Chili Powder | 1 tbsp chili powder, 1.5 tsp cumin | Core taco profile that infuses deep color and warmth into the grains. |
| The Spices | Smoked Paprika & Onion Powder | 1 tsp each | Adds gentle smokiness and rounds out the savory profile. |
| The Spices | Dried Oregano | 1 tsp (crushed between fingers) | Earthy herbal note that blooms in the beef fat. |
| The Cooking Liquid | Low-Sodium Chicken or Beef Broth | 2.5 cups | Cooks the rice; using broth instead of water ensures flavor to the core. |
| Tomato Base | Salsa or Chunky Tomato Sauce | 1 cup (your favorite mild or medium) | Delivers concentrated tomato sweetness, acidity, and moisture. |
| Sweet Texture | Canned Black Beans & Sweet Corn (Optional) | ½ cup each (drained) | Adds pops of sweetness and classic fiesta texture. |
| Seasoning | Coarse Kosher Salt & Black Pepper | 1.5 tsp salt, 1 tsp pepper | Essential seasoning across the meat and grains. |
| The Molten Blanket | Shredded Monterey Jack & Sharp Cheddar | 2 cups (freshly shredded) | Melts into a gooey, bubbly mantle that seals in heat. |
| Fresh Herbs | Fresh Cilantro or Scallions | 3 tbsp (chopped) | Adds a bright herbal finish over the melted cheese. |
Step-by-Step Cooking Instructions
Step 1: Rinse Your Rice (Do Not Skip This!)
Measure out your 1.5 cups of long-grain white rice into a fine-mesh strainer.
Run cold water over it for 60 seconds, gently agitating the grains with your fingers until the water draining out the bottom runs completely clear.
Dry, unwashed rice is coated in loose surface starch from the milling process. If you dump unwashed rice into a one-pot skillet, that surface starch turns into glue, guaranteeing a gummy, sticky texture. Rinsing ensures the grains cook up tender, light, and separate. Shake the strainer well and set it aside to drain dry.
Step 2: Brown the Beef and Aromatics
Set your large, deep skillet over medium-high heat on the stovetop.
Add the ground beef. Use your meat chopper or wooden spoon to break the meat apart into bite-sized crumbles. Cook for 5 to 6 minutes until the beef is browned and no longer pink.
Toss in the finely diced yellow onion and cook for another 3 minutes until the onion turns soft and translucent.
Stir in the minced garlic, chili powder, ground cumin, smoked paprika, onion powder, dried oregano, kosher salt, and black pepper. Cook for 60 seconds, letting the spices toast in the hot meat drippings until fragrant.
Tilt your skillet carefully and use a large spoon to remove the pooling grease, leaving just a thin, flavorful coating in the pan.
Step 3: Toast the Rice in the Spices
Turn the burner heat down to medium.
Pour the rinsed, drained rice directly into the skillet with the seasoned beef and onions.
Stir continuously for 2 minutes, letting the raw rice grains mingle with the seasoned beef fat and spices.
Cook’s Pro-Tip: Toasting the rice grains lightly in the pan before adding liquid coats each kernel in a microscopic layer of fat and spice. This not only deepens the nutty flavor of the rice, but it also strengthens the outer hull of each grain so it won’t burst open and turn mushy during the simmer.
Step 4: Add the Liquids and Bring to a Boil
Pour in the 2.5 cups of low-sodium broth and the 1 cup of salsa (plus the drained black beans and corn, if using).
Stir everything together thoroughly, scraping along the bottom of the skillet to loosen any delicious browned bits (fond) stuck to the metal.
Spread the beef and rice mixture out into a completely flat, uniform layer across the bottom of the skillet.
Crank the burner to high just until the liquid reaches a vigorous, rolling boil across the entire surface.
Step 5: The Low-Flame Sealed Simmer
The second the liquid is boiling, drop your burner to the absolute lowest setting.
Cover the skillet with a tight-fitting lid immediately.
Important Real-Life Trick: If your skillet lid has a steam vent hole, or if the lid feels loose, lay a large sheet of aluminum foil over the top of the skillet first, then press the lid down firmly over the foil. This creates an airtight seal that forces all steam to stay trapped inside the pan rather than escaping into your kitchen.
Let it simmer undisturbed for 18 to 20 minutes.
Do not lift the lid! Every time you peek, you let out the pocket of pressurized steam that is actively cooking the top layer of rice. Trust the timer and let the stove do its job.
Step 6: The Quick Fluff and Taste Check
At the 18-minute mark, lift the lid quickly.
Use a fork to gently poke into the center and lift a small mouthful of rice. The liquid should be completely absorbed, and the rice should be tender, fluffy, and plump.
If the rice has just a faint crunch in the very center, but all the liquid is gone, splash in 2 to 3 tablespoons of warm broth, clamp the lid back down, and let it sit on low heat for another 3 to 4 minutes.
Step 7: The Molten Cheese Blanket
Turn off the burner completely.
Sprinkle the 2 cups of freshly shredded Monterey Jack and sharp cheddar cheese evenly across the entire surface of the steaming rice, coating it from edge to edge.
Put the lid back on the skillet and let it sit off the heat for 5 minutes.
The intense residual heat trapped in the heavy skillet will melt the cheese into a thick, glossy, bubbling blanket that stretches with every scoop.
Uncover the pan, scatter fresh chopped cilantro or scallions across the golden cheese, and bring the entire skillet straight to the counter or table for family-style serving.
The Cold Condiment Station (Don’t Skip the Sides!)
A warm, rich skillet of cheesy beef and rice needs cold, acidic, fresh contrasts to truly sing.
Set out three small bowls right next to the hot skillet, just like the setup on the granite counter in the photo:
- Chunky Guacamole: Ripe avocados mashed with lime juice, sea salt, and a pinch of garlic powder bring cool, buttery richness that balances the warm spices.
- Fresh Pico de Gallo: Diced Roma tomatoes, finely minced white onion, chopped jalapeño, and fresh cilantro tossed with fresh lime juice provide a crisp, juicy, acidic snap that cuts through the melted cheese.
- Sour Cream (or Mexican Crema): A smooth, tangy dollop topped with a pinch of fresh herbs cools down the palate and adds creamy luxury to every bite.
Pair these with a basket of salty tortilla chips so everyone can scoop directly from the skillet, or spoon the mixture into warm flour tortillas for lightning-fast burritos.
Practical Troubleshooting & Common Mistakes
- “My rice scorched on the bottom before it was cooked.”
This happens when the burner isn’t low enough, or if you used a thin, cheap pan with hot spots. Skillets with thin bottoms transfer direct flame heat too fast. If your stove burner runs hot even on “Low,” use a heat diffuser plate beneath the pan, or turn the burner completely off at minute 15 and let the residual steam finish cooking the rice with the lid sealed. - “The rice turned mushy and lost its shape.”
This is the result of using short-grain rice, adding too much liquid, or stirring the pan while it was simmering. Never use sticky short-grain rice or arborio for this dish; stick with long-grain white rice. And once the lid goes on in Step 5, leave it alone—stirring warm rice releases starch and turns it into risotto-like porridge. - “Can I use brown rice instead?”
Brown rice requires roughly double the cooking liquid and at least 45 to 50 minutes of simmering time. If you want to use brown rice, you will need to increase the broth to 3.5 cups and keep the lid tightly sealed for 45 minutes, monitoring closely to ensure it doesn’t run dry.
What to Do with Leftovers
If your family doesn’t polish off the entire skillet in one sitting, this rice keeps exceptionally well in an airtight glass container in the refrigerator for up to 4 days.
In fact, the flavors of cumin, garlic, and tomato deepen overnight, making next-day lunches even better.
To reheat, avoid blasting it dry in the microwave. Instead, transfer the rice to a bowl, sprinkle a tablespoon of water or broth over the top, cover loosely with a damp paper towel, and heat gently for 90 seconds. The water will recreate steam, restoring the rice to its original fluffy, tender texture while re-melting the cheese.
You can also roll cold leftovers into large flour tortillas with an extra spoon of salsa, wrap them in foil, and stash them in the freezer for ready-to-go homemade breakfast and lunch burritos.