
I will never forget the chilly, blustery Sunday evening five years ago that nearly caused me to throw my slow cooker out of the second-story kitchen window.
My family was craving the ultimate Southern comfort meal: tender, juicy shredded chicken simmered with carrots, celery, and sweet peas in a rich, velvety herb gravy, topped with tall, flaky, golden-brown buttermilk biscuits. I had seen countless “dump-and-go” recipes online claiming that all you had to do was shred raw chicken into canned cream of chicken soup, pop open a can of refrigerated biscuit dough, tear the raw dough into chunks, drop them right into the liquid, clamp on the heavy lid, and let it cook.
It sounded so effortless, so hands-off, and so comforting that I didn’t doubt it for a second.
When I lifted the slow cooker lid that evening, the scene was an absolute culinary horror show.
The steam trapped beneath the glass lid had rained continuously onto the dough. Instead of tall, golden, flaky biscuits, I was staring at a layer of grey, slimy, gelatinous dough blobs floating in a lukewarm, watery broth.
When I scooped a ladle into a bowl, the outside of the biscuits felt like wet slug skins, while the interior was completely raw, pasty, and doughy. It tasted like flour paste and salty canned soup. My kids poked at their bowls with their spoons, looked at me with genuine concern, and quietly asked if they could just have bowls of dry cereal. I ended up dumping the entire eight-quart crock into the trash, completely defeated and scrubbing sticky raw flour glue out of the ceramic pot.
That messy dinner bugged me for months. A slow-cooker chicken stew should be the holy grail of weeknight comfort food: hearty, aromatic, packed with vegetables, and rich enough to warm you to your bones.
The failure had nothing to do with the chicken or the gravy; it was a fundamental misunderstanding of bread physics. Slow cookers are steam chambers. Bread dough requires dry radiant heat to trigger the Maillard reaction, rise, and form crispy, flaky, golden layers.
Once I figured out the dual-method secret—slow-simmering a deeply seasoned chicken stew from scratch, and baking tall, buttery biscuits to golden perfection in the oven before nestling them directly into the bubbling cream sauce—I unlocked restaurant-level perfection.
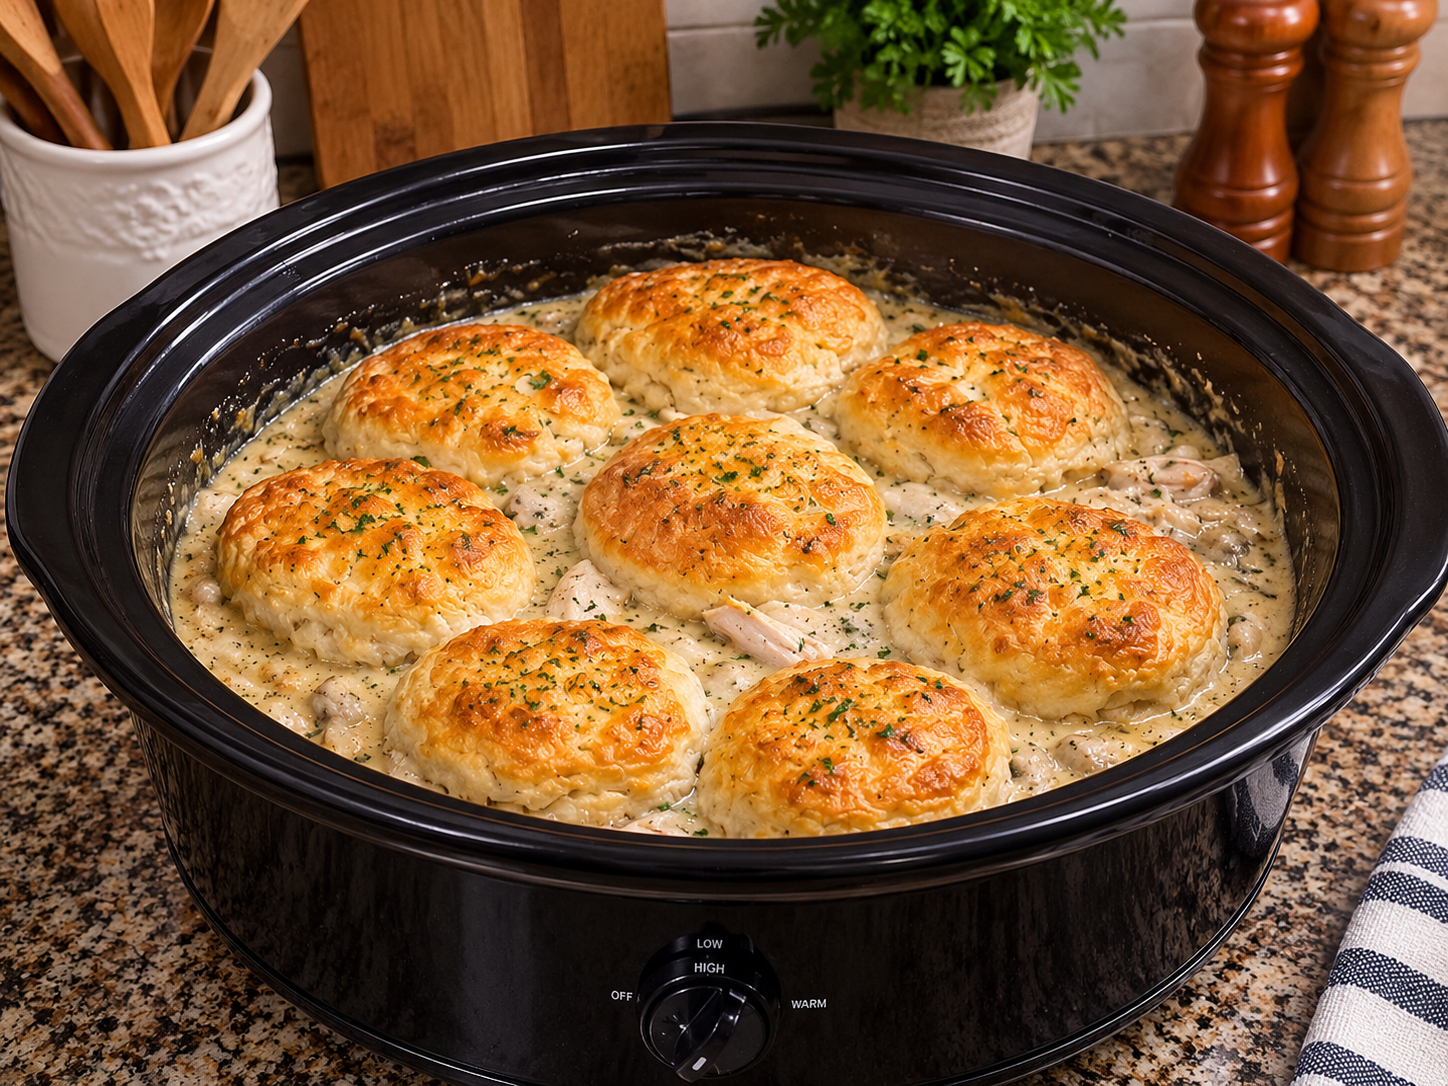
The photo above shows the hard-earned victory sitting on my granite counter: eight tall, flaky, deep-golden buttermilk biscuits resting snugly in an oval slow cooker, floating over a velvety, herb-flecked chicken pot pie stew that is thick, savory, and steaming hot.
Here is how you make this incredible Slow-Cooker Chicken and Biscuits at home without ever facing a gummy, raw biscuit blob again.
Why “Dump-and-Cook” Slow Cooker Biscuits Fail (The Baking Physics)
Understanding how a slow cooker behaves compared to a traditional oven is the secret to mastering this recipe:
1. The Condensation Rain Trap
A slow cooker is a sealed, high-humidity environment. As the chicken and vegetables cook, moisture evaporates, hits the cool underside of the glass lid, condenses into heavy water droplets, and rains continuously back down into the pot. If you place raw biscuit dough into that environment, the falling water droplets instantly dissolve the surface starch, creating a slimy, gummy skin that prevents the dough from rising or developing structure.
2. The Missing Maillard Reaction
Browning requires temperatures above 300°F (150°C) in a dry environment. The air inside a slow cooker rarely exceeds 200°F and is near 100% humidity. Raw dough can cook into a dense boiled dumpling (like chicken and pastry), but it will never brown, crisp, or become flaky. Baking your biscuits in a hot oven while the slow cooker finishes its simmer gives you shatteringly crisp, buttery crusts that can support the heavy stew without disintegrating.
3. The Watery Broth Trap (Condensation Dilution)
Chicken breasts and vegetables release nearly a cup of their own natural juices during a long braise. If you start with a thin liquid, the finished stew will be loose and watery. Building a tight, roux-thickened broth with aromatics, heavy cream, and cornstarch ensures the gravy stays thick, glossy, and spoon-coating, providing a rich cushion for the biscuits to float on.
Ingredients & Tools You’ll Need
Essential Kitchen Gear
- 6- to 7-Quart Oval Slow Cooker: (An oval ceramic slow cooker, like the black unit in the photo, provides a wide surface area so eight large biscuits can sit side-by-side across the top of the stew).
- Rimmed Half-Sheet Baking Pan & Parchment Paper: For baking the biscuits in the oven until tall, flaky, and golden-brown.
- 12-Inch Skillet (Optional but Recommended): For quickly sautéing the mirepoix vegetables before slow-cooking.
- Two Sturdy Dinner Forks or Hand Mixer: For effortlessly shredding the tender braised chicken breasts into juicy, bite-sized ribbons.
- Small Sauce Whisk: For blending the cream and starch slurry smoothly into the stew without lumps.
The Ingredient Breakdown
| Component | Ingredient | Quantity | Practical Role |
| The Star Poultry | Boneless, Skinless Chicken Breasts or Thighs | 2 to 2.5 lbs (approx. 1 kg) | Becomes fork-tender and shreds into succulent, juicy ribbons. |
| Aromatic Mirepoix | Sweet Yellow Onion | 1 large (finely diced) | Melts into the broth, building the sweet, savory flavor foundation. |
| Aromatic Mirepoix | Fresh Carrots | 3 large (peeled and sliced into rounds) | Brings sweet earthiness, color, and tender vegetable bite. |
| Aromatic Mirepoix | Celery Ribs | 3 stalks (sliced) | Traditional savory backbone of classic chicken pot pie. |
| Aromatic Depth | Fresh Garlic Cloves | 4 to 5 cloves (minced) | Delivers punchy, warm aromatics throughout the gravy. |
| The Liquid Base | Low-Sodium Chicken Bone Broth | 2.5 cups | Rich savory stock; low sodium keeps salt levels controlled. |
| Richness Enhancer | Better Than Bouillon Roasted Chicken Base | 1 tbsp | The secret weapon for deep, golden, rotisserie-style flavor. |
| The Velvet Finish | Heavy Whipping Cream | ¾ cup (room temperature) | Transforms the broth into a luxurious, silky pot pie gravy. |
| The Thickener | Cornstarch | 3 tbsp (whisked with 3 tbsp cold water) | Locks the sauce into a glossy, thick gravy that won’t separate. |
| Sweet Veggie Pop | Frozen Sweet Peas & Sweet Corn | 1 cup peas, ½ cup corn (thawed) | Folded in at the end to keep their vibrant green color and snap. |
| Herbal Backbone | Fresh Thyme & Dried Rubbed Sage | 1 tbsp fresh thyme, ½ tsp sage | Earthy, woodsy poultry herbs that perfume the entire house. |
| Base Seasoning | Poultry Seasoning, Kosher Salt, Black Pepper | 1 tsp poultry seasoning, 1.5 tsp salt, 1 tsp pepper | Essential seasoning across the chicken meat and vegetable gravy. |
| The Golden Crown | Jumbo Flaky Buttermilk Biscuits | 1 can (8 count, Pillsbury Grands or scratch-made) | Baked until tall, golden, and flaky; floats atop the stew. |
| The Butter Glaze | Unsalted Butter (melted) | 2 tbsp (brushed on hot biscuits) | Adds a glossy, rich sheen and salted aroma to the crusts. |
| Garnish | Fresh Flat-Leaf Parsley | 2 tbsp (finely chopped) | Sprinkled across the hot stew for a vibrant pop of color. |
Step-by-Step Cooking Instructions
Step 1: Season and Layer the Slow Cooker
Lightly grease the inside ceramic insert of your 6-quart oval slow cooker with nonstick spray or a touch of olive oil.
Scatter your diced yellow onions, sliced celery, and sliced carrots across the bottom of the crock to create an aromatic vegetable bed.
Pat your chicken breasts completely dry with paper towels.
In a small bowl, mix together the poultry seasoning, dried rubbed sage, 1.5 teaspoons of coarse kosher salt, and 1 teaspoon of freshly cracked black pepper.
Rub the seasoning blend evenly over both sides of the chicken breasts.
Lay the seasoned chicken directly on top of the bed of vegetables.
Step 2: Pour the Savory Herb Broth
In a glass measuring cup, whisk together:
- 2.5 cups of low-sodium chicken bone broth
- 1 tablespoon of Better Than Bouillon roasted chicken base
- 4 minced garlic cloves
- 1 tablespoon of fresh chopped thyme leaves
Pour the seasoned broth mixture directly over the chicken and vegetables in the slow cooker.
The liquid should come about halfway up the sides of the chicken breasts—it should not completely submerge them.
Cook’s Real-Life Tip: Resist the urge to add more broth! The chicken breasts and vegetables will naturally release nearly a cup of flavorful juices as they braise. Starting with too much liquid will leave your finished sauce thin and watery.
Step 3: The Low-and-Slow Braise
Clamp the heavy lid onto the slow cooker.
- Low Setting (Strongly Recommended): Cook for 5 to 6 hours.
- High Setting: Cook for 3 to 3.5 hours.
Important Cook’s Rule: Keep the lid closed! Every time you lift the lid during the first four hours of cooking, you vent trapped steam and drop the internal temperature, adding 15 to 20 minutes to your cooking time.
At the 5-hour mark on Low, test a chicken breast with a fork: it should yield effortlessly with zero resistance.
Step 4: Shred the Chicken and Thicken the Gravy
Use metal tongs to transfer the cooked chicken breasts onto a large cutting board.
Using two dinner forks, shred the meat into thick, succulent, bite-sized ribbons.
Cover the shredded chicken loosely with foil so it stays warm and juicy.
Now, thicken the cooking liquid inside the slow cooker:
Turn your slow cooker setting to HIGH.
In a small ramekin, whisk together 3 tablespoons of cornstarch with 3 tablespoons of cold water until you have a smooth, milky slurry with zero lumps.
Pour the cornstarch slurry directly into the hot, bubbling broth in the slow cooker, whisking continuously with a small sauce whisk to incorporate.
Pour in the ¾ cup of heavy whipping cream.
Stir well. Leave the slow cooker uncovered on High for 15 to 20 minutes, stirring every few minutes.
You will watch the thin liquid transform into a luxurious, glossy, ivory-tinted pot pie gravy that easily coats the back of a wooden spoon.
Fold your shredded chicken, thawed sweet peas, and sweet corn directly back into the thickened gravy.
Stir gently to combine. The residual heat will warm the peas and corn through to tender perfection in less than three minutes while preserving their bright, vibrant colors.
Step 5: Bake the Golden Biscuits (The Secret to Zero Slime)
While the gravy thickens during Step 4, preheat your conventional oven to 375°F (190°C).
Line a rimmed baking sheet with parchment paper.
Arrange your 8 jumbo buttermilk biscuits on the baking sheet, leaving about two inches of space between each biscuit so the hot oven air can circulate around the sides.
Slide the baking sheet into the oven and bake for 13 to 16 minutes (according to package directions) until the biscuits have risen tall, the layers are flaky, and the tops are a deep, rich golden-brown.
Pull the hot biscuits out of the oven.
Immediately brush the tops generously with 2 tablespoons of melted unsalted butter.
Sprinkle a tiny pinch of flaky sea salt or dried parsley over the buttery tops.
Step 6: Nestle and Table Presentation
Switch your slow cooker to the “WARM” setting.
Now comes the show-stopping moment (exactly as shown in the reference photo):
Using your hands or metal tongs, gently take each freshly baked, hot, golden biscuit and nestle it directly onto the surface of the steaming, creamy chicken stew.
Arrange them snugly side-by-side in a circular pattern: six around the perimeter and two in the center, so the entire top of the oval crock is crowned in golden, flaky pastry.
Press down very gently so the bottom quarter-inch of each biscuit drinks in a little bit of the warm, velvety gravy, while the tall, flaky, buttery domes stay high, dry, and crisp.
Scatter finely chopped fresh flat-leaf parsley across the stew and between the golden biscuits for a vibrant herbal pop.
Bring the entire black slow cooker directly to the dining table!
How to Serve
This dish is pure homestyle warmth.
To serve, use a large soup ladle or wide serving spoon:
- Lift a whole, golden-crusted biscuit from the top and set it into a wide, shallow dinner bowl.
- Ladle two generous scoops of the steaming, creamy chicken, tender carrots, sweet peas, and velvety herb gravy all around and slightly over the base of the biscuit.
- Serve immediately while steaming hot.
When you cut into the biscuit with your fork, listen for that crisp, buttery crunch on top, followed by the pillowy, soft interior that soaks up every drop of rich, garlicky chicken gravy.
Practical Troubleshooting & Common Mistakes
- “My gravy turned out too thin and runny.”
This happens if you used too much broth at the beginning, or if you didn’t let the cornstarch slurry bubble on the High setting. Cornstarch requires boiling heat (above 200°F) to fully activate its thickening power. Whisk in an extra tablespoon of cornstarch mixed with cold water, leave the lid off on High, and let it bubble for 10 minutes until thick. - “The biscuits turned soggy after an hour on the buffet.”
If you are serving this for a party or game-day gathering where people eat over several hours, do not place all the biscuits into the slow cooker at once! Leave the biscuits on a warm platter next to the slow cooker. Let guests ladle the hot creamy chicken stew into their bowls and grab a fresh, crispy biscuit to place on top themselves. - “The chicken breasts tasted dry or stringy.”
Chicken breasts will dry out if cooked on High for five or six hours. Lean poultry should be cooked on the Low setting for 5 to 6 hours for maximum tenderness. If you prefer even juicier meat that never dries out, swap the chicken breasts for boneless, skinless chicken thighs!
Delicious Upgrades & Variations
While the classic chicken pot pie flavor profile is unbeatable, this slow-cooker setup is remarkably versatile:
- The Cheddar-Garlic Drop Biscuit Twist: Instead of canned buttermilk biscuits, mix up a batch of homemade cheddar-bay drop biscuits with shredded sharp cheddar and garlic powder. Bake them until crisp and float them over the chicken.
- The Bacon & Mushroom Pot Pie: Sauté 8 ounces of sliced cremini mushrooms and 4 strips of chopped bacon in a skillet, then add them to the slow cooker alongside the chicken and vegetables for an incredible earthy, smoky depth.
- The Roasted Turkey Leftover Savior: Have leftover Thanksgiving turkey? Skip the raw chicken braise. Simmer the vegetables and broth in the slow cooker for 3 hours, stir in 3 cups of shredded cooked turkey and the cream slurry for 30 minutes, and top with hot biscuits.
What to Serve Alongside
Because this one-pot meal combines protein, vegetables, rich gravy, and warm bread all in a single scoop, it is a complete dinner on its own. However, a couple of light sides balance the rich creaminess:
- A Crisp, Peppery Green Salad: Baby arugula, torn romaine, and sliced radishes tossed in a sharp lemon-dijon vinaigrette provide an acidic, crisp crunch that cleanses the palate between rich bites.
- Roasted Asparagus or Steamed Broccoli: Simply seasoned with olive oil, sea salt, and black pepper, snappy green vegetables offer a clean contrast to the creamy pot pie filling.
- A Chilled Dry White Wine: A crisp glass of un-oaked Chardonnay, Pinot Grigio, or Sauvignon Blanc cuts right through the heavy cream and rich butter.
Storing and Reheating Leftovers
If you have leftovers, store the biscuits and the chicken stew separately!
If you leave the biscuits submerged in the gravy inside the refrigerator, they will absorb liquid overnight and turn into mush.
- The Chicken Stew: Transfer the creamy chicken and vegetables into an airtight glass container and store in the refrigerator for up to 4 days.
- The Biscuits: Store leftover baked biscuits in a sealed ziplock bag at room temperature for up to 2 days.
How to Reheat:
- Scoop your desired portion of chicken stew into a small saucepan over medium-low heat. Splash in 2 to 3 tablespoons of milk or chicken broth to loosen the chilled gravy, stirring gently until hot and bubbling.
- Pop your leftover biscuit into a toaster oven or standard oven at 350°F (175°C) for 4 to 5 minutes until the crust is warm, flaky, and crisp again.
- Ladle the hot chicken stew into your bowl, set the freshly crisped biscuit right on top, and enjoy comfort food that tastes just as magical as day one!