
I will never forget the chilly Sunday afternoon four years ago that nearly made me swear off cooking whole cabbage meals for the rest of my life.
I was attempting to recreate a hearty, peasant-style stuffed cabbage dinner for my family: tender, sweet braised cabbage leaves wrapped around a succulent, seasoned meat filling, baked in rich juices, and blanketed under a bubbling, golden crust of melted cheese.
I thought I could just rush it. I bought two small green cabbages, hacked off the top thirds, hollowed out the centers with a melon baller like carved pumpkins, crammed raw ground meat and rice straight into the cavities, poured two cans of tomato sauce over the top, tossed on some pre-shredded cheese, and threw the whole glass dish into a hot oven.
An hour later, I pulled out an unmitigated kitchen tragedy.
The raw cabbage walls hadn’t softened into buttery tenderness at all—they had sweated an enormous lake of water directly into the bottom of the dish, diluting the tomato sauce into a pale, acidic pink broth. Because cabbage is dense and fibrous, the outer leaves were tough, leathery, and rubbery, while the cheese on top had melted, burned, and slid right off into the watery mess below.
Worse yet, the ground meat inside had shrunk into a hard, dense ball that hadn’t cooked through evenly. When my partner cut into one with a steak knife, the tough cabbage leaf sprang back, splashing hot pink cabbage water all over their clean shirt. We ended up ordering pizza, and I spent twenty minutes scraping scorched cheese off the corners of my baking pan.
That flop drove me crazy. Cabbage is one of the most economical, flavorful, and nutrient-dense vegetables you can cook with. When treated with the right technique, its sharp, cruciferous bite breaks down into sweet, melt-in-your-mouth comfort food.
The breakthrough came when I realized three key facts: you must par-steam or blanch the cabbage bowls first so the sturdy outer leaves become pliable, you must pre-cook and season the meat filling so it doesn’t shrink into a dry lump, and you have to bake the stuffed bowls tightly covered with foil before finishing them uncovered under the broiler for that gorgeous, blistered cheese crust.
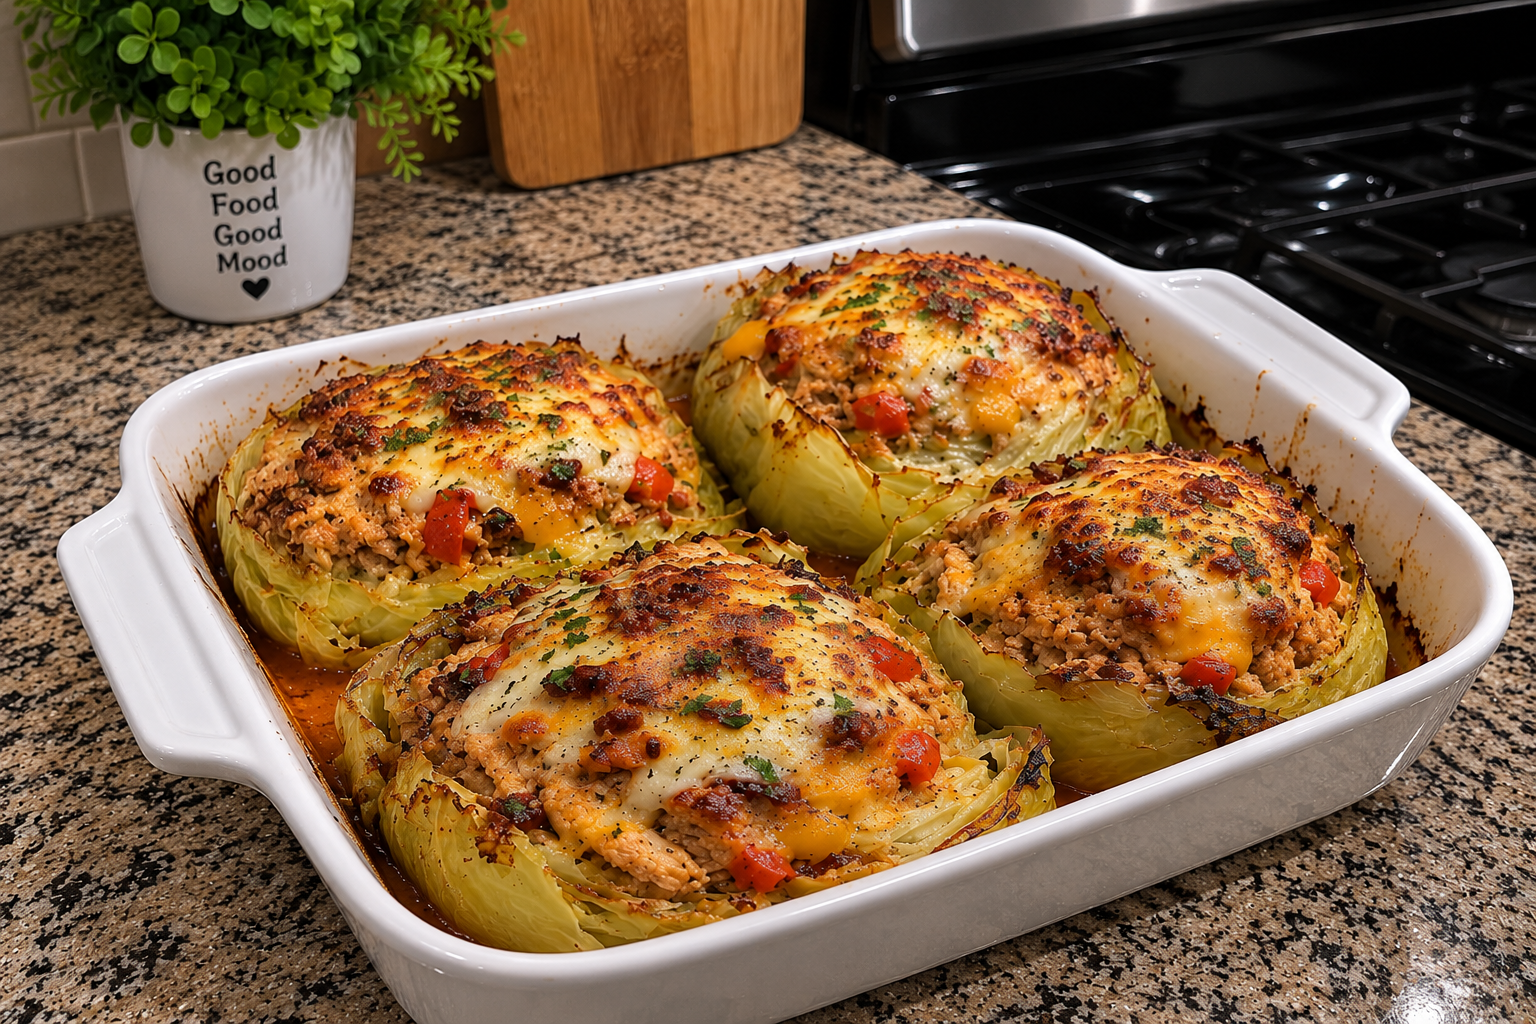
The photo above is the hard-earned victory sitting on my granite counter: four individual baked cabbage bowls nestled snugly in a white ceramic roasting dish, bursting with juicy shredded poultry or seasoned ground meat, sweet diced tomatoes, and aromatic herbs, crowned with a bubbly, blistered, golden-brown blanket of melted cheese that pulls into luscious strings with every single forkful.
Here is how you make these stunning Cheesy Stuffed Cabbage Bowls at home without ending up with tough leaves or a watery puddle.
Why Stuffed Cabbage Bowls Fail (The Moisture & Fiber Science)
Cabbage is not like a bell pepper or zucchini. It has dense, multi-layered cellulose walls that react very differently to heat and moisture. When stuffed cabbage dishes go wrong, it usually comes down to three common traps:
1. The Water Reservoir Problem
Green cabbage is roughly 92% water by weight. In an enclosed oven, as the cellular walls heat up, the cabbage dumps that liquid outward. If you put raw ground meat inside raw cabbage, all that expelled water washes away your seasonings and turns your sauce into a soupy mess. Giving your hollowed cabbage bowls a quick 5-minute par-steam in salted boiling water breaks the tension in the thick veins, removes raw bitter sulfur compounds, and expels the excess surface water before you stuff and bake.
2. The Dense Meat Shrinkage
If you cram raw, unseasoned ground meat tightly into a vegetable cavity, the meat proteins contract as they cook, squeezing out juices and fat. The meat shrinks into a dense, chewy hockey puck, leaving a gaping hollow gap between the meat and the cabbage walls. Sautéing your meat with onions, garlic, and a splash of tomato base beforehand—or mixing it with a cooked starch like rice or breadcrumbs and an egg binder—guarantees a tender, juicy filling that stays packed edge-to-edge.
3. The Burnt Cheese / Tough Cabbage Mismatch
Cabbage requires sustained, moist heat to braise into that silky, fork-tender texture (usually 35 to 45 minutes). Cheese, on the other hand, melts in eight minutes and burns in fifteen. If you put the cheese on at the beginning, you are forced to choose between burnt, rubbery cheese or raw, crunchy cabbage. The two-stage bake solves this: bake the stuffed cabbage bowls tightly covered with foil so trapped steam tenderizes the vegetable, then uncover, pile on freshly grated cheese, and bake until molten, bubbly, and toasted.
Ingredients & Tools You’ll Need
Essential Kitchen Gear
- 9×13-Inch Deep Ceramic or Enamel Baking Dish: (A sturdy rectangular white dish, like the one in the photo, holds heat gently and supports the cabbage bowls so they don’t tip over while baking).
- Large 6- to 8-Quart Stockpot: For par-steaming or blanching the hollowed cabbage heads.
- 12-Inch Skillet: For browning the meat and building the aromatic filling.
- Melon Baller or Curved Paring Knife: The easiest tool to carve out the inner core of the cabbage without puncturing the bottom base.
- Box Grater: For shredding blocks of whole-milk mozzarella and sharp cheddar so they melt into that blistered, golden crust.
The Ingredient Breakdown
| Component | Ingredient | Quantity | Practical Role |
| The Edible Bowls | Small Green Cabbages or Savoy Cabbages | 2 heads (approx. 1.5 to 2 lbs each, halved) | Sweet, tender vegetable vessels that hold the hearty filling. |
| The Savory Meat | Ground Chuck (85/15) or Shredded Chicken/Turkey | 1.5 lbs (700g) | Rich, juicy protein base that anchors the flavor. |
| Aromatic Base | Sweet Yellow Onion | 1 medium (finely diced) | Sautéed in olive oil to build natural sweetness and moisture. |
| Aromatic Punch | Fresh Garlic | 5 cloves (minced) | Delivers robust, savory depth to the meat and pan juices. |
| The Veggie Filling | Sweet Bell Pepper (Red or Orange) | 1 medium (finely diced) | Adds sweet crunch, color flecks, and extra moisture to the core. |
| The Tomato Binder | Crushed San Marzano Tomatoes | 1 can (14 oz, divided) | Keeps the filling juicy and forms the savory pan juices at the bottom. |
| Tomato Engine | Tomato Paste | 2 tbsp | Concentrated tomato umami that thickens the filling and prevents runniness. |
| The Tender Grain | Cooked White Rice or Riced Cauliflower | 1 cup (cooked) | Absorbs internal meat drippings, keeping the filling soft and fluffy. |
| Savory Boosters | Worcestershire Sauce | 1.5 tbsp | Adds fermented umami depth that elevates the meat flavor. |
| Herbal Backbone | Italian Seasoning & Smoked Paprika | 1 tbsp Italian blend, 1 tsp paprika | Classic aromatic warmth that blooms in the hot pan drippings. |
| Cooking Fat | Extra Virgin Olive Oil & Butter | 2 tbsp oil, 2 tbsp butter (divided) | Sauté medium for aromatics; butter enriches the cabbage edges. |
| The Cheese Blanket | Whole-Milk Mozzarella & Sharp Cheddar | 2 cups (freshly shredded, mixed) | Melts into that glorious, gooey, blistered mantle seen in the photo. |
| Base Seasoning | Coarse Kosher Salt & Black Pepper | 1.5 tsp salt, 1 tsp coarse cracked black pepper | Crucial seasoning across the cabbage bowls, filling, and sauce. |
| Fresh Finish | Fresh Italian Flat-Leaf Parsley | 2 tbsp (finely chopped) | Sprinkled across the hot cheese for color and herbal lift. |
Step-by-Step Cooking Instructions
Step 1: Prep and Hollow the Cabbage Bowls
Peel off and discard the two tough, discolored outer leaves of each cabbage.
Rinse the heads under cold water and pat dry.
Set each cabbage stem-side down on your cutting board. Slice each cabbage clean in half horizontally across the middle to create four round cabbage halves.
Trim a very thin sliver off the rounded bottom of each half if necessary, just enough so they sit flat on your cutting board without wobbling.
Now, hollow out the center:
- Using a small, sharp paring knife, cut a circle into the cut face of each cabbage half, leaving a sturdy ½-inch to ¾-inch thick wall of cabbage leaves all the way around the perimeter.
- Use a melon baller or a sturdy metal spoon to scoop out the dense inner leaves and core, creating a deep bowl cavity.
- Be careful not to scoop through the bottom base! You want a solid cup that holds the meat securely.
- (Finely chop about 1 cup of the scooped-out cabbage leaves to fold into the meat filling in Step 3; save the rest for a quick coleslaw or soup).
Step 2: The 5-Minute Par-Steam (The Anti-Rubber Trick)
Bring your large 6-to-8-quart stockpot of water to a rolling boil over high heat with 1 tablespoon of coarse kosher salt.
Carefully lower the four hollowed cabbage bowls into the boiling water using tongs.
Par-boil for 4 to 5 minutes.
You do not want them fully cooked!
You simply want the boiling water to soften the dense outer ribs, making the leaves pliable, supple, and bright vibrant green.
Use tongs to gently lift the cabbage bowls out of the boiling water, turning them upside-down over the pot to drain trapped water from the cavity.
Set them upside-down on a double layer of paper towels or a clean kitchen towel to drain and dry for 5 minutes.
Season the inside of each hollowed bowl with a light pinch of kosher salt and cracked black pepper.
Step 3: Sauté the Savory Filling
Place your 12-inch skillet over medium-high heat with 1 tablespoon of olive oil.
Add your 1.5 pounds of ground meat (or ground turkey/chicken) and finely diced yellow onion.
Break the meat apart into fine, even crumbles with a wooden spoon or meat chopper.
Cook for 5 to 6 minutes until the meat is browned and the onions are soft and translucent.
Add the diced bell pepper, 1 cup of the finely chopped leftover cabbage, and the minced fresh garlic.
Cook for another 3 minutes, stirring frequently, until the peppers soften slightly.
Tilt the skillet and spoon off any excess rendered grease.
Turn the burner heat down to medium-low.
Add the 2 tablespoons of tomato paste, 1 tablespoon of Italian seasoning, 1 teaspoon of smoked paprika, 1.5 teaspoons of kosher salt, and 1 teaspoon of cracked black pepper.
Stir the spices and tomato paste directly against the hot pan for 90 seconds to bloom their aromatic oils and cook out the raw tinny flavor.
Pour in ½ cup of the crushed tomatoes and the 1.5 tablespoons of Worcestershire sauce.
Stir in the 1 cup of cooked rice.
Simmer gently for 2 minutes until the filling is thick, glossy, and tightly bound. Remove from heat.
Step 4: Assemble the Casserole Dish
Preheat your oven to 375°F (190°C).
Take your 9×13-inch ceramic baking dish.
Pour the remaining crushed tomatoes (about ¾ cup) across the bottom of the dish, spreading it into a thin, even layer.
Splash in ¼ cup of water or chicken broth and a pinch of salt.
This bottom liquid creates a gentle steam bath in the oven, keeping the underside of the cabbage moist while developing a rich, spoonable tomato jus.
Arrange the four par-steamed cabbage bowls upright in the baking dish, nestling them snugly side-by-side (exactly as seen in the photo).
Using a large spoon, pack the warm, seasoned meat filling generously into each cabbage cavity.
Mound the filling slightly above the rim of the cabbage walls, pressing it down gently so it fills every crevice.
Dot a tiny pat of butter (about ½ teaspoon) on the exposed cabbage leaf rims of each bowl to keep them tender and rich.
Step 5: The Steamed Foil Bake
Tear off a sheet of heavy-duty aluminum foil.
Lightly mist the underside with nonstick cooking spray so it doesn’t catch on the filling.
Cover the ceramic baking dish tightly with the foil, crimping the edges firmly around the rim to seal in all the steam.
Slide the dish onto the center rack of your preheated 375°F (190°C) oven.
Bake covered for 35 minutes.
Why This Step Is Non-Negotiable: The tightly trapped steam forces the hot tomato juices and aromatic butter through the thick cabbage leaf walls. This breaks down tough plant fibers until the cabbage turns as tender as braised buttered greens, while heating the meat filling through to piping-hot temperature.
Step 6: The Molten Cheese Crown & Broiler Char
Carefully pull the baking dish out of the oven using heatproof mitts and remove the foil (watch out for escaping hot steam!).
Test the cabbage wall with the tip of a paring knife: it should slide into the thickest outer leaf with gentle ease.
Now, blanket the top of each stuffed cabbage bowl with your freshly shredded mozzarella and sharp cheddar cheese blend—about ½ cup of cheese per bowl.
Make sure the cheese covers the exposed meat mound completely and drapes slightly over the outer cabbage leaves to create that sealed, golden-brown crust.
Return the dish to the oven uncovered for 8 to 10 minutes until the cheese is completely melted and bubbling around the sides.
Now, switch the oven setting to BROIL (High) for 2 to 3 minutes.
Keep your eyes glued to the oven window!
The direct radiant heat from the broiler will cause the mozzarella and cheddar to puff up violently, toasting into those gorgeous, savory, dark-golden blisters seen in the reference photo.
Pull the baking dish out the second the cheese looks blistered and bronzed.
Step 7: The Mandatory 5-Minute Rest and Serving
Set the hot ceramic baking dish on a wooden cutting board or heatproof trivet.
Scatter finely chopped fresh Italian parsley across the bubbling melted cheese for a vibrant green herbal pop.
Cook’s Real-Life Tip: Do not attempt to scoop or cut into these bowls right out of the oven!
Straight from under the broiler, the melted cheese is molten liquid, and the cabbage bowls are holding intense internal steam.
If you try to serve them right now, the cheese will run off and the cabbage leaves can slip.
Let the dish rest undisturbed on the counter for 5 to 7 full minutes.
During this short pause:
- The melted cheese sets just enough into a rich, gooey, stretchy blanket that clings securely to the cabbage walls.
- The cabbage leaves absorb the surrounding tomato pan juices, becoming completely fork-tender.
- The interior filling settles into a firm, juicy cake that cuts cleanly under a knife and fork.
Use a flat metal spatula to lift an entire stuffed cabbage bowl out of the dish, transferring it directly into a shallow dinner bowl or wide plate.
Spoon two to three tablespoons of the rich tomato pan juices from the bottom of the dish right over the cabbage.
Serve hot and enjoy that incredible combination of sweet, tender cabbage, savory seasoned meat, and blistered, gooey cheese!
Practical Troubleshooting & Common Mistakes
- “The cabbage leaves were tough and chewy.”
This happens if you skipped the 5-minute par-steam in boiling water, or if you didn’t seal the baking dish tightly with foil. Cabbage needs trapped steam to break down its tough cellulose. Always blanch first, and ensure your foil seal is airtight during the first 35 minutes of baking. - “The bottom of the dish was flooded with watery liquid.”
This is the hallmark of stuffing wet cabbage. After par-boiling, always invert the cabbage bowls on clean towels to drain out trapped water. Additionally, make sure you cook your meat filling until thick rather than adding watery canned sauces directly into the cavity. - “The cheese burned before the cabbage got tender.”
Never add the cheese at the start of baking! Cheese can only handle 8 to 10 minutes of direct heat before drying out and burning. Always bake the cabbage covered first, and add the cheese only for the final uncovered finish.
Delicious Upgrades & Variations
While this Italian-American beef and mozzarella version is the ultimate weeknight comfort meal, this cabbage bowl technique works with endless flavor combinations:
- The Low-Carb Keto Version: Swap the cooked rice for riced cauliflower or extra sautéed mushrooms. Use 80/20 ground beef or Italian sausage, and increase the cheese topping.
- The Mediterranean Lamb Twist: Swap the ground beef for ground lamb seasoned with cumin, coriander, cinnamon, and fresh mint. Top with a mix of mozzarella and salty crumbled feta cheese.
- The Buffalo Chicken Stuffed Cabbage: Shred cooked chicken breast and toss with buffalo hot sauce, cream cheese, and diced celery. Stuff the cabbage bowls, top with Monterey Jack and blue cheese crumbles, and bake until bubbly.
What to Serve with Cheesy Stuffed Cabbage Bowls
These hearty, all-in-one stuffed cabbage bowls deliver protein, vegetables, and complex carbohydrates in a single serving, but they pair beautifully with simple, classic sides:
- Crusty Garlic Bread or Warm Sourdough: Mandatory for swiping through the bottom of the ceramic dish to soak up every drop of that savory tomato-cabbage broth.
- A Crisp Green Garden Salad: Crisp romaine lettuce, sliced cucumbers, and radishes tossed in a bright red-wine vinaigrette or lemon dressing provide a sharp, refreshing crunch that cleanses the palate between rich bites.
- Roasted Garlic Mashed Potatoes: For the ultimate comfort meal, set a whole stuffed cabbage bowl right into a shallow mound of buttery mashed potatoes and spoon the pan juices over everything.
- A Medium-Bodied Red Wine: A glass of Chianti Classico, Sangiovese, or Merlot cuts cleanly through the rich melted cheese and balances the sweet, braised cabbage.
Storing and Reheating Leftovers
If you have leftover stuffed cabbage bowls, let the ceramic dish cool completely to room temperature.
Transfer individual cabbage bowls into airtight glass containers and store in the refrigerator for up to 4 days.
Because cabbage holds its structure well when properly braised, these bowls reheat remarkably well without turning to mush.
When reheating, avoid blasting them dry in the microwave on high power.
Instead, use your oven or toaster oven:
- Place a leftover cabbage bowl in a small oven-safe dish.
- Spoon 2 tablespoons of water or chicken broth into the bottom of the dish to create steam.
- Cover loosely with aluminum foil and warm at 350°F (175°C) for 15 minutes until heated through to the center.
- Remove the foil for the final 2 minutes so the cheese melts and stretches again.
The cabbage stays fork-tender, the meat filling remains juicy, and you get to enjoy all the deep comfort of homemade stuffed cabbage with practically zero effort!