
Introduction: When a Romantic Evening Goes Sideways in the Kitchen
Let me take you back to a disastrous wedding anniversary a couple of years ago. I wanted to pull out all the stops and cook an expensive, high-end seafood dinner at home to impress my partner. I splurged on four gorgeous lobster tails and a couple of pounds of large, beautiful shrimp from our local fish market. I felt like a top-tier chef carrying those brown paper bags out of the shop.
Fast forward an hour later, and my kitchen looked like a disaster zone filled with white smoke, panic sweat, and the heartbreaking smell of scorched shellfish.
What went wrong? Absolutely everything. I didn’t thaw the lobster tails properly, I threw them into a pan that wasn’t nearly hot enough, and my homemade garlic butter sauce completely separated into an ugly, greasy yellow slick because I let it boil too hard.
When we finally sat down to eat, the lobster was tough and rubbery like an old boot, the shrimp were shriveled up into tiny question marks, and the garlic was burnt black and tasted bitter. My partner chewed slowly, smiled a very forced smile, and gently asked if we had any leftover takeout in the fridge.
Talk about a humbling experience! I threw the ruined seafood into the trash, poured myself a very large glass of wine, and sat on the couch feeling thoroughly defeated.
That kitchen catastrophe bruised my ego, but it also lit a fire under me. I refused to let seafood intimidate me ever again. I spent the next few weeks treating my kitchen like a food laboratory—testing different pans, experimenting with heat levels, figuring out how to keep butter from breaking, and learning how to achieve that gorgeous, restaurant-style pan sear you see in food magazines.
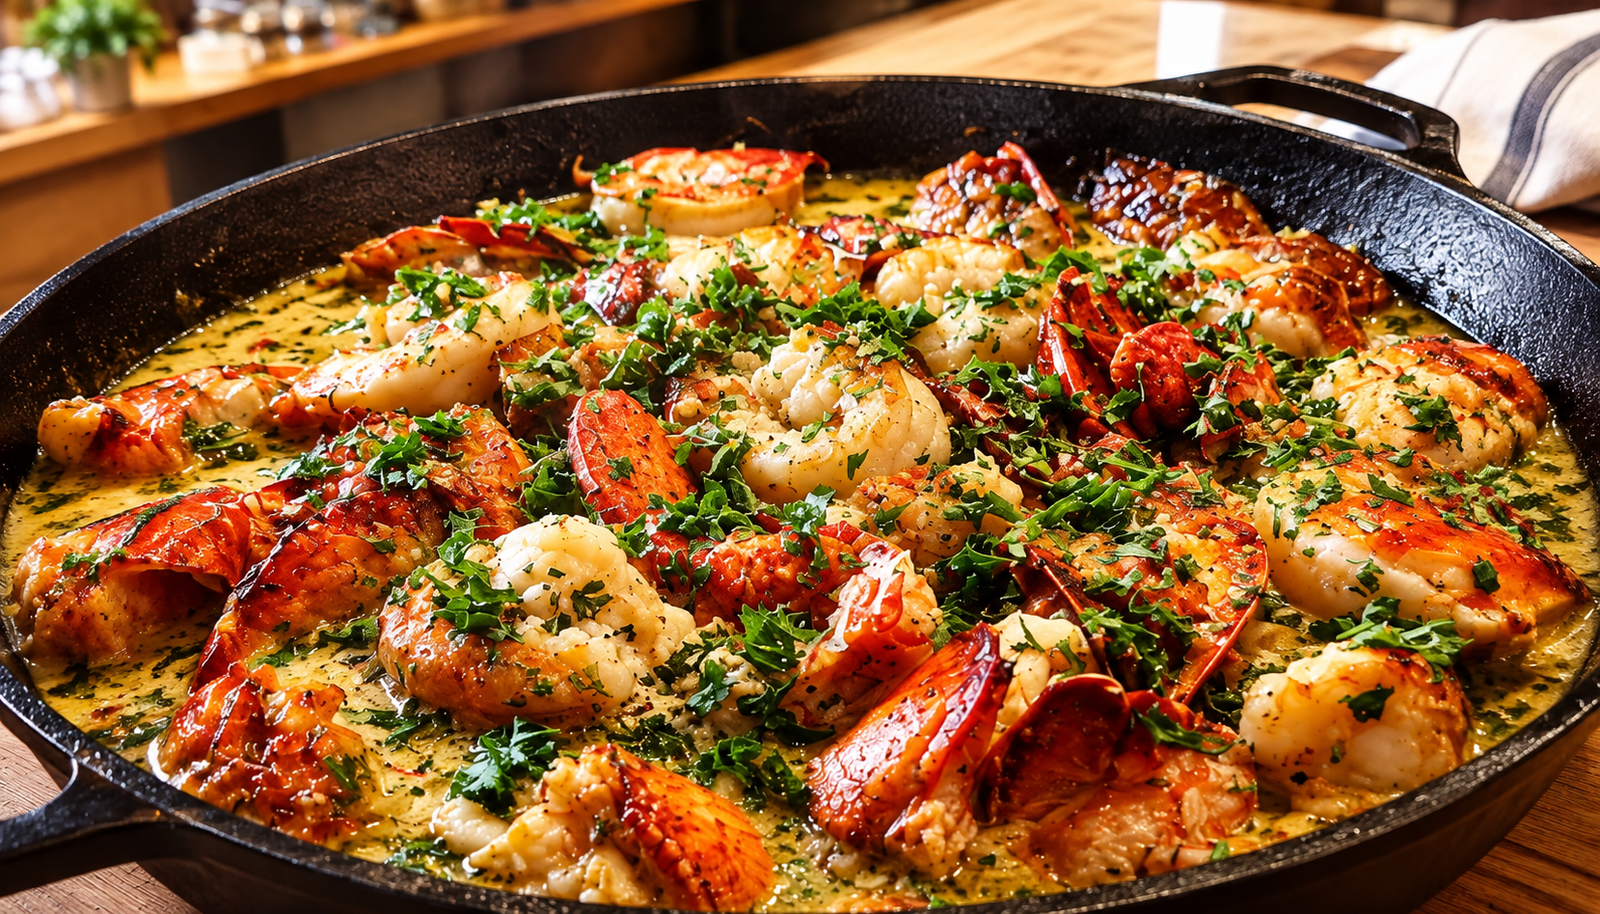
Today, I am sharing the glorious result of that months-long journey: my absolute favorite Garlic Butter Lobster and Shrimp Skillet. It is rich, decadent, loaded with savory garlic flavor, and surprisingly easy once you know the exact steps. Grab a heavy-duty skillet and a wooden spoon—let’s dive in.
The Reality Check: Why Cooking Seafood at Home Can Be a Minefield
Before we get to the fun part of cooking, we need to talk about why making seafood dishes like lobster and shrimp at home can feel like walking through a minefield.
Have you ever tried cooking seafood, only to watch your butter break into a greasy puddle? Or have you ever overcooked shrimp by just sixty seconds, turning them into chewy rubber bands?
I made every single one of those mistakes so you don’t have to repeat them. Here are the three golden rules I learned the hard way:
- Never rush the thaw. If you try to thaw frozen lobster tails by throwing them into hot water, the outer edges start cooking while the center stays icy. Always thaw them slowly overnight in the fridge, or submerge them in a sealed bag of cold water for 45 minutes.
- Control your butter. Butter is made of milk solids, water, and fat. If you blast it over roaring high heat with raw garlic, the milk solids burn instantly, turning acrid and bitter. Managing your burner temperature is everything.
- Choose the right pan. Thin, cheap aluminum pans create hot spots that scorch garlic and unevenly cook seafood. You want a heavy-bottomed, heat-retaining pan—like a well-seasoned cast iron skillet—to distribute heat evenly and build that incredible savory flavor base.
With those hard-earned lessons tucked under our aprons, let’s look at what you need to stock your kitchen counter with.
The Ingredient List
For a meal that tastes like an expensive coastal restaurant dinner, the ingredient list is surprisingly straightforward. You can find everything easily at your local grocery store or fish market.
| Category | Item | Quantity / Notes |
| The Seafood | Lobster Tails | 4 medium-sized tails (about 5-6 oz each), fully thawed and patted dry. |
| Large Shrimp | 1.5 lbs, peeled and deveined (tails left on for a great presentation). Fresh or fully thawed. | |
| The Garlic Butter Sauce | Unsalted Butter | 1/2 cup (1 stick), melted. Unsalted lets you control the salt levels. |
| Olive Oil | 2 tablespoons. Raises the smoke point so the butter doesn’t burn. | |
| Fresh Garlic | 6 cloves, finely minced. Fresh is non-negotiable here! | |
| Fresh Lemons | 2 whole lemons. One sliced into rounds for the pan, and one juiced. | |
| Herbs & Seasoning | Fresh Parsley | 3 tablespoons, finely chopped, for a bright pop of green and fresh flavor. |
| Smoked Paprika & Italian Seasoning | 1 tsp smoked paprika + 1 tsp Italian seasoning. | |
| Red Pepper Flakes | 1/2 teaspoon (optional, adds a wonderful little kick of heat). | |
| Kosher Salt & Black Pepper | To taste. |
Step-by-Step Guidance: Building Your Masterpiece
Ready to get to work? Make sure you have a large, heavy cast iron skillet ready. A heavy skillet distributes heat evenly and retains temperature beautifully—trust me, after my burnt anniversary dinner disaster, a good cast iron skillet is my non-negotiable kitchen rule.
Step 1: Prep the Seafood Properly
- Bring to Room Temp: Take your thawed lobster tails and shrimp out of the fridge about 15 minutes before cooking. Ice-cold seafood hitting a hot pan will seize up and cook unevenly.
- Pat Dry: Grab a roll of paper towels and pat every single lobster tail and shrimp until they are completely bone dry. Moisture creates steam, and steam prevents that gorgeous golden sear.
- Butterfly the Lobster Tails (Optional but Recommended): Take heavy-duty kitchen shears and cut straight down the center of the hard top shell of each lobster tail, stopping right before the tail fan. Gently pull the meat up and lay it right on top of the cracked shell like a little blanket. This exposes the sweet meat to the pan and makes it look incredible.
Step 2: Fire Up the Cast Iron Skillet
- Place your large cast iron skillet over medium heat and let it heat up for a solid 3 minutes. You want the whole pan nice and hot.
- Add your 2 tablespoons of olive oil and 2 tablespoons of butter. Let them melt together and swirl to coat the entire bottom of the skillet.
- Carefully place your prepared lobster tails into the hot skillet (meat-side down if butterflied, or shell-side down if left whole). Let them sear undisturbed for about 2 to 3 minutes until the exposed meat turns a light golden-brown.
Step 3: Add the Shrimp and Aromatics
- Turn your stove burner down to medium-low. Arrange your peeled shrimp all around the spaces between the lobster tails in the skillet.
- Add the rest of your butter into the pan, letting it melt down into a rich, foaming pool.
- Scatter your freshly minced garlic, red pepper flakes, smoked paprika, Italian seasoning, and lemon rounds directly into the bubbling butter.
- As the butter foams up with the garlic and spices, tilt the skillet slightly and use a large spoon to continuously ladle that aromatic, golden garlic butter right over the top of the cooking lobster and shrimp. This bathes the seafood in flavor and cooks it gently.
Step 4: The Finish Line
- Cook everything together for another 4 to 5 minutes, stirring the shrimp gently and spooning butter over the lobster.
- You’ll know it’s done when the shrimp turn completely pink, opaque, and curl into tight “C” shapes, and the lobster meat turns a brilliant pearly white and opaque all the way through. (An instant-read thermometer inserted into the thickest part of the lobster meat should read around 135°F to 140°F).
- Turn off the heat. Drizzle the juice of your second fresh lemon all over the skillet, and immediately scatter your freshly chopped parsley across the top.
Real Examples, Use Cases, and Life Lessons
Even seasoned home cooks run into roadblocks. Here are a few practical scenarios and common traps to keep in mind so your dinner goes off without a hitch:
- The Burnt Garlic Trap: Garlic burns very easily, and burnt garlic turns bitter and ruins an entire dish. That is why we add the minced garlic after the initial high-heat sear, right when we turn the temperature down to medium-low for the butter-basting phase.
- The Overcooked Shellfish Trap: Lobster and shrimp cook terrifyingly fast. If you leave them in the hot pan for an extra three minutes “just to be safe,” you will end up with rubbery, tough seafood. Pull the skillet off the heat the exact second the shrimp curl and turn pink.
- Leftovers and Reheating: Seafood is always best eaten fresh out of the pan. However, if you happen to have leftovers, store them in an airtight container in the fridge. When reheating, place them in a small skillet over low heat with a tiny splash of chicken broth or water, cover with a lid, and warm gently for 3 minutes. Never microwave seafood on high power, or the shrimp will turn into rubber bullets!
As for serving suggestions? Serve this stunning dish right out of your cast iron skillet family-style in the center of the table. Spoon that rich, garlic-herb butter sauce generously over the top of everything. It pairs brilliantly with a bed of garlic butter pasta, roasted baby potatoes, or crusty sourdough bread designed specifically for mopping up that incredible pan sauce.
Common Mistakes to Avoid Summary
To ensure your Garlic Butter Lobster and Shrimp Skillet turns out tender, rich, and delicious on your very first try, keep these quick checkpoints handy:
- Don’t skip drying your seafood: Always pat your lobster tails and shrimp thoroughly dry with paper towels to prevent steaming.
- Don’t add garlic too early: Wait until you lower the heat for the butter-basting phase so your garlic doesn’t burn into a bitter paste.
- Don’t overcook: Keep a close eye on the clock; shellfish cooks in minutes and residual heat will finish the job.
Final Thoughts
That disastrous anniversary dinner feels like a lifetime ago now. Making an incredible, restaurant-quality seafood feast at home isn’t about being a professional chef; it’s about respecting your ingredients, managing your heat, and learning how flavors build upon one another in a good pan.
Next time you want to celebrate a milestone, host a cozy date night in, or simply treat yourself on a weekend, skip the crowded restaurant waitlists and spend 25 minutes making this Garlic Butter Lobster and Shrimp Skillet.
Take your time, keep the butter flowing, and enjoy every single buttery, sweet bite. Happy cooking!