
I will never forget the exhausting Wednesday evening a couple of years back that nearly made me give up on baking boneless, skinless chicken breasts forever.
I was running on empty after a long workday, my kitchen was slightly cluttered, and I wanted to make something comforting yet effortless for dinner. In my mind, I had a picture-perfect meal planned: thick, tender chicken cutlets nestled in a glass baking dish, smothered under a bubbling, golden-brown mantle of garlicky, melted cheeses, with savory juices sizzling around the perimeter.
I figured I could just throw it in the oven and hope for the best.
I took three large chicken breasts straight out of the cold supermarket styrofoam tray, tossed them directly into my 9×13 glass casserole dish without pounding them flat, dumped a cup of bottled Italian dressing over the top, buried them under a bag of pre-shredded mozzarella, and shoved the pan into a 400°F oven for forty minutes.
When the timer went off, dinner was an unmitigated culinary disaster.
The chicken had dumped nearly a cup of cloudy, waterlogged fluid into the bottom of the dish as it heated up. Instead of baking in a luscious sauce, the meat was boiling in its own bland liquid.
Even worse, the pre-shredded cheese hadn’t melted into a cohesive, velvety blanket—it had separated under the intense heat into a rubbery, greasy orange puddle floating on top of greyish water.
When my partner tried to slice through one of the breasts with a dinner knife, the meat was so tough and leathery that the fork literally squeaked against the fibers. Inside, the chicken was chalky, fibrous, and completely devoid of moisture. We ended up swallowing a few choked-down bites with big gulps of water, pushing the rest aside, and fixing bowls of cold cereal at 8:30 PM while I scrubbed crusty, burnt cheese rings off my glass dish.
That humiliating dinner bothered me for weeks. Boneless, skinless chicken breasts are notoriously unforgiving. Because they are virtually devoid of intramuscular fat and connective collagen, they have zero natural safety net. If you bake them naked or improperly protected, heat forces the muscle fibers to contract like wrung-out towels, expelling every drop of internal moisture.
The breakthrough came when I realized three fundamental rules: you must pound the chicken breasts to a uniform thickness, you must pat them bone-dry before seasoning, and you need a rich, savory “moisture blanket” made of cream cheese, real mayonnaise, minced garlic, and freshly grated parmesan to seal in steam while the cheese browns into a blistered, golden-crusted crown.
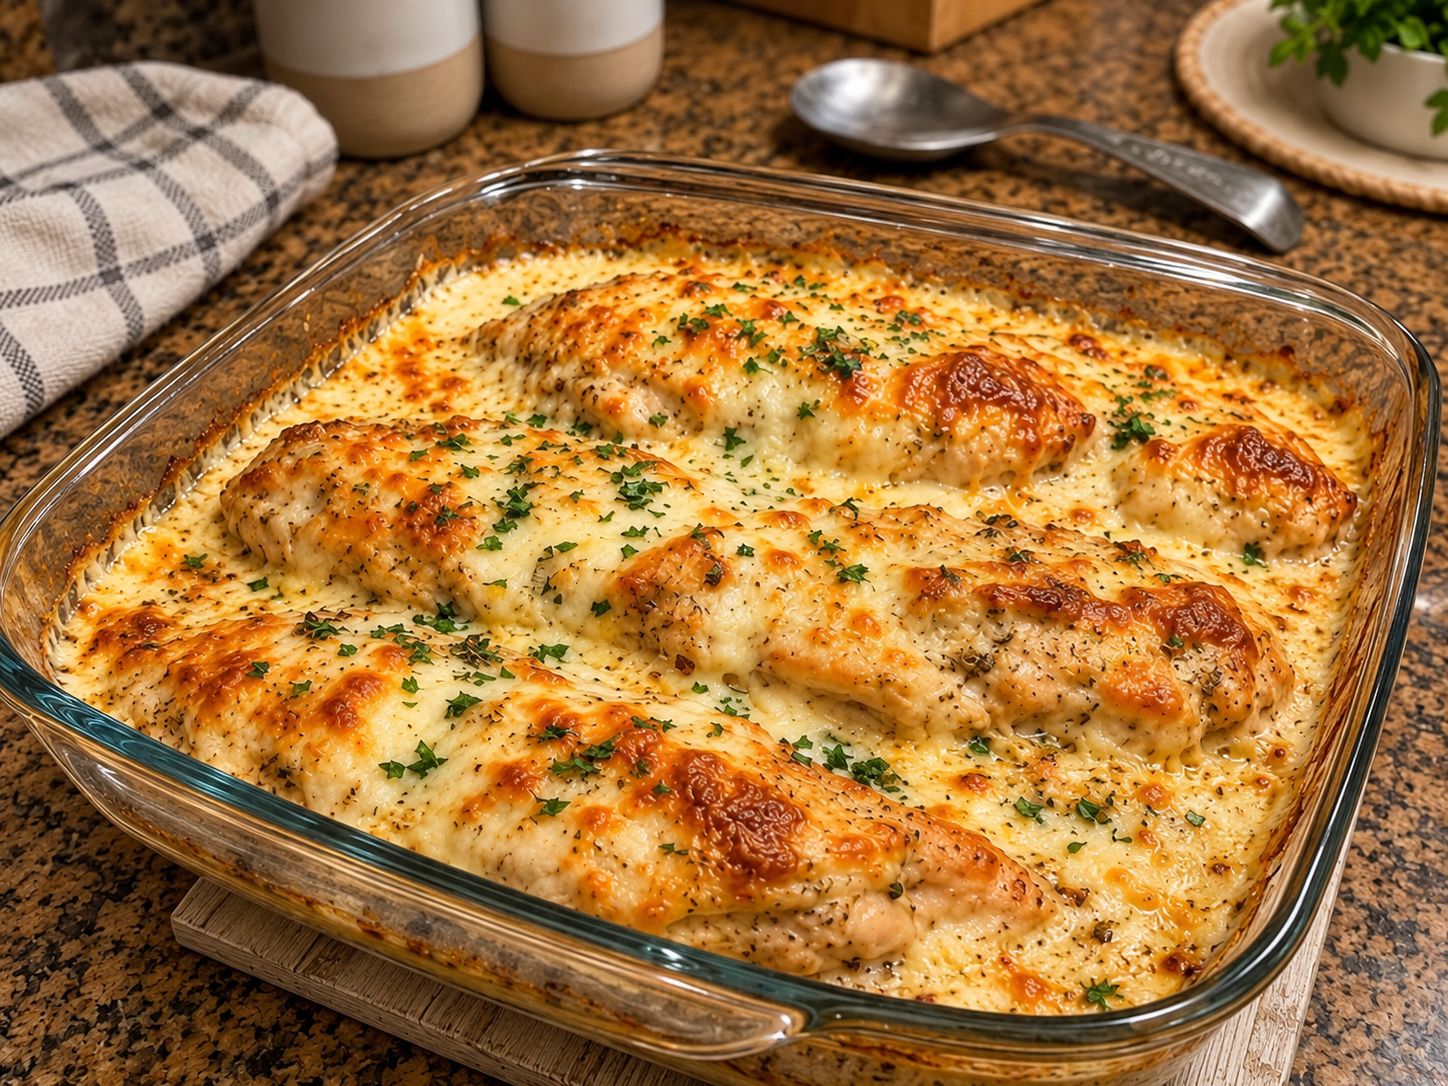
The photo above is the hard-earned victory sitting on my kitchen counter: three plump, incredibly juicy chicken breasts baked to perfection in a clear glass casserole dish, blanketed in a bubbly, golden-brown, blistered crust of melted mozzarella, provolone, and parmesan, flecked with cracked pepper and fresh parsley.
Here is how you make foolproof, melt-in-your-mouth Cheesy Garlic Baked Chicken Breasts at home without ever suffering through dry, stringy meat or a watery puddle again.
Why Baked Chicken Breasts Turn Tough (The Protein & Moisture Science)
Cooking lean poultry in a hot oven requires an understanding of moisture dynamics. If your baked chicken breasts have ever turned out rubbery or floated in a watery mess, here is what happened behind the scenes:
1. The Uneven Thickness Trap
A standard chicken breast is naturally shaped like an irregular wedge: very thick at the rounded shoulder and paper-thin at the tapered tail. If you throw an uneven chicken breast into a hot oven, the thin tail finishes cooking in fifteen minutes, while the thick shoulder requires thirty-five. By the time the thickest part reaches a safe internal temperature, the rest of the breast has shot past 180°F, turning fibrous, dry, and tough. Pounding the breasts to a uniform ¾-inch thickness ensures every square inch cooks at the exact same rate.
2. The Surface Water Dilution
Supermarket poultry is often packed in a sodium-water chilling solution (sometimes called “plumping”). When exposed to oven heat, that exterior moisture immediately turns into steam and collects at the bottom of your baking pan. If you don’t pat the meat thoroughly dry with paper towels, your chicken will boil in diluted liquid rather than roasting.
3. The Need for a Protective Fat Blanket
Because breast meat has almost zero fat, direct radiant oven air pulls moisture outward like a vacuum. Creating a savory spread using mayonnaise, cream cheese, garlic, and parmesan acts as an edible thermal insulator. The fat-dense spread shields the delicate lean muscle proteins from direct dry heat, locking in natural internal steam while baking into that luxurious, savory crust you see in the reference photo.
Ingredients & Tools You’ll Need
Essential Kitchen Gear
- 9×13-Inch Heavy Tempered Glass Baking Dish: (A clear glass casserole dish, like the one in the photo, provides gentle, even heat distribution, allowing you to watch the cheese bubble and brown along the edges).
- Digital Instant-Read Meat Thermometer: (A ThermoWorks ThermoPop or similar digital probe is non-negotiable; pull chicken strictly by internal temperature, never by guessing on the clock).
- Heavy Meat Mallet or Rolling Pin: For gently pounding the chicken breasts into an even, uniform thickness.
- Plastic Wrap or Ziplock Bag: To cover the chicken while pounding, preventing raw juices from splattering across your countertops.
- Box Grater: For freshly grating whole blocks of mozzarella and aged parmesan cheese.
The Ingredient Breakdown
| Component | Ingredient | Quantity | Practical Role |
| The Star Poultry | Boneless, Skinless Chicken Breasts | 3 large breasts (approx. 2 to 2.5 lbs total) | Plump, lean protein; pounded to uniform ¾-inch thickness. |
| The Moisture Seal | Full-Fat Cream Cheese | 4 oz (half a block, softened to room temp) | Creates a rich, velvety base that anchors the topping. |
| The Moisture Seal | Real Mayonnaise (Duke’s or Hellmann’s) | ¼ cup | The secret emulsifier; locks in internal chicken juices without tasting like mayo. |
| The Cheesy Core | Aged Parmigiano-Reggiano | ½ cup (freshly grated) | Delivers sharp, salty, nutty umami depth to the topping paste. |
| Aromatic Punch | Fresh Garlic Cloves | 5 to 6 cloves (finely minced) | Infuses the cheese blanket with bold, sweet bistro aromatics. |
| Herbal Backbone | Italian Seasoning & Dried Oregano | 1 tsp Italian seasoning, ½ tsp dried oregano | Fragrant woodsy herbs that bloom in the melting cheese fats. |
| Savory Booster | Dijon Mustard | 1 tsp | Mild acidity and emulsifier that cuts through rich dairy. |
| Savory Booster | Worcestershire Sauce | 1 tsp | Deepens the savory undertone of the garlic-cheese paste. |
| Dry Rub Seasoning | Garlic Powder, Onion Powder, Paprika | 1 tsp garlic powder, 1 tsp onion powder, ½ tsp smoked paprika | Creates an initial savory dry crust directly on the raw chicken. |
| Base Seasoning | Coarse Kosher Salt & Black Pepper | 1.5 tsp salt, 1 tsp coarse cracked black pepper | Crucial seasoning across the chicken meat and cheese spread. |
| The Molten Crown | Low-Moisture Whole-Milk Mozzarella | 1.5 cups (freshly shredded from a block) | Melts into that bubbly, gooey, golden-blistered crust. |
| The Molten Crown | Provolone or Fontina (Optional) | ½ cup (freshly shredded) | Adds an extra layer of buttery melt and gentle sharpness. |
| Fresh Finish | Fresh Italian Flat-Leaf Parsley | 2 tbsp (finely chopped) | Sprinkled over the hot blistered cheese for vibrant color and freshness. |
Step-by-Step Cooking Instructions
Step 1: Prep and Pound the Chicken Breasts
Preheat your oven to 375°F (190°C).
Lightly mist your 9×13-inch glass baking dish with olive oil or nonstick cooking spray.
Take your three large chicken breasts out of the refrigerator.
Trim away any stray bits of yellow fat, cartilage, or loose tendon.
Place one breast inside a large gallon-sized ziplock bag (or between two sheets of sturdy plastic wrap) on a stable cutting board.
Using the flat side of a meat mallet or a heavy wooden rolling pin, gently pound the thick shoulder of the breast with firm, glancing blows, working outward toward the tapered end.
Cook’s Real-Life Tip: Do not aggressively smash the meat into paste! You simply want to level out that thick hump so the entire breast is a uniform ¾-inch thickness from end to end. Repeat with the remaining two breasts.
Pat the pounded chicken breasts completely bone-dry on both sides using paper towels.
In a small ramekin, mix together the garlic powder, onion powder, smoked paprika, 1 teaspoon of kosher salt, and ½ teaspoon of coarse black pepper.
Rub this dry spice blend generously over both sides of each breast, massaging it into the meat fibers.
Arrange the seasoned chicken breasts flat in your prepared glass baking dish in a neat, single layer, leaving a finger of space between each piece (just like the three beautiful fillets pictured in the reference photo).
Step 2: Mix the Creamy Garlic-Parmesan Moisture Seal
In a medium mixing bowl, combine:
- 4 ounces of softened room-temperature cream cheese
- ¼ cup of real full-fat mayonnaise
- ½ cup of freshly grated Parmigiano-Reggiano
- 5 to 6 cloves of finely minced fresh garlic
- 1 teaspoon of Dijon mustard
- 1 teaspoon of Worcestershire sauce
- 1 teaspoon of dried Italian seasoning
- ½ teaspoon of dried oregano
- ½ teaspoon of coarse kosher salt
- ½ teaspoon of freshly cracked black pepper
Use a sturdy silicone spatula or a fork to mash and beat the mixture together vigorously for 60 seconds until completely smooth, creamy, and uniform.
Why Mayonnaise Works Magic Here: If you are nervous about using mayonnaise, don’t worry—your baked chicken will not taste like mayo at all! Mayonnaise is simply an emulsion of egg yolks, oil, and vinegar. Under oven heat, the egg yolk binds moisture while the oil keeps the lean chicken breast fibers succulent, preventing them from drying out during the bake.
Step 3: Blanket the Chicken
Using your spatula or the back of a spoon, divide the garlic-parmesan mixture evenly among the tops of the three chicken breasts—roughly two to three heaping tablespoons per breast.
Spread the paste in a thick, even layer across the entire top surface of each fillet, sealing the edges right down to where the meat meets the bottom of the glass dish.
This thick paste acts like a moisture-retaining helmet, keeping internal steam locked inside the meat as it roasts.
Step 4: The Shredded Cheese Crown
Now, blanket the top of each breast with your freshly shredded whole-milk mozzarella (and provolone, if using).
Scatter roughly ½ cup of shredded cheese generously over each chicken breast.
Allow some of the cheese shreds to spill over the sides onto the glass dish.
As the casserole bakes, those runaway cheese strands will melt directly against the hot glass, developing those irresistible, crunchy, caramelized cheese edges visible around the rim in the photo.
Step 5: The Baking Sweet Spot
Slide the glass baking dish onto the center rack of your preheated 375°F (190°C) oven.
Bake uncovered for 22 to 26 minutes.
Around the 22-minute mark, slide the probe of your digital instant-read thermometer horizontally into the thickest center of the middle chicken breast:
- Target Reading: 160°F (71°C).
The Temperature Rule: Do not wait until the thermometer reads 165°F in the oven! Chicken breast continues to cook via carryover heat once removed from the oven. Pulling the dish at 160°F allows the internal temperature to coast gently up to a perfectly safe, succulent 165°F during the rest period without squeezing out juices.
Step 6: The Golden Broiler Char
Once your thermometer registers 160°F, leave the dish in the oven and switch the setting to BROIL (High).
Keep your eyes glued to the oven window for 2 to 3 minutes.
The direct radiant heat from the broiler will cause the mozzarella to bubble violently, puff up, and toast into those gorgeous, savory, dark-golden blisters seen in the reference photo.
The moment the top is blistered, toasted, and deeply bronzed, pull the baking dish out immediately using heavy heatproof mitts.
Step 7: The Mandatory 8-Minute Rest
Set the hot glass baking dish onto a wooden board or heatproof trivet on your kitchen counter.
Immediately scatter finely chopped fresh Italian flat-leaf parsley across the bubbling melted cheese for a vibrant green herbal pop.
The Non-Negotiable Rule: Do not pierce or slice into these chicken breasts right now!
Straight out from under the broiler, the chicken fibers are under intense thermal pressure, and the melted cheese is molten liquid.
If you slice into the meat immediately, all the internal juices will rush out into the glass dish, leaving your chicken dry.
Let the dish rest undisturbed on the counter for 7 to 8 full minutes.
During this short pause:
- The meat fibers relax and pull the flavorful juices back into the cellular structure of the chicken.
- Carryover heat finishes cooking the core safely to 165°F.
- The molten mozzarella sets just enough into a rich, stretchy, cohesive blanket that clings securely to the breast when sliced.
Use a flat metal spatula to lift an entire smothered chicken breast out of the dish, spooning a generous ladle of the savory garlic-butter pan drippings from the bottom of the glass dish right over the top.
Practical Troubleshooting & Common Mistakes
- “My chicken breasts turned out dry and chalky.”
This happens if you skipped pounding the chicken to an even thickness, or if you relied on the clock instead of an instant-read thermometer. Chicken breasts dry out rapidly past 165°F. Always pound them to a uniform ¾-inch thickness, check with a digital probe at the 22-minute mark, and pull them at 160°F. - “The bottom of the dish filled with cloudy water.”
This is the hallmark of using “plumped” supermarket chicken without drying it. Always pat the raw meat completely bone-dry with paper towels before seasoning. Additionally, make sure your oven is fully preheated to 375°F before the dish goes in so the meat cooks quickly rather than sweating out moisture at low temperatures. - “The cheese separated into an oily orange slick.”
Never use pre-shredded cheese from a plastic bag! Bagged shredded cheese is coated in potato starch and cellulose powder, which inhibits smooth melting and causes dairy fats to separate under broiler heat. Always buy whole blocks of low-moisture whole-milk mozzarella and grate it yourself on a box grater for that velvety, stretchy pull.
Delicious Upgrades & Variations
While this classic garlic parmesan and mozzarella combination is the ultimate comfort dinner, you can easily adapt the flavor profile to match what is in your pantry:
- The Bacon Cheddar Ranch Twist: Swap the Italian seasoning for a tablespoon of dry ranch seasoning mix, and use a blend of sharp cheddar and Monterey Jack. Top the melted cheese with crispy crumbled bacon right after broiling.
- The Florentine Spinach & Artichoke Version: Fold ½ cup of well-drained, chopped frozen spinach and ¼ cup of diced canned artichoke hearts directly into the cream cheese and garlic spread before blanketing the chicken.
- The Spicy Buffalo Chicken Bake: Stir 2 tablespoons of Frank’s RedHot sauce directly into the cream cheese and mayonnaise mixture. Top with pepper jack cheese and finish with blue cheese crumbles and sliced green onions.
What to Serve with Cheesy Garlic Baked Chicken
This dish is rich, savory, and produces plenty of garlicky pan drippings, making it the perfect partner for sides that can soak up the sauce or offer crisp, refreshing contrast:
- Garlic Butter Egg Noodles or Fettuccine: Boil pasta until al dente, toss with butter, sea salt, and fresh parsley, and spoon the savory, cheesy pan drippings from the glass dish directly over the noodles.
- Creamy Garlic Mashed Potatoes: Fluffy Yukon Gold mashed potatoes provide a comforting bed for the sliced cheesy chicken breast.
- Roasted Asparagus or Steamed Broccoli: Crisp-tender green vegetables tossed with a squeeze of fresh lemon juice provide a clean, snappy, acidic contrast that balances the rich, melted cheese.
- A Crisp Caesar or Garden Salad: Romaine lettuce, cherry tomatoes, and shaved parmesan tossed in a sharp lemon-vinaigrette dressing cleanse the palate between rich bites.
- Crusty Sourdough Bread: Mandatory for wiping the glass casserole dish clean of every drop of savory garlic-cheese pan jus.
Storing and Reheating Leftovers (The Gentle Oven Trick)
If you have leftover cheesy chicken breasts, let the glass dish cool to room temperature.
Transfer the chicken and any pan drippings into an airtight glass container and store in the refrigerator for up to 4 days.
Avoid reheating this chicken in the microwave on high power! The microwave’s harsh radiation will cook the chicken breast past its moisture threshold, turning it into rubbery leather while causing the cheese blanket to split into clear grease.
Instead, use your oven or toaster oven:
- Place the leftover chicken breast in a small oven-safe dish.
- Spoon 1 to 2 tablespoons of chicken broth or water around the base of the chicken to create steam.
- Cover loosely with aluminum foil to protect the cheese.
- Warm at 350°F (175°C) for 12 to 15 minutes until heated through to the center.
- Remove the foil for the final 2 minutes so the cheese bubbles and stretches again.
The chicken stays remarkably succulent, the cheese blanket returns to its stretchy, gooey perfection, and you get to enjoy a restaurant-level comfort meal all over again with practically zero effort!