
I will never forget the chilly Saturday evening three winters ago that almost completely broke my culinary confidence.
I had invited friends over for what was supposed to be a show-stopping French bistro dinner: succulent, bone-in beef short ribs slow-braised in a rich Cabernet reduction until fall-apart tender, surrounded by sweet carrot coins, buttery baby potatoes, and fragrant fresh thyme in my favorite red enameled cast-iron Dutch oven.
I thought braising was foolproof, so I took every lazy shortcut in the book. I grabbed cold beef short ribs straight from the grocery pack, gave them a half-hearted one-minute sizzle, threw raw carrots and whole potatoes into the pot at the exact same time, dumped an entire bottle of cheap wine and a carton of beef broth over everything, clamped the heavy red lid down, and let it boil away on the stovetop.
Three hours later, when I lifted that lid, dinner was an unmitigated disaster.
Instead of a velvety, mahogany-colored sauce, I was staring at a murky, purple puddle with a quarter-inch slick of yellow rendered fat floating across the surface. The meat hadn’t turned tender; because the pot had boiled too violently, the muscle fibers had contracted into dense, dry, stringy knots that clung stubbornly to the bones.
Worst of all, the carrots and potatoes had completely disintegrated into mush, clouding the liquid with gritty vegetable debris. When my friends tried to take a bite, they had to saw through the meat with steak knives while dodging floating grease. I ended up ordering takeout pizzas at 8:30 PM, feeling completely humiliated while staring at eighty dollars’ worth of ruined beef.
That humiliating dinner sent me down a deep rabbit hole of classic braising mechanics.
Beef short ribs are loaded with tough connective tissue and intramuscular fat. You cannot rush them, and you cannot boil them. But when you understand the mechanics of searing, render and skim the excess tallow, stagger your root vegetables so they hold their shape, and let the oven’s radiant heat slowly melt collagen into rich gelatin, you get pure restaurant perfection.
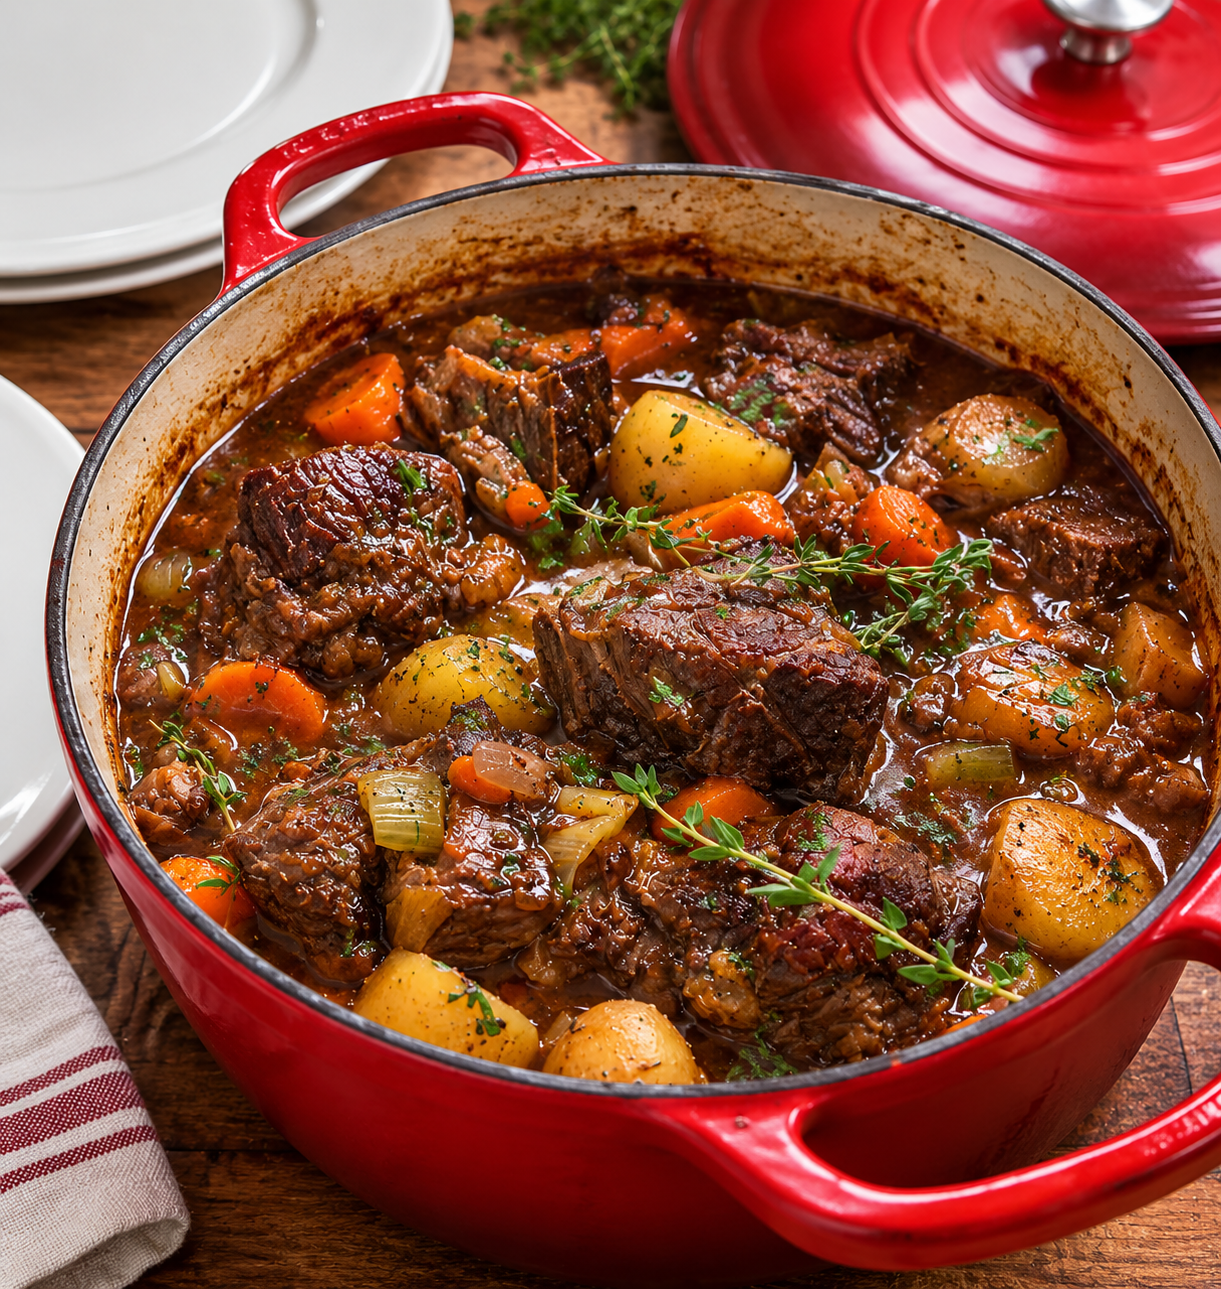
The photo above is the hard-won standard sitting on my wooden table: a vibrant red Dutch oven filled with deeply browned, fork-tender beef short rib portions resting in a glossy, dark wine-and-herb gravy, studded with tender carrot rounds, intact golden baby potatoes, and fresh sprigs of thyme ready for the dinner plates.
Here is how you make this soul-warming French Red Wine Braised Beef Short Rib Stew at home without ever facing tough meat or a greasy sauce again.
Why Braised Short Ribs Go Wrong (The Collagen & Fat Physics)
Braising is the gentle art of cooking tough cuts in a small amount of liquid over low, steady heat. If your braised beef has ever turned out stringy, greasy, or bland, here is what happened behind the scenes:
1. The Violent Boil Trap
Tough meat cuts like short ribs contain heavy bands of connective collagen. Collagen only converts into velvety, melt-in-your-mouth gelatin at sustained temperatures between 180°F and 200°F (82°C to 93°C). If you braise on the stovetop over high heat, the liquid easily surpasses 212°F (100°C). That violent boil causes the meat proteins to tighten like clenched fists, squeezing out every drop of moisture and leaving the meat dry and fibrous, even though it is submerged in liquid. Braising inside a low-temperature oven (300°F to 325°F) surrounds the Dutch oven with gentle, even radiant heat that never boils.
2. The Un-Skimmed Fat Slick
Beef short ribs have a high proportion of fat. As they braise for three hours, that fat renders completely into the cooking liquid. If you leave all that rendered tallow in the pot, your gravy will separate into a greasy, unappetizing puddle that coats your tongue in oil. Taking two minutes to skim the rendered fat—or cooling the braising liquid so the fat cap hardens on top—transforms a heavy, oily mess into a glossy, clean, velvety pan sauce.
3. Adding Root Vegetables Too Early
Carrots and baby potatoes only need about 45 to 60 minutes to cook through to tender perfection. If you drop them into the pot at the very start of a three-hour meat braise, their cellular walls completely collapse. They turn into waterlogged mush and dissolve into the broth. Adding your root vegetables during the final 45 minutes of cooking ensures they become fork-tender and sweet while maintaining their distinct, gorgeous shapes.
Ingredients & Tools You’ll Need
Essential Kitchen Gear
- 5.5- to 7-Quart Enameled Cast-Iron Dutch Oven: (A heavy, lidded Dutch oven—like the classic red pot pictured in the photo—distributes heat evenly from all sides and traps moisture perfectly).
- Large Metal Tongs: For turning heavy, sizzling short ribs without tearing the meat.
- Flat Wooden Spatula: Mandatory for scraping up the savory caramelized fond from the bottom of the pot during deglazing.
- Fine-Mesh Skimmer or Large Metal Spoon: For removing excess rendered beef fat from the surface of the braising liquid.
- Digital Instant-Read Probe Thermometer: To verify the meat’s internal tenderness.
The Ingredient Breakdown
| Component | Ingredient | Quantity | Practical Role |
| The Star Meat | Bone-In or Boneless Beef Short Ribs | 3 to 3.5 lbs (cut into thick portions) | Packed with rich collagen that braises into fork-tender richness. |
| The Crust Dredge | All-Purpose Flour | ¼ cup | Dusts the ribs to promote a hard sear and naturally thickens the jus. |
| The Searing Fat | High-Smoke-Point Oil | 2 tbsp (avocado or olive oil) | Allows high-heat searing without scorching or smoking. |
| The Aromatic Base | Sweet Yellow Onions | 2 medium (coarsely chopped) | Melts down to provide sweet, savory vegetable body to the sauce. |
| The Aromatic Base | Celery Ribs | 2 stalks (sliced) | Adds classic mirepoix earthy backbone to the braise. |
| The Aromatic Punch | Fresh Garlic Cloves | 6 to 8 cloves (smashed and minced) | Delivers robust, sweet bistro aroma throughout the gravy. |
| The Braising Wine | Dry Red Wine (Cabernet, Merlot, or Pinot Noir) | 2 cups (half a bottle) | Dissolves pan fond and cuts the rich beef fat with deep acidity. |
| The Liquid Base | Low-Sodium Beef Bone Broth | 2 to 2.5 cups | Forms the rich, savory foundation without over-salting as it reduces. |
| Tomato Umami | Tomato Paste | 2.5 tbsp | Blooms in hot fat to add brick-red color, body, and sweet tang. |
| Umami Booster | Worcestershire Sauce | 1.5 tbsp | Adds fermented depth that elevates the slow-cooked beef flavor. |
| Fresh Herbs | Fresh Thyme Sprigs | 6 to 8 sprigs (plus extra for garnish) | Essential rustic French woodsy herb that perfumes the sauce. |
| Fresh Herbs | Fresh Rosemary & Dried Bay Leaves | 2 sprigs rosemary, 2 bay leaves | Grounding earthy aromatics that slowly infuse into the meat. |
| The Root Veggies | Fresh Carrots | 4 large (peeled and sliced into thick coins) | Adds natural sweetness, bright color, and tender vegetable bite. |
| The Root Veggies | Baby Dutch Yellow or Creamer Potatoes | 1 lb (halved or left whole) | Waxy spuds that hold their shape and soak up the wine jus. |
| Base Seasoning | Coarse Kosher Salt & Black Pepper | 1.5 tbsp salt, 1 tbsp coarse cracked pepper | Crucial seasoning across the ribs, aromatics, and gravy. |
Step-by-Step Cooking Instructions
Step 1: Prep and Dredge the Short Ribs
Take your beef short ribs out of the refrigerator 30 to 40 minutes before cooking to take the deep chill off. Cold beef hitting a hot pot drops the pan temperature instantly, causing the meat to steam rather than develop a golden crust.
Pat the short ribs completely bone-dry with paper towels on every side. Moisture is the enemy of a hard sear!
In a wide, shallow dish, whisk together the ¼ cup of flour, 1 tablespoon of coarse kosher salt, and 1 teaspoon of cracked black pepper.
Lightly roll each short rib in the seasoned flour, shaking off the excess so only a faint, dusty coating remains.
Step 2: The Hard Dutch Oven Sear
Set your heavy red enameled Dutch oven over medium-high heat on the stovetop.
Add 2 tablespoons of oil.
Once the oil is shimmering hot, lay half of the floured short ribs into the pot.
Do not crowd the pot! If you dump all the meat in at once, moisture gets trapped between the ribs, boiling them instead of searing them.
Sear untouched for 3 to 4 minutes on the first side until a dark, mahogany-brown crust forms.
Use your metal tongs to turn the ribs, searing all four sides plus the meaty ends for roughly 8 to 10 minutes total per batch.
Transfer the browned ribs to a large plate and repeat with the remaining ribs.
Cook’s Tip from Experience: That dark brown crust (the Maillard reaction) is where eighty percent of your stew’s savory flavor comes from. Take your time and get a deep, dark sear on every piece!
Step 3: Sweat the Aromatics and Bloom the Paste
Preheat your oven to 325°F (165°C).
Look into the bottom of your Dutch oven: you will see rendered beef fat and dark brown bits stuck to the enamel.
Carefully spoon off all but about 2 tablespoons of the rendered fat so your finished stew doesn’t turn greasy.
Turn the stove burner down to medium.
Add the coarsely chopped yellow onions and sliced celery with a pinch of kosher salt.
Cook for 5 to 6 minutes, stirring with a flat wooden spatula, until the onions soften, turn translucent, and begin lifting up the savory beef fond from the bottom of the pot.
Stir in the minced fresh garlic and 2.5 tablespoons of tomato paste.
Cook for 90 seconds, stirring constantly, until the tomato paste darkens to a deep brick-red color and smells sweet and caramelized.
Step 4: The Wine Deglaze and Reduction
Pour the 2 cups of dry red wine directly into the hot Dutch oven.
The wine will bubble vigorously.
Use your flat wooden spatula to scrape firmly along the bottom and corners of the pot, loosening every single caramelized speck of beef fond.
Let the wine simmer vigorously over medium-high heat for 4 to 5 minutes until it reduces by about half.
Reducing the wine cooks off the harsh raw alcohol fumes, leaving behind sweet, concentrated fruit acids and rich tannins that tenderize the beef.
Stir in the 2 cups of beef bone broth and 1.5 tablespoons of Worcestershire sauce.
Bring the liquid back to a gentle simmer.
Step 5: Nestle the Ribs and The Gentle Oven Braise
Using your tongs, nestle the seared short ribs (along with any savory juices that pooled on their plate) back into the Dutch oven.
Arrange them in a single, snug layer.
The braising liquid should come roughly halfway to two-thirds up the sides of the beef—it should not completely submerge them!
Tuck the fresh thyme sprigs, rosemary sprigs, and bay leaves deep into the liquid between the meat pieces.
Bring the pot to a simmer on the stovetop, then clamp the heavy red lid down tightly.
Slide the entire Dutch oven into your preheated 325°F (165°C) oven.
Bake undisturbed for 2 hours.
The heavy cast iron will maintain an even, gentle thermal environment that slowly converts the tough short rib collagen into melting gelatin without boiling the meat dry.
Step 6: Skim the Fat and Add the Root Vegetables
After 2 hours, carefully pull the Dutch oven out of the oven using heavy heatproof mitts and remove the lid (watch out for escaping steam!).
Test a piece of beef with a fork: it should be noticeably softening, but still holding its shape.
Look at the surface of the braising liquid: you will see a layer of clear yellow rendered beef fat that has separated during cooking.
Use a large shallow metal spoon or a fat skimmer to gently skim off that surface fat, discarding it into a heatproof bowl. This single step guarantees your sauce stays silky and rich rather than heavy and oily.
Now, tuck your thick carrot coins and halved baby yellow potatoes into the braising liquid around and between the short rib pieces (exactly as seen in the photo).
Spoon a ladle of the dark, bubbling red wine jus over the tops of the vegetables.
Clamp the red lid back onto the pot and return it to the 325°F oven for another 45 to 50 minutes.
Step 7: The Tenderness Test and Gravy Glaze
Pull the Dutch oven out of the oven.
Slide the tip of a paring knife into a short rib: it should glide through the meat with zero resistance, yielding like warm, soft butter.
Pierce a potato wedge: it should be fork-tender to the core while maintaining its clean, distinct edges.
Fish out and discard the woody thyme stems, rosemary sprigs, and bay leaves.
Look at the consistency of your braising jus:
- It should be dark mahogany, glossy, and fragrant with wine, garlic, and herbs.
- If you prefer an even thicker, spoon-coating gravy, set the uncovered Dutch oven over medium-low heat on the stovetop for 3 to 5 minutes to let the liquid bubble and reduce slightly.
Step 8: Garnish, Rest, and Table Presentation
Let the Dutch oven rest off the heat source with the lid off for 5 to 8 minutes before serving.
This brief pause allows the simmering bubbles to subside, letting the rich juices settle back into the tender beef fibers.
Scatter fresh sprigs of fresh green thyme across the top of the stew for an aromatic, rustic herbal pop (exactly like the beautiful presentation in the photo).
Grind fresh coarse black pepper over the center.
Bring the entire red cast-iron Dutch oven straight to the dining table, setting it onto a wooden trivet alongside wide white dinner plates.
Practical Troubleshooting & Common Mistakes
- “My short ribs are still tough and chewy.”
If your beef feels tough after 2.5 hours, do not panic! It simply means the collagen hasn’t fully converted into gelatin yet. Short ribs vary in thickness. Clamp the lid back on the pot and return it to the 325°F oven for another 30 to 45 minutes. They will surrender into fork-tender perfection once they hit that magic window. - “The sauce tastes too sharp or sour.”
This happens if you used a very tart wine or didn’t let the wine reduce long enough in Step 4. If your finished sauce has an acidic bite, stir in 1 teaspoon of dark brown sugar or a tablespoon of cold unsalted butter right before serving. The fat and sweetness will immediately round out the harsh acids. - “The gravy is thin and watery.”
If your braising liquid looks too thin, carefully transfer the cooked ribs, potatoes, and carrots to a warm serving platter with tongs. Set the Dutch oven over medium-high heat on the stove and boil the liquid for 5 to 7 minutes until it reduces into a thick, glossy, spoon-coating glaze, then pour it right back over the meat and vegetables.
Delicious Upgrades & Variations
While this classic French red wine and herb profile is the ultimate comfort standard, you can easily customize the dish:
- The Sautéed Pearl Onion & Mushroom Twist: Sauté 8 ounces of whole cremini mushrooms and peeled pearl onions in butter until browned, and fold them into the pot alongside the carrots and potatoes for a traditional Boeuf Bourguignon flavor.
- The Guinness Stout Variation: Swap the dry red wine for two bottles of dark Irish extra stout. The roasted barley and malt flavors create a deep, savory, pub-style stew with an incredible molasses undertone.
- The Smoky Bacon Addition: Fry 4 strips of thick-cut diced bacon in the Dutch oven before searing the beef. Remove the crispy bacon, sear the ribs in the bacon fat, and scatter the bacon bits back into the stew during the final simmer.
What to Serve with French Braised Short Ribs
This dish is rich, deeply savory, and loaded with velvety red wine pan gravy, making it the ultimate centerpiece for hearty accompaniments:
- Warm Crusty Sourdough or French Baguette: Mandatory! You need thick, crusty slices with plenty of soft crumb to wipe the bottom of your plate clean of every last drop of that mahogany wine sauce.
- Creamy Polenta or Buttered Egg Noodles: Spooning the tender short ribs, carrots, potatoes, and rich jus over a bowl of soft, cheesy polenta or egg noodles creates an unforgettable meal.
- A Crisp, Peppery Arugula Salad: Baby arugula, thinly sliced radishes, and shaved parmesan tossed in a bright lemon-dijon vinaigrette provide an acidic, crunchy counterpoint that cuts through the rich beef fat.
- The Same Red Wine You Used to Cook: Pour glasses of the same Cabernet Sauvignon, Merlot, or Côtes du Rhône you used in the braise. The tannins in the wine pair naturally with the rich, slow-braised beef protein.
Storing and Reheating Leftovers (The Next-Day Magic)
Braising is one of those culinary miracles that tastes even better the second day.
As the stew chills in the refrigerator overnight, the beef absorbs the garlic, thyme, and red wine flavors deep into its core, while the starches in the potatoes stabilize.
Even better: chilling makes defatting completely effortless. Any remaining rendered beef fat will rise to the top of the pot and harden into a solid white disc overnight, which you can simply lift off with a fork and discard before reheating!
Transfer any leftovers to an airtight glass container and store in the refrigerator for up to 4 days.
How to Reheat Properly:
Never blast braised short ribs in the microwave on high power! The rapid radiation will heat the exterior while leaving the dense center cold, drying out the tender muscle fibers.
Instead, use the gentle oven or stovetop method:
- Place your leftover short ribs, potatoes, carrots, and gravy back into your Dutch oven or a covered skillet.
- Splash in 2 to 3 tablespoons of beef broth or water to loosen the chilled, gelatinized sauce.
- Cover and warm in a 325°F (165°C) oven (or over medium-low heat on the stovetop) for 15 to 20 minutes until the meat is piping hot and the gravy melts back into a silky, glossy glaze.
Ladle into wide bowls, garnish with a fresh pinch of thyme, and enjoy a luxurious bistro-quality dinner with practically zero effort!