
I will never forget the Sunday afternoon four years ago that nearly caused me to ban cabbage from my kitchen entirely.
My mother and grandmother used to make traditional Eastern European stuffed cabbage rolls—the kind where savory beef, rice, and aromatics are swaddled inside tender leaves and slow-baked in rich tomato gravy. I had spent all morning trying to recreate that magic for a cozy family dinner. But if you have ever tried to make traditional cabbage rolls from scratch, you already know the absolute gauntlet: wrestling with a boiling-hot, slippery head of cabbage, peeling off scalding wet leaves that tear right down the center, rolling them up tightly with greasy hands, and praying they don’t burst open in the oven.
I thought I had done everything right. I stacked sixteen rolls into a deep casserole dish, poured marinara over them, and baked them for an hour.
When I lifted the lid, dinner was an utter disaster.
Half of the rolls had completely unraveled into a chaotic swamp of pale cabbage ribbons and floating meat crumbles. Worse, the water trapped inside the cabbage leaves had leaked into the baking dish, diluting my rich tomato sauce into a sour, watery pink broth. And when my partner tried to lift one onto a plate, the entire parcel collapsed into a mushy, stringy mess. It took forty minutes of rolling and wrapping just to end up with a watery casserole that looked like cafeteria scraps.
That frustrating afternoon got me thinking: why are we spending an hour rolling slippery cabbage leaves like burrito wrappers when the leaf itself naturally forms a perfect bowl?
What if, instead of rolling, you core small whole cabbage rounds or layer pliable, blanched cabbage leaves directly into individual baked cups? What if you pack them to the brim with seasoned, savory garlic-herb beef and rice, blanket them in a thick, concentrated tomato glaze, and melt a bubbling crown of mozzarella and provolone over the top until blistered and golden?
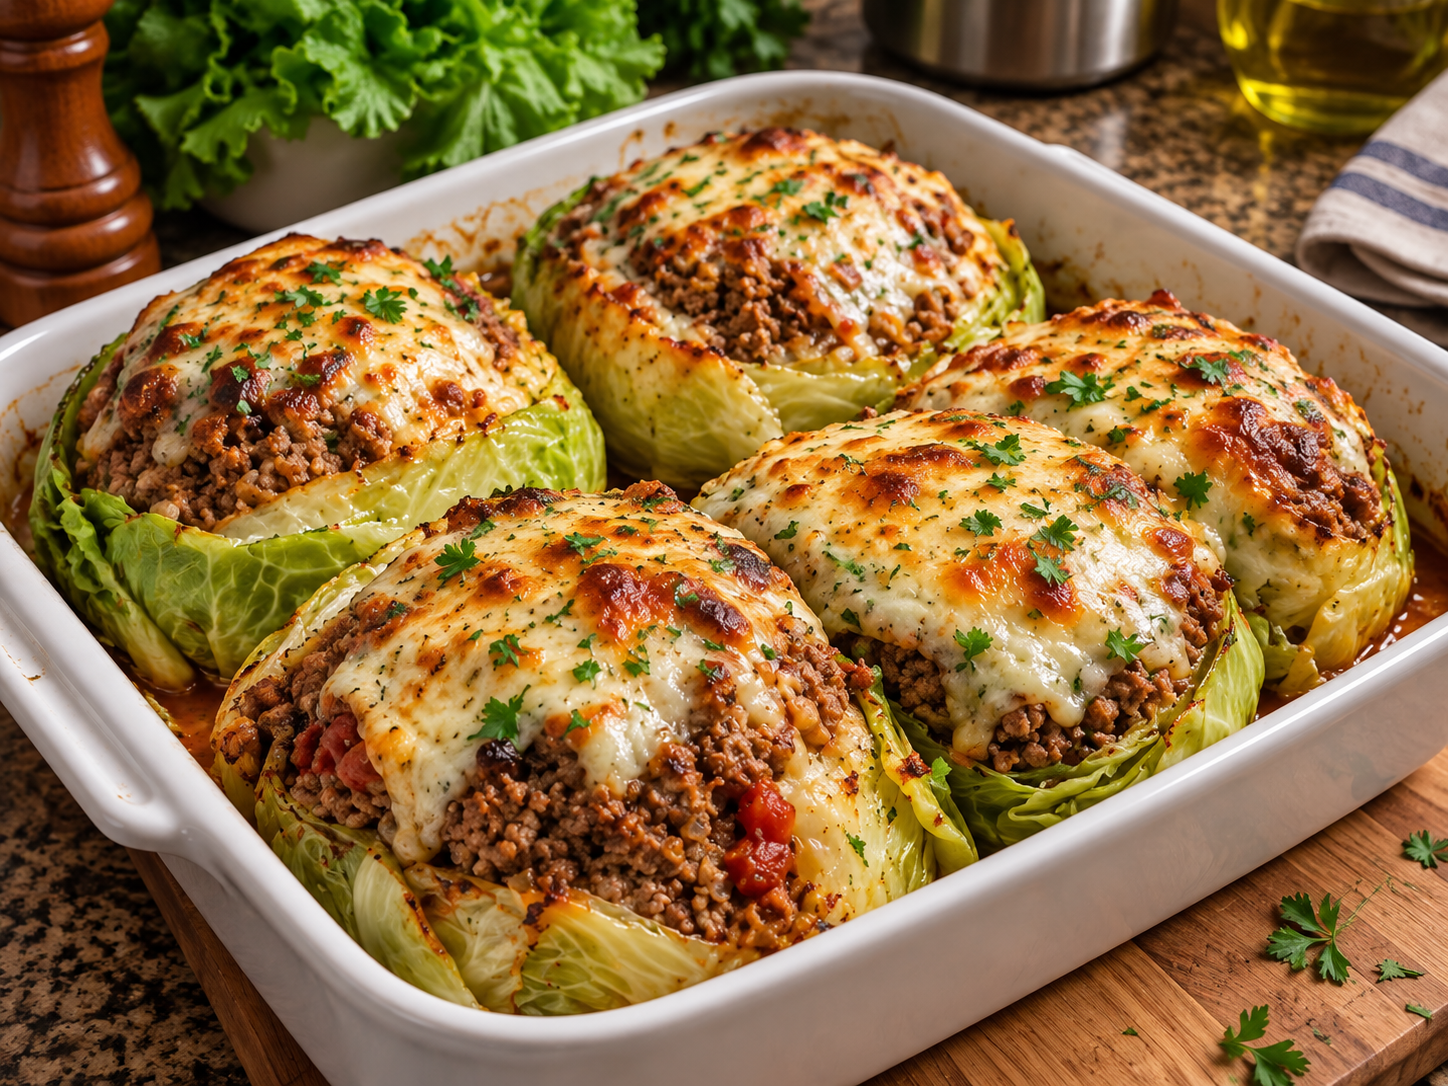
The photo above is the hard-earned victory sitting on my wooden trivet: individual baked cabbage cups nestled in a white ceramic casserole dish, packed with juicy, seasoned ground beef, sauced to perfection, and crowned with a thick, molten mantle of browned, blistered cheese being lifted cleanly with a metal spatula.
Here is how you make these Cheesy Stuffed Cabbage Bowls at home without tearing a single leaf or ending up with a watery casserole.
Why Traditional Cabbage Rolls Fail (And How Cabbage Cups Fix It)
Cabbage is a fantastic vegetable for braising, but its moisture mechanics can easily sabotage your cooking if you don’t adjust your technique:
1. The Watery Swamp Problem
Raw cabbage is roughly 92% water. When cabbage leaves heat up in a closed baking dish, they sweat out that water directly into your sauce. If you use a thin marinara or pour beef broth into the pan, your sauce dissolves into watery soup. The secret is par-boiling the leaves just enough to soften the structural rib, blotting them thoroughly with clean towels, and using a thick, reduced tomato-garlic paste base that welcomes that extra moisture without turning runny.
2. The Tough Center Rib
Every large cabbage leaf has a thick, fibrous white spine running down the center. If you leave that thick rib intact, the leaf is stiff, refuses to bend, and cracks open when shaped. Shaving down the raised back of the rib with a paring knife—or making a tiny V-cut at the very base—makes the leaf completely pliable, allowing it to cup effortlessly against the baking dish without snapping.
3. Missing the Cheese Seal
Traditional cabbage rolls are usually simmered plain under tomato sauce, which leaves the top leaves exposed to dry oven air where they turn leathery and tough. Blanketing each filled cabbage bowl with a generous layer of whole-milk mozzarella and sharp provolone does two things: it protects the tender cabbage edges from drying out, and it creates a rich, fatty, savory seal that makes every bite taste like an Italian-stuffed pepper crossed with lasagna.
Ingredients & Kitchen Tools
Essential Gear
- 9×13-Inch Ceramic or Enamel Baking Dish: (A sturdy rectangular white dish, like the one in the photo, holds heat evenly and supports the cabbage cups so they stay upright during baking).
- Large 6-to-8-Quart Stockpot: For blanching the whole cabbage head or individual leaves until pliable.
- 12-Inch Cast-Iron or Heavy Stainless Skillet: For browning the beef, sweating the aromatics, and blooming the tomato sauce.
- Slotted Metal Spatula: For lifting individual stuffed cups cleanly out of the baking dish without tearing the cabbage base.
- Paper Towels or Clean Flour-Sack Towels: Mandatory for blotting all surface moisture off the blanched leaves.
The Ingredient Breakdown
| Component | Ingredient | Quantity | Practical Role |
| The Edible Vessels | Savoy or Standard Green Cabbage | 1 large head (approx. 2.5 lbs) | Savoy leaves are tender and crinkled; green cabbage holds great cup structure. |
| The Savory Meat | 85/15 Ground Chuck or Beef/Pork Blend | 1.5 lbs (700g) | Delivers robust, juicy flavor without leaving an oily grease slick. |
| The Tender Grain | Cooked Jasmine or White Rice | 1 cup (cooked and cooled) | Absorbs internal meat juices, keeping the filling tender and fluffy. |
| Aromatic Base | Sweet Yellow Onion | 1 large (finely diced) | Sautéed in olive oil to build natural sweetness and moisture. |
| Aromatic Punch | Fresh Garlic | 5 cloves (minced) | Delivers bold, savory depth to both the filling and sauce. |
| The Rich Sauce | Tomato Paste & Crushed Tomatoes | 2 tbsp paste, 1 can (14 oz) crushed | Creates a thick, rich tomato glaze that won’t turn watery in the oven. |
| Savory Boosters | Worcestershire Sauce | 1.5 tbsp | Adds fermented umami that makes the ground beef taste richer. |
| Herbaceous Notes | Italian Seasoning & Smoked Paprika | 1 tbsp Italian herbs, 1 tsp smoked paprika | Earthy, aromatic spices that season the beef from the inside out. |
| The Moisture Cushion | Large Egg | 1 whole (lightly beaten) | Binds the meat, rice, and herbs into a tender, cohesive filling. |
| Base Seasoning | Coarse Kosher Salt & Cracked Pepper | 1.5 tsp salt, 1 tsp coarse black pepper | Crucial seasoning across the blanched cabbage, filling, and sauce. |
| The Molten Crown | Whole-Milk Mozzarella & Provolone | 2 cups (freshly shredded, mixed) | Melts into that bubbly, golden-brown blistered mantle seen in the photo. |
| Fresh Finish | Fresh Flat-Leaf Italian Parsley | 2 tbsp (finely chopped) | Sprinkled over the hot cheese for color and herbal lift. |
Step-by-Step Cooking Instructions
Step 1: Prep and Blanch the Cabbage Leaves
Bring your large 6-to-8-quart stockpot of water to a rolling boil over high heat. Add 1 tablespoon of kosher salt.
Using a sharp chef’s knife, cut a deep circle around the stem of the cabbage to remove the hard core.
Gently lower the whole cored cabbage head into the boiling water using tongs.
Let it simmer for 4 to 5 minutes.
As the hot water penetrates the core, the outer leaves will naturally loosen and pull away from the head.
Use your tongs to peel off 10 to 12 large, intact outer leaves as they soften, transferring them directly into a colander in your sink.
Rinse the leaves under cold tap water to stop the cooking.
Lay the blanched leaves flat across a double layer of paper towels and pat them completely bone-dry.
Cook’s Tip from Experience: Flip each leaf rib-side up on your cutting board. Use a small paring knife to slice off the raised, woody ridge of the center stem so it is flush with the rest of the leaf. This makes the leaf completely supple and easy to mold into cup shapes.
Step 2: Brown the Beef and Build the Filling
Place your 12-inch skillet over medium-high heat with 1 tablespoon of olive oil.
Add the 1.5 pounds of ground chuck and finely diced yellow onion.
Break the meat apart into fine crumbles with a wooden spoon or meat chopper.
Cook for 5 to 6 minutes until the beef is nicely browned and the onions are soft and translucent.
Stir in the minced garlic and cook for 60 seconds just until fragrant.
Tilt the skillet and carefully spoon out any excess rendered fat.
Stir in the 2 tablespoons of tomato paste, Italian seasoning, smoked paprika, 1.5 teaspoons of kosher salt, and 1 teaspoon of cracked black pepper.
Cook the paste against the hot pan for 2 minutes until it darkens to a rich brick-red color.
Remove the skillet from the heat source and let the mixture cool for 5 minutes.
In a large mixing bowl, combine the warm beef-and-onion mixture, the 1 cup of cooked rice, 1 lightly beaten egg, 1.5 tablespoons of Worcestershire sauce, and ½ cup of the crushed tomatoes.
Fold together gently with a spatula until evenly combined. The mixture should feel moist, rich, and cohesive.
Step 3: Shape and Line the Cabbage Cups
Preheat your oven to 375°F (190°C).
Lightly grease your 9×13-inch ceramic baking dish with olive oil or cooking spray.
Spoon the remaining crushed tomatoes across the bottom of the dish to create a thin, savory bed.
Now, build your cabbage bowls:
- Take two blanched cabbage leaves.
- Overlap them in your palm or directly in the baking dish, crossing the stems at the bottom to form a sturdy, cupped nest with ruffled leaf edges flaring upward.
- Pack roughly ½ to ¾ cup of the savory beef-and-rice filling firmly into the center of each cabbage nest.
- Gently fold the lower leaf edges upward around the meat, pressing them into a round, compact bowl that cradles the filling (just like the neat portions shown in the reference photo).
Arrange the stuffed cabbage cups snugly side-by-side in your baking dish.
A standard 9×13 dish comfortably holds five to six generous cups. Packing them close together keeps their leafy walls upright as they bake.
Step 4: Sauce, Cover, and Bake
Spoon a tablespoon of crushed tomato sauce over the exposed meat center of each cabbage cup.
Tear off a sheet of aluminum foil and cover the baking dish tightly.
Slide the dish onto the center rack of your preheated 375°F (190°C) oven and bake for 25 minutes.
Why the Covered Bake Matters: Cabbage needs trapped steam to finish tenderizing into melt-in-your-mouth perfection. The foil creates a mini steam chamber that finishes cooking the egg binder inside the beef while softening the cabbage leaves until they can be cut with a fork.
Step 5: The Molten Cheese Crown & Broil
Carefully remove the baking dish from the oven and discard the foil.
You should see bubbling juices around the base and tender, fragrant cabbage cups.
Now, blanket the top of each stuffed cup with your freshly shredded mozzarella and provolone cheese blend—about ⅓ cup of cheese per cup.
Make sure the cheese covers the exposed meat and drapes slightly over the cabbage rim to lock in moisture.
Return the dish to the oven uncovered for 10 minutes until the cheese is completely melted and bubbling.
Now, switch your oven setting to BROIL (High) for 2 to 3 minutes.
Watch through the oven window like a hawk!
The direct radiant heat from the broiler will cause the mozzarella to bubble violently, toasting into those gorgeous, savory, golden-brown blisters seen in the photo.
Pull the baking dish out the second the cheese looks toasted and bronzed.
Step 6: The Mandatory 5-Minute Rest
Set the hot ceramic baking dish onto a wooden board or heatproof trivet.
Scatter finely chopped fresh Italian parsley across the bubbling melted cheese for a vibrant green herbal pop.
Cook’s Real-Life Rule: Do not try to lift these cups out of the dish immediately!
Straight out of the oven, the melted cheese is molten liquid, and the cabbage cups are full of hot steam.
If you try to scoop one up right now, the leaf base can slip and the filling will slide out.
Let the dish rest undisturbed on your counter for 5 to 7 full minutes.
During this short pause:
- The melted cheese cools from boiling-hot to a rich, stretchy blanket that anchors the cabbage leaves firmly to the meat filling.
- The cabbage leaves absorb the surrounding tomato pan juices, becoming tender and sliceable.
- The interior beef-and-rice matrix sets into a firm, juicy cake that lifts cleanly in one piece.
Slide a flat metal spatula under the base of a cabbage cup (exactly as shown in the action shot) and transfer it directly onto a wide dinner plate.
Practical Troubleshooting & Common Mistakes
- “My cabbage cups unraveled in the baking dish.”
This happens if you didn’t shave down the thick center stem, or if you placed the cups too far apart. Always slice down the woody white rib so the leaf is flexible, and pack the cups snugly against each other in the baking dish so the ceramic walls and neighboring cups support their shape. - “The sauce in the bottom turned watery.”
This is the hallmark of using watery jarred sauce or skipping the leaf-drying step. Blanched cabbage leaves hold pockets of water; always pat them dry with towels before assembling. Also, use concentrated crushed tomatoes and tomato paste rather than loose, runny marinara. - “The cabbage was tough and hard to chew.”
Cabbage needs both moisture and time to soften. If your leaves are chewy, you likely baked them uncovered or didn’t blanch them long enough. Always blanch until the leaves are pliable, and keep the dish tightly sealed with foil for the first 25 minutes of baking.
Delicious Upgrades & Variations
While this Italian-American beef and mozzarella version is pure comfort food, you can easily adapt the flavor profile to match your cravings:
- The Traditional Polish Style: Swap the Italian seasoning for fresh chopped dill and a pinch of caraway seeds. Replace the mozzarella with a dollop of cold sour cream added right at the table.
- The Ground Turkey & Herb Twist: Lighten the dish by using ground turkey or chicken. Fold 2 tablespoons of basil pesto directly into the meat and rice mixture for rich herbal moisture that prevents poultry from drying out.
- The Spicy Arrabbiata Version: Add ½ teaspoon of crushed red pepper flakes and a splash of red wine to the tomato sauce, and swap the provolone for pepper jack cheese for a bold, fiery kick.
What to Serve with Cheesy Stuffed Cabbage Cups
These hearty, protein-packed cabbage bowls are a complete meal in a single dish, but they pair wonderfully with simple, rustic accompaniments:
- Crusty Garlic Bread or Sourdough: Mandatory for dipping into the rich tomato pan drippings left at the bottom of the ceramic dish.
- A Crisp Cucumber and Dill Salad: Thinly sliced English cucumbers and red onions tossed with white vinegar, olive oil, and fresh dill provide a crisp, refreshing, acidic crunch that cuts through the rich beef and melted cheese.
- Buttered Egg Noodles or Roasted Potatoes: If you are feeding a hungry crowd, serve these cups over a bed of buttered egg noodles to catch every drop of savory tomato-meat juice.
- A Medium-Bodied Red Wine: A glass of Chianti, Sangiovese, or Pinot Noir complements the sweet braised cabbage and rich tomato sauce without overpowering the dish.
Storing and Reheating Leftovers
If you have leftover stuffed cabbage cups, let the baking dish cool to room temperature, cover tightly with foil, or transfer individual cups into an airtight glass container. They keep beautifully in the refrigerator for up to 4 days.
When reheating, skip the microwave if you want to keep that incredible bubbly cheese texture.
Instead, use your oven or toaster oven:
- Place the leftover cabbage cup into a small oven-safe dish.
- Spoon 1 to 2 tablespoons of water or broth around the base to generate steam.
- Cover loosely with foil and warm at 350°F (175°C) for 12 to 15 minutes until heated through.
- Remove the foil for the final 2 minutes so the cheese bubbles and stretches again.
The cabbage stays remarkably tender, the beef filling remains succulent, and you get to enjoy all the deep comfort of homemade stuffed cabbage without ever having to roll a single leaf again!