
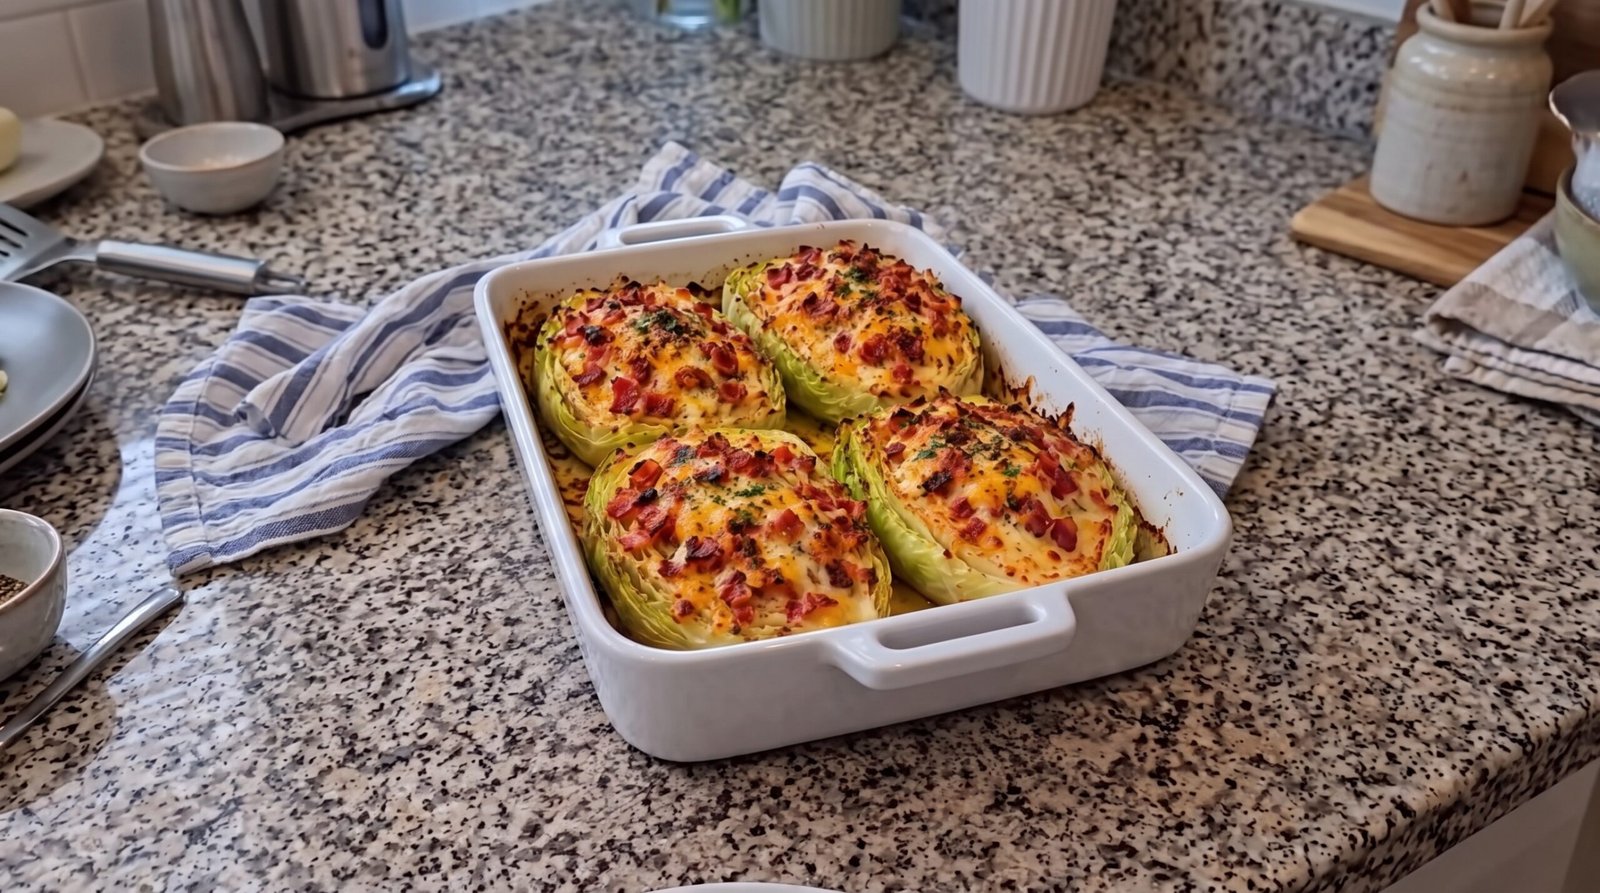
I remember the first time I tried to turn a head of cabbage into a main course. I had just come back from the store with a giant head of green cabbage that felt heavier than a bowling ball, and I had absolutely no plan for it. I was staring at my kitchen counter, tired after a long day, wanting something warm and filling that did not require a complicated sauce or five different pans. I decided to slice it into thick, sturdy wedges and treat them like a canvas for some of my favorite pantry staples. What came out of the oven was a revelation. The edges of the cabbage had turned a deep, dark brown where they touched the hot baking dish, while the inside stayed tender and sweet. When topped with melted cheese and crispy bacon, those simple leaves transformed into a hearty, savory meal that I have been making every week since.
This recipe for baked cabbage wedges is about letting the heat do the work. It is a straightforward approach that turns a humble vegetable into the star of the table. You will learn how to prepare the cabbage so it stays together, how to choose the right cheese for the best melt, and exactly how long to keep it in the heat to get the right texture. It is a simple dinner for when you want to use fresh ingredients without spending all night standing over the stove.
Why This Recipe Works
The main reason I reach for this recipe again and again is the combination of textures. When you roast cabbage wedges, the outer layers of the leaves catch the heat of the oven and brown. This process, which cooks the moisture out of the leaves, creates a concentrated, savory flavor that you just cannot get from boiling or steaming. While the edges are turning dark and picking up a hint of sweetness, the core of the wedge remains tender and buttery. It is a contrast that keeps every bite interesting.
Then there is the topping. Adding a layer of cheese and bacon serves two purposes. First, the fat from the bacon renders down and drips into the leaves, acting like a basting agent. This keeps the interior of the cabbage from drying out as it bakes. Second, the cheese melts into the crevices of the cabbage, acting as a glue for the bits of crispy bacon. You end up with a dish that is salty, savory, and rich, which balances out the mild flavor of the cabbage itself.
Ease of preparation is another big factor. Unlike stuffed cabbage rolls that require you to blanch leaves and carefully roll them without tearing, this recipe only needs a sharp knife and a sturdy baking dish. You spend about five minutes prepping the cabbage and then the oven does the heavy lifting for forty-five minutes. It gives me enough time to tidy up the kitchen or get a small salad ready. Since everything bakes in one dish, the cleanup is fast as well. It is a reliable, stress-free way to feed a group or just have extra for lunch the next day.
Ingredient Notes
The Base
The most important ingredient is the cabbage itself. You want a fresh, firm head of green cabbage. When you hold it, it should feel dense for its size. Avoid heads that have loose or wilted outer leaves, as those have likely been sitting in the store too long. I usually look for heads that are about two pounds. This size gives you nice, thick wedges that hold their shape well when you bake them. If you can only find smaller ones, you might get fewer wedges, but they will still work. If you have a head that is falling apart, it is better to save it for a stir-fry or coleslaw because it will not stay in a wedge shape in the oven.
The Toppings
For the cheese, I prefer a mix that melts well. Sharp cheddar is my go-to because it provides a strong flavor that stands up to the cabbage. However, you can use Monterey Jack or even a mix of Gruyere if you want something nuttier. The key is to grate it yourself. Pre-shredded cheese is coated in potato starch to keep it from clumping in the bag, which prevents it from melting into that smooth, gooey texture we want here.
For the bacon, I suggest using thick-cut varieties. Since we are chopping it into pieces, thick-cut bacon provides more texture and holds up better during the baking process. If you want to save a little time, you can use pre-cooked bacon, but I find that cooking it fresh in a skillet allows you to control the crispness. You want it to be firm before it hits the oven, because it will only get slightly darker once it is on top of the cabbage.
Seasoning and Liquids
A little bit of olive oil or melted butter is essential to help the cabbage brown and to carry the flavor of the salt and pepper. I also add a dash of garlic powder and onion powder to the oil mixture. Fresh herbs like parsley or chives add a pop of color and a fresh note at the end to cut through the richness of the bacon and cheese.
| Ingredient | Amount | Notes |
|---|---|---|
| Green cabbage | 1 large head | Roughly 2 pounds |
| Olive oil | 3 tablespoons | Or melted butter |
| Bacon | 6 strips | Thick-cut preferred |
| Cheddar cheese | 1.5 cups | Shredded from a block |
| Garlic powder | 1 teaspoon | Adds depth |
| Salt and pepper | To taste | Use sparingly |
| Fresh parsley | 1 tablespoon | Chopped for garnish |
The Recipe
- Prep Time: 10 minutes
- Cook Time: 45 minutes
- Total Time: 55 minutes
- Servings: 4
- Difficulty: Easy
Equipment Needed
- Large sharp chef's knife
- Large cutting board
- 9×13 inch baking dish
- Large mixing bowl
- Small skillet for the bacon
- Cheese grater
Step 1: Prep the Ingredients
First, preheat your oven to 400 degrees Fahrenheit. While the oven heats up, remove the damaged or wilted outer leaves from the head of cabbage. Use your knife to slice the cabbage in half through the core, then slice each half into two wedges. You should end up with four thick wedges that each still have a piece of the core attached. The core is important because it acts as the anchor that keeps all the leaves together while they roast.
Arrange the four wedges in your baking dish. They should fit snugly but do not crowd them too much or they will steam instead of roasting. If you have any small stray leaves that fell off during cutting, you can tuck them into the gaps, but focus on the main wedges.
Step 2: Prepare the Bacon
While the oven is coming up to temperature, fry your bacon in a skillet over medium heat. Do not worry about making it extra crispy, just get it to the point where the fat has rendered out and the edges are starting to brown. This usually takes about six or seven minutes. Remove the bacon to a paper towel-lined plate to drain. Once it is cool enough to handle, chop it into small, bite-sized pieces.
Step 3: Season the Cabbage
In a small bowl, whisk together the olive oil, garlic powder, salt, and pepper. Use a pastry brush or just a spoon to drizzle this mixture over the cut sides of the cabbage wedges. You want to make sure you get a little bit of the oil into the spaces between the leaves. This will help the leaves soften and pick up the flavor of the seasoning as they cook.
Step 4: First Roast
Place the dish in the center rack of your oven and roast for 30 minutes. You will notice the cabbage starting to brown along the edges, and the leaves will begin to wilt slightly. At this point, the cabbage should be starting to soften, but it will not be tender enough to eat yet. This is the stage where the magic happens, and the raw, harsh flavor of the vegetable begins to mellow out.
Step 5: Add Toppings
After the 30 minutes are up, carefully pull the dish out of the oven. Sprinkle the shredded cheese evenly over the tops of each cabbage wedge, making sure it gets into the layers. Top the cheese with your chopped, pre-cooked bacon. The bacon will stick to the cheese as it melts. Put the dish back into the oven for another 15 minutes.
Step 6: Final Bake
Bake for the final 15 minutes until the cheese is bubbling and has turned a nice golden color. The cabbage should be soft when pierced with a fork. Remove the dish from the oven and sprinkle with your chopped fresh parsley. Let it sit for about 5 minutes before serving so the cheese sets slightly and does not slide off the cabbage when you lift it out of the dish.
Mistakes I Made (So You Don't Have To)
Cutting the wedges too thin
In my early attempts, I cut the cabbage into thin, steak-like slices. The problem was that without the core to hold them together, the leaves just fell apart in the oven and turned into a pile of limp greens. The fix is to ensure each wedge has a generous piece of the core attached. This is the structural support for the dish and it makes it much easier to transfer from the pan to the plate.
Overloading the toppings
I once tried to pile on way too much cheese, thinking more was better. What happened was the cheese melted and ran down into the pan, burning onto the bottom of the dish before the cabbage was cooked. It created a smoky smell and a messy clean-up. Now, I keep the cheese focused on the top surface of the wedges. It stays where it belongs and creates that nice crust I want.
Forgetting to season the layers
My first batch was bland because I only put salt and oil on the top of the wedge. The inside leaves didn't get any flavor, and the dish tasted like plain, watery cabbage. Now, I make sure to pull the layers apart just a little bit with my fingers while I am brushing on the olive oil mixture. It ensures that the seasoning gets deep into the center of the wedge, which makes every bite delicious.
Not resting the dish
I used to rush to serve these the second they came out of the oven. Because the cabbage is hot and the cheese is molten, everything would fall apart as soon as I touched it with a spatula. Letting the dish rest for at least 5 minutes allows the cheese to firm up just enough to hold the bacon in place and makes for a much neater presentation.
Variations and Tips
Using butter instead of oil
If you want a richer, more savory profile, swap the olive oil for melted butter. The milk solids in the butter will brown along with the cabbage, giving the whole dish a nutty, toasted flavor. It pairs really well with the sharp cheddar and bacon, though you might need to use a little less salt in your spice mix since butter usually contains more salt than olive oil.
Adding some heat
If you like things with a bit of a kick, add a pinch of red pepper flakes to your oil mixture before brushing it on the cabbage. You can also sprinkle a little cayenne pepper over the cheese right before you put it back in the oven. It adds a nice background warmth that cuts through the fat of the bacon and cheese without being overwhelming.
The make-ahead tip
You can prep the cabbage wedges earlier in the day and keep them in the baking dish in the fridge. Just brush them with the oil and spices, cover the dish with plastic wrap, and keep it chilled until you are ready to bake. Do not add the cheese and bacon until you are ready for the final step. This saves me time on busy evenings when I just want to preheat the oven and get things going.
Substituting the cheese
If you want to experiment, try using a blend of shredded Mozzarella and Parmesan. The Mozzarella provides that long, stretchy pull that people love, while the Parmesan adds a salty, savory punch that browns beautifully. It gives the dish a different personality compared to the sharpness of cheddar, but it is just as tasty.
Storage and Reheating
If you have leftovers, store them in an airtight container in the refrigerator within two hours of cooking. They will stay good for up to 3 days. When you are ready to eat them again, I recommend reheating in the oven at 350 degrees Fahrenheit for about 10 to 15 minutes, or until the cabbage is steaming hot. You want to make sure it reaches 165 degrees Fahrenheit to be safe. Avoid the microwave if you can, because it tends to make the cabbage turn soft and watery, and the bacon will lose its texture. Unfortunately, this dish does not freeze well, as the high water content of the cabbage causes it to become mushy and lose its structure once thawed.
Frequently Asked Questions
Can I use red cabbage instead of green?
Yes, you can absolutely use red cabbage. It will taste slightly earthier and a bit more bitter than green cabbage, but it works just as well in terms of structure. Just keep in mind that the color will bleed into the dish, and it might look a bit different. It still cooks in the same amount of time, so you don't need to change the temperature or the steps.
Why is my cabbage still hard in the center?
If the center core of the wedge is still crunchy after 45 minutes, it usually means the heat was too low or the wedges were cut too thick. You can cover the dish with a piece of aluminum foil and put it back in the oven for another 10 minutes. The steam trapped under the foil will help finish cooking the core without burning the top.
Should I remove the core before eating?
That is a personal preference. Some people love the core because it gets sweet and tender when roasted, while others find it a bit tough. You can easily cut it away with a fork once it is on your plate. It is better to leave it on during cooking so the wedge holds its shape, even if you decide not to eat it later.
Can I make this in an air fryer?
You can, provided you have an air fryer basket large enough to hold the wedges without crowding them. Reduce the temperature to 375 degrees Fahrenheit and start with 20 minutes for the first roast. Check for tenderness, then add the cheese and bacon and cook for another 5 minutes. Watch it closely, as air fryers cook much faster than standard ovens and can burn the top quickly.
What should I serve with this?
Since this is a hearty dish with bacon and cheese, I usually pair it with something light like a simple green salad with a vinaigrette dressing. A side of crusty bread is also nice for soaking up any juices in the bottom of the pan. If you want a more substantial meal, a piece of grilled protein like chicken or a pork chop goes well, but the cabbage is often filling enough on its own.
Final Thoughts
Making these cheesy bacon cabbage wedges has taught me that you don't need fancy ingredients to create a memorable meal. Sometimes, the best dishes are the ones where you treat a basic, inexpensive vegetable with a little care and let the heat do the work. It is my go-to when I want comfort food without the hassle.
I hope you find this recipe as useful as I do. It is a great way to use up a head of cabbage and turn it into something that everyone at the table will look forward to eating. Don't be afraid to experiment with the seasoning or the type of cheese you use; once you get the technique down, the possibilities are endless. Enjoy your cooking.