
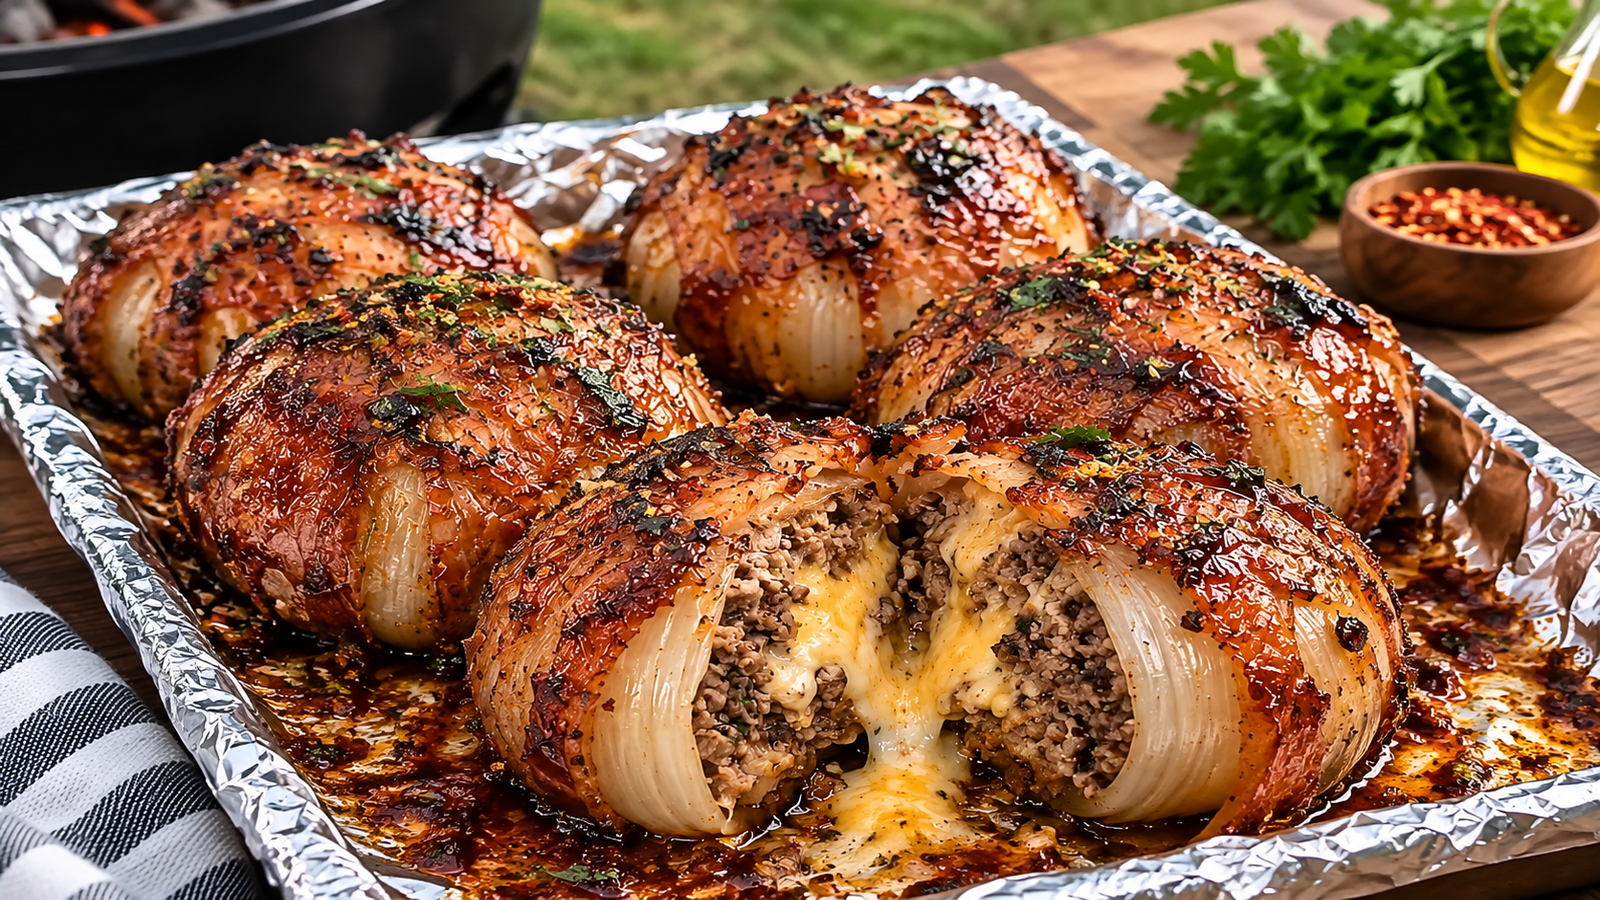
I remember the exact moment I realized standard burgers weren’t going to cut it for my weekend cookout. I had the smoker fired up, a fridge full of standard ground beef, and a crowd of friends expecting something memorable. I wanted the flavor profile of a bacon cheeseburger, but with a presentation that would actually make people stop and look. That’s when I decided to take those classic ingredients and stuff them inside a whole sweet onion.
The result is what you see here: Bacon-Wrapped, Cheese-Stuffed Onion Bombs. When you slice one of these open, a molten center of yellow cheese spills out over savory, seasoned ground beef. The meat is encased in a tender, translucent layer of sweet onion, and the entire thing is wrapped in bacon that has been caramelized with a dark, sticky BBQ glaze and sprinkled with green herbs. It is backyard barbecue food at its absolute peak, and while they look incredibly complex, assembling them is just a matter of basic construction.
The Anatomy of an Onion Bomb
These aren’t just thrown together; they are built in layers to ensure everything cooks perfectly at the same time. The outermost layer is thin-cut bacon. You need thin bacon so the fat renders completely and crisps up before the inside overcooks. Underneath that is the onion shell. As it roasts or smokes, the onion absorbs the bacon fat from the outside and the beef juices from the inside, transforming from sharp and raw to sweet and tender.
The core is where the magic happens. A dense layer of seasoned ground meat surrounds a solid block of cheddar cheese. As the meat cooks and tightens, it traps the melting cheese inside. When you finally cut into it, the cheese erupts, mimicking the perfect juicy cheeseburger experience but without the bun.
The Mandatory Ingredients
To replicate the exact look and flavor of the onion bombs pictured, stick closely to these ingredients. The ratios are important to ensure the meat fits inside the onion and the bacon wraps entirely around the exterior.
| Ingredient | Amount | Notes |
| Large Sweet Onions | 3 to 4 whole onions | Vidalia or Walla Walla work best. Look for perfectly round onions to make wrapping easier. |
| Ground Beef (80/20) | 1.5 lbs | Do not use lean beef (90/10). You need the fat content to keep the meat from drying out during the long cook. |
| Cheddar Cheese Block | 4 oz | Must be a solid block cut into 1-inch cubes. Pre-shredded cheese melts too quickly and will disappear into the meat. |
| Thin-Cut Bacon | 12 to 16 slices | Standard or thin-cut is mandatory. Thick-cut bacon will not render or crisp properly on this dish. |
| Your Favorite BBQ Rub | 2-3 tbsp | Used to season the ground beef. A sweet and smoky pork/beef rub works perfectly. |
| Sticky BBQ Sauce | 1/2 cup | Go for a thicker, sugar-based sauce so it tacks up and caramelizes on the bacon. |
| Fresh Parsley | 2 tbsp | Finely chopped for garnishing the finished sticky glaze. |
[Image 2: Close up of whole sweet onions being hollowed out on a wooden cutting board]
Prepping the Onion Shells
This is the only part of the recipe that requires a little finesse. If you force the onion, you’ll crack the outer rings, which leads to your cheese leaking out during the cook.
First, slice off the top and bottom of the onion, just enough to expose the inner layers. Peel off the papery outer skin. Now, you need to separate the layers. I find the easiest method is to take your thumbs and gently push the center rings out, leaving the outermost two or three layers intact. You want the shell to be sturdy. If you only leave one layer of onion, it will tear when you try to wrap the bacon around it.
Save the center onion pieces! Chop them up and freeze them for your next batch of soup, or toss them in a foil packet with some butter to smoke alongside the onion bombs.
Mixing and Stuffing
Place your 80/20 ground beef into a large bowl and sprinkle in your BBQ rub. Mix it gently with your hands. Overworking the beef will make it tough and dense.
Take a handful of the seasoned beef and press it into the bottom of your hollowed-out onion shell. You are creating a small bowl out of the meat. Place one of your 1-inch cheddar cheese cubes directly into the center of the meat. Next, take another small handful of beef and press it over the top of the cheese, sealing it completely.
Critical Step: Make sure the meat is packed tightly against the inner walls of the onion, and ensure the cheese is fully encased in beef. If there is a gap, or if the cheese is touching the onion wall directly, it will find a way to leak out during the cooking process.
[Image 3: Ground beef mixed with BBQ rub, alongside perfectly portioned cubes of cheddar cheese]
The Bacon Wrapping Technique
Wrapping a sphere in flat strips of meat can be frustrating if you don’t have a plan. Take one slice of thin-cut bacon and drape it vertically over the stuffed onion, tucking the ends underneath the bottom. Take a second slice and drape it horizontally, creating an “X” across the top.
Depending on the size of your onion, you will need one or two more slices wrapped around the “equator” of the onion to cover any exposed spots. The bacon should stretch slightly as you wrap it. As the bacon cooks, it will shrink and tighten, holding the entire bomb together. There is usually no need for toothpicks if you overlap the ends on the bottom of the onion, but you can use them if your bacon feels loose.
[Image 4: Hollowed onion rings being carefully stuffed with the ground beef mixture and a cube of cheddar]
Cooking Instructions (Smoker or Oven)
These onion bombs require indirect heat. If you hit them with a direct flame, the bacon will burn before the raw beef inside is safe to eat. You can cook these perfectly on a smoker (for maximum flavor) or in a standard oven.
The Smoker Method (Preferred) Preheat your smoker to 250°F (120°C). Hickory, apple, or cherry wood chunks work beautifully here. Place the bacon-wrapped onions directly on the grates or on a foil-lined baking sheet as seen in the reference. Smoke them for roughly 1.5 to 2 hours.
You are looking for two things: an internal temperature of 160°F (71°C) in the ground beef, and fully rendered, crispy bacon on the outside.
The Oven Method
If you don’t have a smoker, preheat your oven to 375°F (190°C). Place a wire rack over a foil-lined baking sheet. The wire rack is crucial in the oven; it allows the bacon fat to drip away so the bottoms don’t get soggy. Bake for 45 to 60 minutes, checking the internal temperature of the meat.
[Image 5: Raw stuffed onions wrapped in slices of thin-cut bacon, ready for the heat]
The Glaze and the Finish
No matter which cooking method you choose, the final 15 minutes are reserved for the glaze. Once the bacon is browned and the meat is cooked through, use a silicone brush to paint a generous layer of sticky BBQ sauce over the entire exterior of each onion bomb.
Let them continue to cook for another 15 minutes. The sugars in the sauce will caramelize, creating a dark, sticky, slightly charred exterior. Remove them from the heat, sprinkle the tops with freshly chopped parsley, and let them rest for 10 minutes. Do not skip the resting phase. If you slice them immediately, the molten cheese will completely run out onto the cutting board instead of staying thick and gooey inside the meat.
[Image 6: Onion bombs on a foil-lined baking sheet, getting brushed with a thick layer of BBQ sauce]
Real-World Troubleshooting and Mistakes
I have made dozens of these, and the learning curve usually involves a mess on the bottom of my smoker. Here are the most common pitfalls:
- The Cheese Blowout: This is the most common issue. You pull them off the smoker, and the cheese has erupted out of the side, leaving an empty cavity. This happens when the cheese isn’t fully encased in the beef, or when you use shredded cheese that melts too rapidly. Always use a solid block of cheese and pack the meat firmly.
- Rubbery Bacon: This is the sad result of using thick-cut, premium bacon. Thick-cut bacon is great for breakfast, but wrapped around an onion at 250°F, the fat simply will not render fast enough. Stick to cheap, thin-cut bacon; it conforms to the shape better and crisps up perfectly.
- Slipping Bacon: If your bacon starts unspooling during the cook, you likely didn’t overlap the seams on the bottom of the onion. The weight of the onion resting on the bacon seams is what locks it in place.
- Raw Onions: If you push your smoker temperature too high (over 300°F), the bacon will crisp and the meat will cook, but the thick onion shell won’t have enough time to soften. Low and slow is the key to achieving that tender, bite-through onion texture.
Texture and Flavor Profile
When properly executed, eating one of these is a serious sensory experience. The first thing you hit is the sticky, sweet, caramelized BBQ glaze clinging to the salty, smoky snap of the bacon. Right beneath that, the sweet onion has lost all its raw bite and acts as a savory, tender wrapper. Then you get the densely packed, heavily seasoned beef, and finally, the rich, molten cheddar cheese that coats the entire bite. It is rich, heavy, and incredibly satisfying.
Because of the richness, one onion bomb is usually a full meal for most people. I like to serve them alongside something acidic or fresh to cut the fat—a bright, vinegar-based coleslaw or simple grilled asparagus works perfectly.
[Image 7: A sliced onion bomb showing the melted cheese core and the cooked beef inside the onion shell]
Storage and Reheating
If you have leftovers, store them in an airtight container in the fridge for up to three days.
Reheating them properly is vital if you want to save the bacon. Do not use the microwave; the bacon will become soggy and rubbery, and the meat will turn grey and tough. The absolute best way to reheat an onion bomb is in an air fryer at 350°F for about 8 to 10 minutes. This re-crisps the bacon and gently remelts the cheese core without drying out the ground beef. Alternatively, you can put them back in a 350°F oven on a wire rack for 15 minutes.
Frequently Asked Questions
Can I use ground pork or sausage instead of ground beef?
Absolutely. A 50/50 mix of ground beef and ground pork sausage (like a mild Italian or breakfast sausage) is incredible. It adds even more fat and flavor. Just ensure whatever meat you use isn’t too lean.
Can I prep these the day before the cookout?
Yes. You can hollow the onions, stuff them, wrap them in bacon, and leave them uncovered in the fridge overnight. In fact, leaving them uncovered in the fridge helps dry out the exterior of the bacon slightly, which aids in crisping up on the smoker the next day. Just wait to apply the BBQ sauce until the very end of the cook.
What kind of cheese works best if I don’t like cheddar?
Pepper Jack is an excellent substitute if you want a little heat. Gouda melts beautifully and adds an extra layer of smoke. Avoid soft cheeses like fresh mozzarella or brie, as they will liquify too quickly and leak out before the meat is fully cooked. Always buy a solid block and cut your own cubes.
Building these onion bombs takes a little patience during the prep phase, but watching your friends slice into them and seeing that river of cheese pour out makes the effort completely worth it. They are messy, they are over-the-top, and they are exactly what backyard barbecue food should be.