
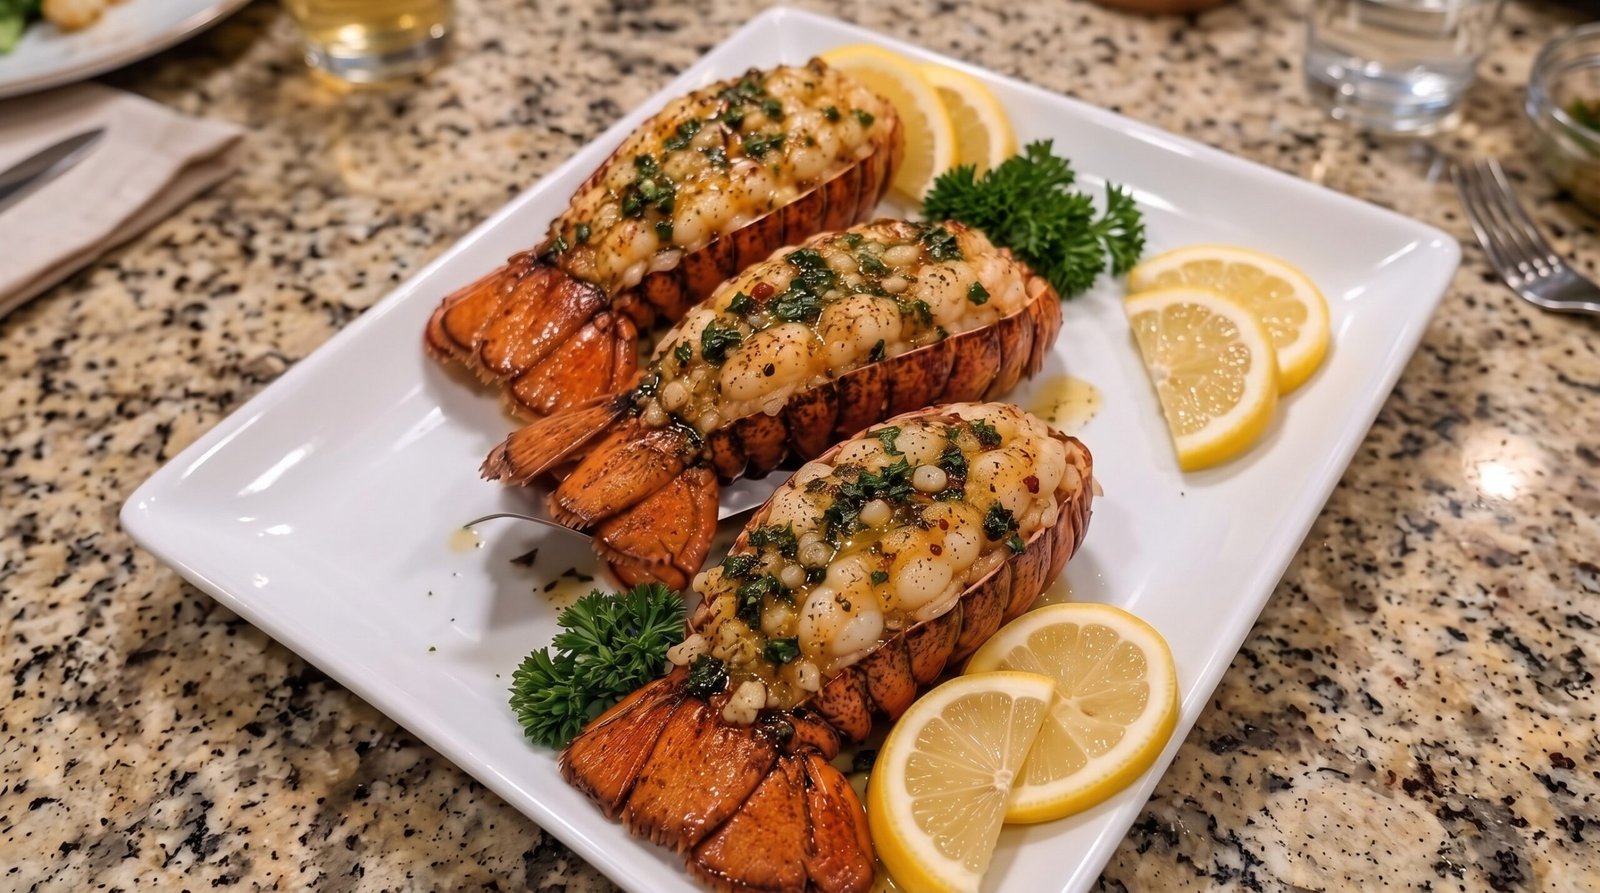
I remember the first time I tried to cook lobster tails in my own kitchen. I was terrified of ruining such an expensive ingredient. I had this idea that lobster was something only chefs at fancy restaurants could handle. I kept overthinking the timing and worrying that I would end up with rubbery, tough meat that felt like chewing on a pencil eraser. After a few tries, I realized that cooking lobster tails is actually much easier than roasting a chicken or even making a decent steak. Once you learn how to butterfly the shell, which is just a simple cut down the back, you are halfway there. I used to be intimidated by seafood, but this garlic butter broiled lobster tails recipe has become my go-to for birthdays, anniversaries, or just when I want a nice dinner on a Friday night without spending hours hovering over the stove.
You will find that this method relies on the broiler, which gives the lobster meat a nice color and helps the butter sauce soak right into the flesh. The high, direct heat is exactly what the delicate meat needs to cook through without drying out. This recipe provides you with the basic techniques and confidence to handle lobster tails without any stress. You get a meal that looks impressive and tastes even better.
Why This Recipe Works
The main reason I rely on this specific preparation is the broiling method. When you bake lobster, it often sits in its own juices and can become a bit soggy. By using the broiler, you are getting intense, direct heat from above. This cooks the top of the meat quickly and creates a slight golden hue on the surface, which adds a bit of flavor depth that you just do not get with standard oven roasting or boiling. It is a quick process, which is essential because lobster meat is very lean. Because it lacks fat, it can lose moisture in a heartbeat. Broiling takes only about 8 to 10 minutes depending on the size of your tails, so you are in and out of the kitchen quickly.
The second factor is the garlic butter sauce. I like to brush the butter mixture on both before the lobster goes into the oven and halfway through the cooking time. The first layer keeps the meat from drying out while the heat starts to penetrate the shell. The second application ensures that the garlic and herbs stay fresh and fragrant rather than burning under the intense heat. Using fresh parsley is a personal preference because it cuts through the richness of the butter and gives the dish a bright finish.
I also find that butterflying the shell is the best way to present the lobster. It serves two purposes. It makes the meat look beautiful and exposed, which is how you see it at high-end restaurants, but it also makes eating the meal much easier for your guests. There is no struggling with tools or getting shells everywhere. You just use a fork to lift the meat right out of the shell. It is functional, visually appealing, and keeps the meat evenly exposed to the heat source.
Ingredient Notes
The Seafood
- Lobster Tails: Aim for tails that are about 6 to 8 ounces each. This size is usually the standard for a single serving. When buying them, look for shells that appear vibrant in color, not dull or discolored. If you can find cold-water lobster tails, they generally have a cleaner, sweeter taste compared to warm-water varieties. Always check your product labels if you have specific dietary needs. I prefer to buy them frozen if fresh local options are not available because they are usually flash-frozen right on the boat to preserve quality. If you buy them frozen, make sure to thaw them completely in the refrigerator overnight. If you are in a rush, you can place them in a sealed bag in cold water for about an hour, changing the water every twenty minutes.
The Aromatics and Fats
- Salted Butter: Use a high-quality salted butter for the sauce. Since lobster is very neutral, the salt in the butter helps bring out the natural sweetness of the meat. If you only have unsalted butter, just add a pinch of kosher salt to the mixture.
- Fresh Garlic: You really need to use fresh cloves here. Avoid the pre-minced jars found in the produce aisle, as they often contain additives that change the flavor profile when heated. You want the sharp, pungent aroma of freshly crushed garlic to infuse the butter.
- Lemon Juice: Freshly squeezed lemon is a must. The bottled stuff has a metallic aftertaste that will ruin the delicate flavor of the seafood. The acidity of the lemon cuts through the butter and cleanses your palate with every bite.
- Fresh Parsley: Use curly or flat-leaf parsley. It adds a pop of color and a fresh, herbaceous note that balances the garlic and butter perfectly.
| Ingredient | Amount | Notes |
|---|---|---|
| Lobster Tails | 4 tails | 6-8 ounces each |
| Salted Butter | 4 tablespoons | Melted |
| Fresh Garlic | 3 cloves | Minced finely |
| Lemon Juice | 1 tablespoon | Freshly squeezed |
| Fresh Parsley | 2 tablespoons | Chopped |
| Paprika | 1/2 teaspoon | For a hint of color |
| Black Pepper | 1/4 teaspoon | Freshly cracked |
The Recipe
- Prep Time: 15 minutes
- Cook Time: 9 minutes
- Total Time: 24 minutes
- Servings: 4
- Difficulty: Easy
Equipment needed: Kitchen shears, a small saucepan, a basting brush, and a rimmed baking sheet.
Step-by-Step Instructions
Step 1: Prep the Lobster Tails
Start by taking your kitchen shears and cutting down the center of the hard shell on the top of the tail. Cut until you reach the base of the tail, but be careful not to cut into the meat underneath. Once the shell is split, use your fingers to gently pry the shell open slightly. You want to loosen the meat from the inside so you can lift it up.
Run your thumb between the meat and the bottom shell to pull the lobster meat upward. Lift the meat out of the shell, keeping it attached at the base of the tail. Lay the meat on top of the shell so it sits flat. This is called butterflying. Doing this properly is the secret to a professional look. Repeat this for all four tails.
Step 2: Make the Garlic Butter
In a small saucepan, melt the four tablespoons of salted butter over medium-low heat. You do not want the butter to brown or separate, just melt it gently. Once it is liquid, remove the pan from the heat. Stir in the finely minced garlic, fresh lemon juice, chopped parsley, paprika, and black pepper.
Let this mixture sit for a couple of minutes so the flavors can get to know each other. The residual heat from the melted butter will soften the garlic slightly, which makes it much more pleasant to eat than raw, sharp pieces. Give it a good whisk before you start brushing it onto the meat.
Step 3: Season and Prep for Broiling
Place your butterflied lobster tails on a rimmed baking sheet. I like to line the tray with a piece of parchment paper just to make cleanup easier, though it is not strictly necessary. Using your basting brush, apply a generous amount of the garlic butter sauce over the top of each lobster tail.
Make sure you get into the crevices of the meat. You want the butter to coat everything. If you have extra butter sauce, save it for later, but try to use at least half of the mixture during this initial coating phase. The butter acts as a protective barrier against the harsh heat of the broiler.
Step 4: Broil the Lobster
Set your oven to broil on high. Place the baking sheet on the middle rack of the oven. Do not place it too close to the heating element or the garlic and parsley will burn before the lobster is cooked. The middle rack is usually about 6 inches away from the broiler, which is perfect for even cooking.
Broil the lobster for 8 to 10 minutes. You will know it is done when the meat turns opaque and firm. The internal temperature of the lobster should be around 140°F to 145°F when measured with a meat thermometer. The shell will also turn a bright, vibrant red color. Keep an eye on it; broilers can be quite aggressive, and you do not want to walk away.
Step 5: Final Glaze and Serve
Remove the baking sheet from the oven once the tails are cooked through. Immediately brush the remaining garlic butter over the cooked meat. This gives it a glossy, fresh appearance and adds that final punch of flavor before you bring it to the table.
Serve the lobster tails warm, maybe with extra lemon wedges on the side. I usually serve these with a side of steamed vegetables or a simple salad because the lobster and butter are quite rich on their own. Be sure to use a fork to enjoy every bit of the meat.
Mistakes I Made (So You Don't Have To)
Overcooking the Lobster
The biggest mistake I made in my early days was treating lobster like beef. I thought it needed a long time to get tender, but the opposite is true. If you cook it for even two minutes too long, it turns into rubber. Use a thermometer to check the temperature. If it goes above 145°F, it starts to lose its texture. If you do not have a thermometer, look for the meat to turn from translucent to a solid, pearly white. If it looks dry or stringy, you have gone too far.
Burning the Garlic
I used to add the garlic to the butter and let it sauté in the pan for too long before brushing it onto the lobster. By the time the lobster finished broiling, the garlic on top was black and bitter. Now, I only add the garlic to the melted butter off the heat. The gentle warmth is enough to flavor the butter without cooking the garlic to a crisp. If you prefer, you can even add the garlic raw to the melted butter and let it cook only while it is inside the oven on the lobster.
Improper Cutting
I once cut too deep and sliced all the way through the bottom shell, which caused the meat to fall apart during cooking. You only want to cut the top shell. Use your kitchen shears to follow the natural curve of the shell. If you feel resistance, stop and reposition the shears. Taking your time during this step ensures that the lobster stays in one beautiful piece, which makes for a much better presentation.
Using Old Butter
I once tried to save time by using margarine or a low-quality butter spread that had been in my fridge for a while. It completely ruined the delicate flavor of the lobster. Lobster is a luxury ingredient and it needs real, high-quality butter to taste its best. Stick with real, salted butter. The quality of your butter is just as important as the quality of the lobster itself, as it is the primary seasoning for the dish.
Variations and Tips
Adding a Touch of Heat
If you like things a little spicy, try adding a quarter teaspoon of red pepper flakes into your butter sauce. It adds a subtle warmth that contrasts well with the sweetness of the lobster. Just be careful not to overdo it, as you do not want to mask the natural flavor of the seafood. A little goes a long way.
Using Different Herbs
While parsley is the classic choice, you can swap it for fresh tarragon or chives. Tarragon has a slight anise flavor that pairs beautifully with shellfish. If you use fresh herbs, make sure they are very finely minced so they distribute evenly across the meat. Dried herbs do not work as well here, so try to stick with fresh if possible for the best results.
The Make-Ahead Trick
You can prepare the lobster tails by butterflying them and placing them on the baking sheet a few hours before you plan to cook them. Cover them with plastic wrap and keep them in the refrigerator. Make the garlic butter sauce separately and keep it in a small bowl. When you are ready to eat, simply brush the butter on and pop them in the broiler. It saves you all the prep work when guests are around.
Serving Ideas
I love serving these lobster tails with a side of warm crusty bread. You will want something to soak up all that leftover garlic butter at the bottom of the plate. A simple side of roasted asparagus or steamed broccoli also works well. The goal is to keep the side dishes light so the lobster remains the star of the show. If you want to be fancy, a glass of crisp white wine is a lovely pairing.
Storage and Reheating
If you have leftovers, they should be stored in an airtight container in the refrigerator. Seafood is delicate, so consume the leftovers within 24 hours for the best taste, although it is safe for up to 3 days if handled properly. Never leave the lobster out at room temperature for more than two hours after cooking.
When it comes to reheating, you want to be extremely careful not to overcook the meat again. I recommend heating it in a low-temperature oven or a toaster oven until just steaming hot, aiming for 165°F. Do not use the microwave if you can avoid it, as it will make the meat rubbery very quickly. If you must use a microwave, use the lowest power setting and watch it constantly. To be honest, I usually prefer to eat the leftovers cold in a lobster roll with a little mayo and celery the next day, which avoids the reheating issue entirely.
Frequently Asked Questions
Can I use frozen lobster tails for this recipe?
Absolutely. Just make sure to thaw them completely in the refrigerator before you start. If you try to cook them while they are still icy in the center, the outside will dry out before the middle is cooked through. Thawing them slowly is the best way to ensure the meat stays tender and juicy.
What should I do if my broiler doesn't have a high or low setting?
Most standard ovens just have a single broil setting. If that is the case for your oven, simply keep an eye on the lobster carefully. You might need to adjust the rack height if the top is browning too quickly before the meat is cooked. If it looks like it is browning too fast, move the tray down one rack level.
How do I know if the lobster is bad before I cook it?
Fresh or properly thawed lobster should smell clean, like the ocean. If the meat has a strong, fishy, or ammonia-like smell, do not cook it. The texture should be firm and bounce back slightly when touched. If it feels slimy or soft, it is best to discard it. Always trust your nose when it comes to seafood.
Can I cook these on the grill instead of the broiler?
Yes, you can grill these over medium-high heat. The process is similar, but you have to be much more careful about flare-ups because of the butter. I usually grill them shell-side down for most of the cooking time to protect the meat from direct flame. It gives a nice smoky flavor, but the broiler is my preferred method for consistent results.
Is it necessary to remove the vein from the lobster meat?
Usually, the vein is removed during the processing of the lobster tail, but sometimes you might see a thin dark line running along the center of the meat. If you see it, you can easily pull it out with the tip of a knife or your fingers. It is not harmful, but it can have a gritty texture, so it is better to remove it if you find one.
Final Thoughts
Making these garlic butter broiled lobster tails is a confidence booster. It is one of those meals that feels like a special occasion even if you are just treating yourself on a quiet evening. The simple combination of fresh seafood, high-quality butter, and a bit of garlic creates something truly special.
I hope you enjoy making this as much as I do. Just remember to watch the clock and keep an eye on that broiler. Once you get the timing down, you will be making this often. It is a simple, elegant dish that really highlights the beauty of good ingredients without any unnecessary complexity.