
I will never forget the disaster that was my first attempt at stuffed meatloaf.
It was a Sunday evening, football was on, and I had this grand vision of cutting into a savory, glaze-lacquered meatloaf and watching a river of hot, stretchy cheese flow onto the cutting board. I took two pounds of ground beef, flattened it haphazardly into a metal loaf pan, dumped an entire bag of shredded mozzarella in the middle, pinched the edges of the meat together with all the structural integrity of wet paper, smothered the top in ketchup, and slid it into the oven.
Forty minutes later, I smelled burning dairy.
I opened the oven door to complete chaos. The cheese had expanded under the heat, ruptured the weak top seam of the meat like an erupting volcano, and flooded the bottom of the scorching oven. Half the cheese had burned into black, bitter smoke on the oven floor, while the remaining meat sat in a pool of greasy liquid, split wide open, dry and empty inside. We had to air out the kitchen with three box fans and order takeout.
It took me three more tries—and some serious advice from an old diner cook—to understand the physics of stuffed meatloaf.
You cannot just shove cheese inside ground meat and hope for the best. You need an airtight meat seam, a moisture-locking panade, and a two-stage baking technique that sets the meat before the cheese fully expands.
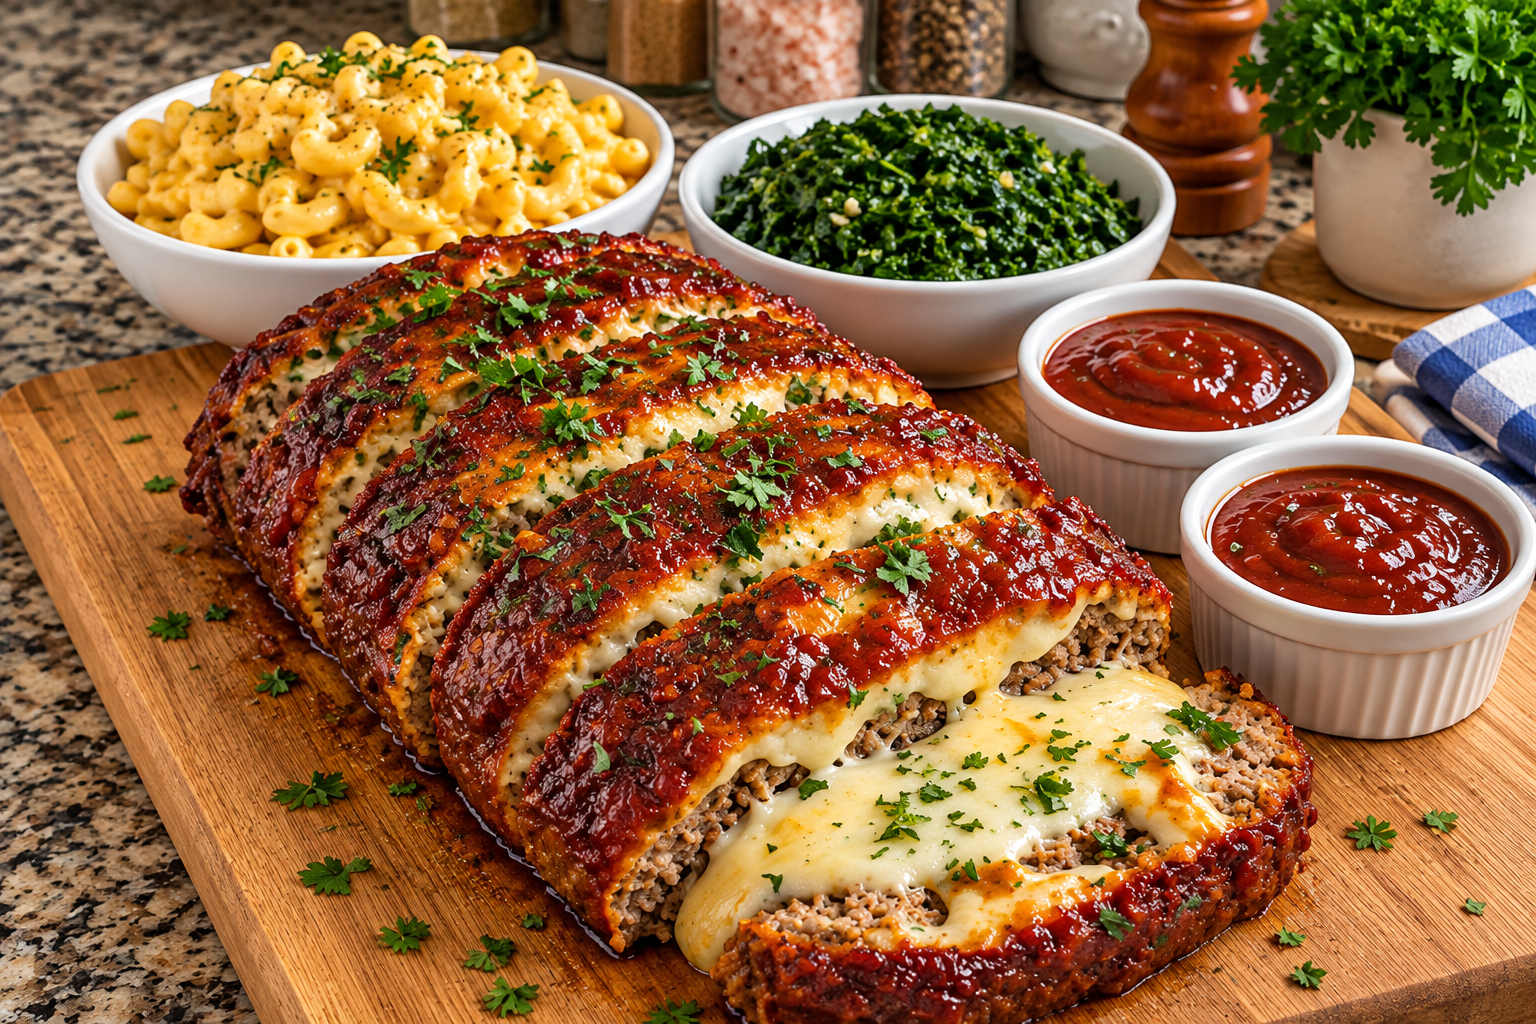
The photo above is the hard-won payoff: an ultra-tender, seasoned beef loaf with an edge-to-edge sticky tomato-herb glaze, a golden-toasted cheese crust on top, and a thick, molten mozzarella core that stays locked inside until the exact moment you carve it on the cutting board.
Here is how you make it at home without turning your oven into a dairy slip-and-slide.
Why Stuffed Meatloaf Fails (And the Science to Fix It)
Stuffing ground meat with cheese introduces a battle of temperatures and structural pressure. Here is why so many home versions burst or dry out:
1. The Seam Failure Trap
As ground meat cooks, the proteins shrink and contract, expelling moisture. As cheese heats up, it liquefies and expands with steam. If your meat wrap is thin or has any tiny hairline fissures, the expanding cheese will hunt down that weak spot and blast straight out of the loaf into the pan. Rolling the meat tightly like a jelly roll or forming a thick, seamless meat capsule using parchment paper is non-negotiable.
2. High-Moisture Cheese vs. Low-Moisture Block
If you use fresh mozzarella balls packed in brine, the water inside the cheese boils into steam, turning the center of your meatloaf into a wet puddle. Shredded bagged cheese is almost as bad because it is coated in starch that prevents a smooth, stretchy melt. The best choice is a solid block of low-moisture, whole-milk mozzarella (or provolone) cut into thick batons or freshly shredded from the block. It melts into that silky, stretchy ribbon without releasing water.
3. Baking in a Bread Pan vs. Free-Form Roasting
Pressing stuffed meatloaf into a deep bread tin forces the meat to boil in its own rendered fat and steam, softening the outer crust and increasing the odds that the seams split. Free-forming the loaf on a flat, foil-lined rimmed baking sheet lets hot air circulate around all four sides, creating a firm exterior that holds the cheese securely inside.
Ingredients & Tools You’ll Need
Essential Kitchen Gear
- Rimmed Baking Sheet (Quarter or Half-Sheet): Lined with heavy-duty foil and a sheet of parchment paper for effortless cleanup and easy meat transfer.
- Large Mixing Bowl: Roomy enough to toss the meat mix with your fingers without compacting it.
- Parchment Paper or Plastic Wrap: Your secret weapon for rolling the meat tightly around the cheese core without tearing.
- Instant-Read Digital Thermometer: (A ThermoWorks ThermoPop or similar digital meat probe is essential so you don’t overbake the beef).
- Sharp Chef’s Knife: For getting clean, thick slices that reveal the cheese center without tearing the meat.
The Ingredient Breakdown
| Component | Ingredient | Quantity | Practical Role |
| The Meat | 80/20 Ground Chuck | 2 lbs (900g) | Ideal fat-to-lean ratio; keeps the loaf tender and juicy without drying out. |
| The Panade | Plain Panko Breadcrumbs | ¾ cup | Light, airy breadcrumbs that cushion the meat fibers against shrinking. |
| The Panade | Whole Milk (or Beef Broth) | ½ cup | Hydrates the breadcrumbs to trap internal moisture. |
| The Binder | Large Eggs | 2 whole | Lightly beaten to bind the meat mixture together. |
| Aromatic Core | Yellow Onion | 1 medium (finely minced) | Softened in butter before mixing so it doesn’t release raw water inside the loaf. |
| Aromatic Core | Fresh Garlic | 4 cloves (minced) | Delivers that classic savory Italian-American depth. |
| Savory Boosters | Worcestershire Sauce | 2 tbsp | Rich fermented umami backbone. |
| Savory Boosters | Tomato Paste | 2 tbsp | Adds concentrated richness and natural color to the meat mixture. |
| Savory Boosters | Grated Parmesan Cheese | ½ cup (freshly grated) | Blends into the beef for a salty, nutty bite. |
| Herbal Lift | Italian Herb Blend | 1.5 tsp | Dried basil, oregano, and parsley for warm aromatics. |
| Seasoning | Kosher Salt & Coarse Black Pepper | 1.5 tsp salt, 1 tsp pepper | Essential seasoning across the meat base. |
| The Molten Center | Low-Moisture Mozzarella | 8 oz (block cut into thick sticks or freshly shredded) | Melts into that glorious, gooey center without weeping water. |
| The Savory Glaze | Thick Marinara or Ketchup-BBQ Blend | ½ cup | Brushes over the top to caramelize into a sticky, glossy crust. |
| Top Cheese Crown | Provolone or Mozzarella Slices | 3 to 4 thin slices (or ¼ cup shredded) | Melts across the top ridges to toast under the broiler. |
| Garnish | Fresh Flat-Leaf Parsley | 2 tbsp (finely chopped) | Sprinkled over the carved slices for color and clean herbal brightness. |
Step-by-Step Cooking Instructions
Step 1: Build the Panade and Aromatics
In a small bowl, stir together the ¾ cup of panko breadcrumbs and ½ cup of whole milk. Set it aside for 5 to 10 minutes so the breadcrumbs drink up the milk and transform into a soft paste.
While the crumbs soak, melt 1 tablespoon of butter in a small skillet over medium heat. Add the finely minced yellow onion and cook for 5 to 7 minutes until completely soft, translucent, and sweet. Stir in the minced garlic and cook for 60 seconds until fragrant.
Remove the skillet from the heat and let the cooked onions cool for 5 minutes.
Cook’s Real-Life Tip: Never toss raw diced onions into ground meat. Raw onions release moisture as they bake, which creates pockets of steam that will blow out the seams of your meatloaf while leaving the onion crunchy and bitter. Always soften them in a pan first!
Step 2: Mix the Flavor Binder
In your large mixing bowl, lightly beat the 2 eggs with a fork.
Whisk in the softened panko panade, cooled cooked onions and garlic, 2 tablespoons Worcestershire sauce, 2 tablespoons tomato paste, ½ cup grated Parmesan cheese, Italian seasoning, kosher salt, and black pepper.
Whisk thoroughly until it looks like a thick, savory paste.
Combining all binders and seasonings beforehand means you will only need to touch the raw beef for about thirty seconds, preventing you from overworking the meat.
Step 3: Combine with a Gentle Hand
Add the 2 pounds of ground chuck to the bowl.
Using clean hands with fingers spread open like rakes, gently toss and fold the meat with the seasoning paste just until no dry streaks remain.
Stop immediately once it comes together. Squeezing, packing, or kneading ground beef breaks down the delicate muscle fibers, turning the finished loaf tough and rubbery instead of crumbly and tender.
Step 4: The Parchment Paper Roll (The Leak-Proof Method)
Tear off a large sheet of parchment paper (about 15 inches long) and lay it flat on your kitchen counter.
Turn the seasoned meat mixture out onto the center of the parchment.
Using your hands, press and pat the meat out into a flat, uniform rectangle roughly 10 inches wide, 12 inches long, and about ¾-inch thick. Keep the thickness consistent so there are no thin, fragile spots.
Arrange your low-moisture mozzarella down the center third of the meat rectangle, leaving a clear 1.5-inch border of bare meat around all four edges.
Now, use the parchment paper to lift the bottom edge of the meat and fold it snugly up and over the cheese. Lift the top edge of the meat and fold it down, overlapping the first fold.
Use your fingers to pinch and smooth the overlapping seam tightly until the seam disappears completely.
Pinch and tuck both end caps securely, folding the meat inward so the cheese core is completely sealed inside an airtight meat capsule.
Smooth your hands along the outside of the loaf, checking for any cracks, thin spots, or exposed cheese. If you find a weak spot, pinch meat from the ends to reinforce it.
Step 5: Transfer to the Pan
Line a sturdy rimmed baking sheet with heavy-duty aluminum foil for easy cleanup.
Gently roll the stuffed meatloaf off the parchment paper and onto the foil-lined baking sheet, seam-side down.
Taper the ends slightly so it forms a classic, rounded oblong loaf roughly 9 to 10 inches long and about 4 inches wide.
Step 6: The First Bake
Preheat your oven to 375°F (190°C).
Slide the uncovered baking sheet onto the middle oven rack and bake untouched for 35 minutes.
During this initial bake, the exterior meat proteins firm up, the panade sets, and the sealed outer shell cooks through before the interior cheese gets hot enough to exert steam pressure.
Step 7: Glaze, Cheese Crown, and Finish
Pull the baking sheet out of the oven.
Spoon your thick marinara or ketchup-BBQ glaze generously over the top and long sides of the loaf, brushing it into a smooth, shiny coat.
Lay thin slices of provolone or mozzarella across the top ridges of the glazed loaf, letting a bit of the red glaze peek through the center and edges (just like the gorgeous striping in the photo).
Return the loaf to the oven for another 15 minutes.
The glaze will bubble and caramelize into a sticky lacquer, and the top cheese will melt completely across the ridges.
To get those toasted, golden-brown gratin freckles, switch the oven to BROIL (High) for the final 2 minutes. Watch it closely so the cheese blisters into a deep golden crust without scorching.
Step 8: Verify Internal Doneness
Insert the probe of your digital instant-read thermometer into the meat near the center of the loaf (try to test the meat layer rather than hitting the molten cheese core directly).
You are looking for an internal meat temperature of 160°F (71°C).
Once it reaches 160°F, pull the pan out of the oven immediately.
Step 9: The Mandatory 15-Minute Rest (Do Not Skip!)
This is where 90% of home cooks ruin their stuffed meatloaf.
If you cut into this loaf while it is blistering hot, the molten mozzarella inside is at maximum liquidity. It will gush straight out of the cut onto the board, leaving your slices completely hollow.
Leave the loaf resting undisturbed on the pan or transfer it gently to a wooden cutting board for 12 to 15 minutes.
During this rest, the internal steam pressure settles, the juices reabsorb into the beef, and the melted cheese cools down just enough to thicken into a luxurious, warm ribbon that stays nestled inside every slice without bleeding out.
Scatter freshly chopped parsley over the golden crust, then carve with a sharp chef’s knife into thick, 1-inch slices.
Practical Troubleshooting & Common Mistakes
- “Cheese still leaked out the side.”
This happens if you leave hairline cracks in the raw meat or if you rolled the cheese too close to the outer edges. Always leave a generous 1.5-inch border around the perimeter, and spend an extra minute smoothing the seams with damp fingers before baking. - “The bottom of the meatloaf was swimming in grease.”
An 80/20 ground chuck blend releases substantial natural fat. Baking free-form on a flat rimmed baking sheet allows that fat to drain naturally away from the meat instead of forcing the loaf to boil in it. When moving the loaf to your carving board, use two wide spatulas to lift it cleanly off the grease-coated foil. - “The meat felt tough and dense.”
Overworking the ground beef during the initial mix is the number one cause of tough meatloaf. Mix only until the panade is integrated, and never squeeze or pack the meat tightly into a mold.
What to Serve with It & Handling Leftovers
A centerpiece comfort dish like this pairs naturally with classic homestyle sides (as seen around the cutting board in the photo):
- Creamy Baked Mac and Cheese: Rich, velvety elbow macaroni balances the tangy, savory tomato glaze.
- Sautéed Garlic Greens or Steamed Broccoli: Fresh chopped spinach, collards, or broccoli rabe provide a crisp, earthy contrast to the rich beef and cheese.
- Extra Warm Marinara or Glaze: Serve small ramekins of warm sauce on the side for dipping the crust edges.
If you have leftover slices, wrap them individually in foil and refrigerate for up to 4 days.
Reheat a cold slice in a nonstick skillet with a dab of butter over medium-low heat for 3 to 4 minutes per side until the outer beef edges crisp up and the cheese core melts into gooey perfection again. Slipped between two slices of buttered, griddled garlic bread, it makes one of the greatest lunchtime meatloaf sandwiches you will ever experience.