
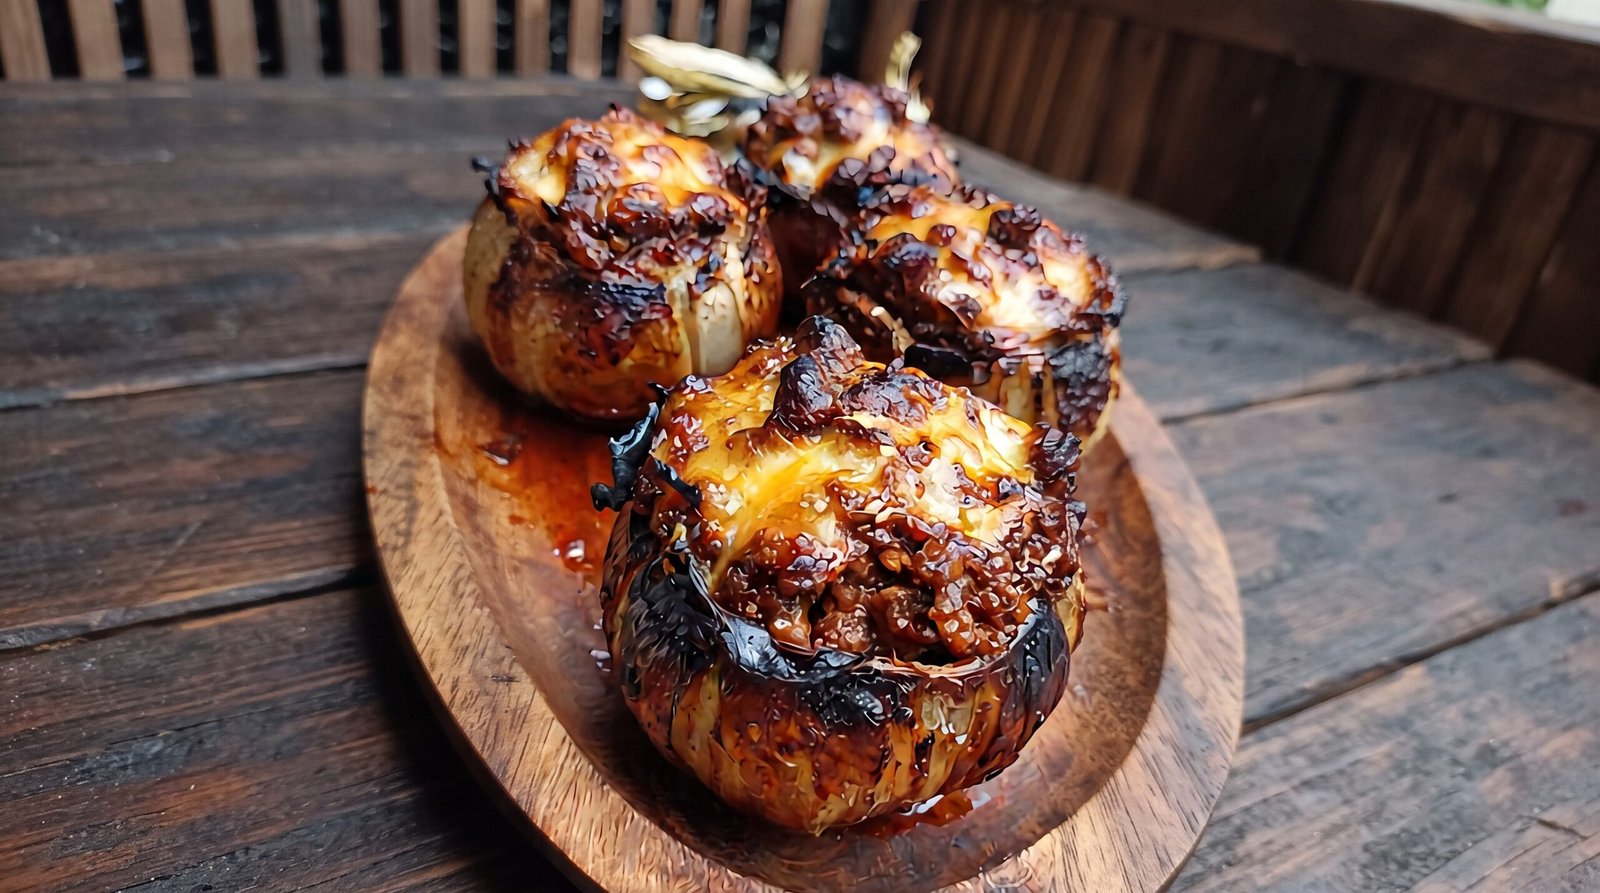
I remember the first time I tried to make stuffed onions for a busy weeknight dinner. I was looking for something comforting, something that felt like a project but did not take all day to prepare. I had a bag of large yellow onions sitting in my pantry and some ground beef in the freezer that needed using. I started by scooping out the centers, roasting the shells until they were tender and slightly charred, and filling them with a mix of browned meat and herbs. The result was a rustic, deeply flavorful meal that really hit the spot. These stuffed roasted onions have become a regular in my kitchen because they offer a complex taste without requiring fancy ingredients or complicated equipment. They provide a satisfying combination of sweet, soft roasted onion and savory, browned meat filling that feels like a complete meal all on its own.
Why This Recipe Works
The main reason I come back to this dish is the way the onion changes as it spends time in the heat of the oven. When you roast an onion whole or as a shell, the natural sugars intensify. This creates a sweet base that perfectly contrasts with the savory, salt-forward meat filling. Most people forget how delicious onions can be when they are the star of the show rather than just a supporting actor in a larger dish. By hollowing them out, you create a vessel that keeps the meat moist throughout the cooking process.
From a practical standpoint, this recipe is quite forgiving. You can prepare the filling while the onion shells are getting their first roast, which helps you manage your time in the kitchen effectively. The texture is another standout feature. You get the soft, yielding layers of the onion against the slightly firmer, browned texture of the meat mixture. It is a satisfying mouthfeel that feels substantial without being overly heavy.
Another factor is the ease of cleanup. Because you serve the dish directly in the onion skin, you have less to worry about in terms of presentation or plating complexity. It looks impressive on the table but requires very little effort to arrange. The flavors meld together beautifully; as the meat cooks inside the onion, its juices seep into the layers, seasoning the vegetable from the inside out. It is a harmonious marriage of flavors that builds up over the forty-five minutes of total oven time. You do not need professional culinary skills to pull this off, just a bit of patience while waiting for the oven to do its work. It is honest, straightforward cooking that emphasizes quality ingredients and simple techniques.
Ingredient Notes
The Onion Base
For this recipe, size is everything. You want large yellow onions that are uniform in size. If you pick ones that are too small, you will not have enough room to stuff them. Yellow onions provide that classic, robust flavor profile that holds up well to roasting and high heat. Avoid using red onions if you can, as they tend to become a bit watery and lose their structural integrity too quickly in the oven. The white or yellow varieties are firmer and better at holding their shape.
The Savory Meat Filling
I prefer using a mix of ground beef and a little bit of finely chopped pork sausage. The fat content in the sausage adds a depth of flavor that keeps the stuffing from drying out while it bakes. If you do not have sausage, regular ground beef works perfectly fine. Just make sure to season it well. I always include a handful of fresh herbs like thyme or parsley to lift the flavor profile of the meat. You can also add breadcrumbs to the mixture; they act as a binder and help soak up any juices that the meat releases as it cooks.
Binding and Seasoning
You need a bit of moisture in your filling. I use a small splash of Worcestershire sauce and a bit of garlic. These ingredients add a savory, umami punch. Salt and black pepper are non-negotiable here. I find that a little grated hard cheese, like Parmesan, sprinkled on top before the final phase of baking, adds a nice salty finish that crisps up beautifully in the oven.
| Ingredient | Amount | Notes |
|---|---|---|
| Large Yellow Onions | 4 whole | Peel and trim the tops |
| Ground Beef | 1 pound | 80/20 fat ratio is ideal |
| Garlic Cloves | 3 minced | Fresh is better than jarred |
| Breadcrumbs | 1/2 cup | Panko or standard white |
| Worcestershire Sauce | 1 tablespoon | Adds depth |
| Dried Thyme | 1 teaspoon | For herbal notes |
| Salt | To taste | Adjust for your preference |
| Black Pepper | 1/2 teaspoon | Freshly cracked |
| Parmesan Cheese | 1/4 cup | Grated for the topping |
The Recipe
- Prep Time: 20 minutes
- Cook Time: 45 minutes
- Total Time: 1 hour 5 minutes
- Servings: 4
- Difficulty: Easy
Equipment Needed:
– Sharp chef knife
– Baking sheet or shallow roasting pan
– Mixing bowl
– Large spoon for scooping
– Aluminum foil
Step-by-Step Instructions
Step 1: Prepare the Onions
Start by peeling your onions completely, ensuring you remove the papery outer skin. Slice off the top quarter of each onion to create a flat lid and remove the root end slightly so they stand upright. Take a sharp knife and carefully cut a small circle around the top center. Using a spoon, scoop out the inner layers of the onion, leaving about two layers of the wall intact. You want a sturdy cup shape. Chop the removed onion pieces into small bits, as you will use these in your filling.
Step 2: Par-roast the Shells
Preheat your oven to 400 degrees Fahrenheit. Place your hollowed-out onion shells on a baking sheet. Drizzle them with a little olive oil and a pinch of salt. Roast them in the oven for about 15 minutes. This step is important because it softens the onion walls and removes that harsh raw bite. You want them to be slightly pliable but not falling apart. Remove them from the oven once they look tender to the touch but still hold their shape well.
Step 3: Create the Filling
While the shells are roasting, heat a large skillet over medium-high heat. Add your ground beef and the chopped onion bits you saved earlier. Cook this mixture until the meat is browned and the bits of onion have softened significantly. You want to make sure the meat is not pink anymore. Drain any excess fat if there is too much, leaving just enough to keep things moist. Stir in the garlic, thyme, Worcestershire sauce, breadcrumbs, salt, and pepper. Give it a good mix and let it cook for another 2 minutes until everything is well combined and fragrant.
Step 4: Stuffing the Onions
Remove your skillet from the heat. Take a large spoon and pack the meat mixture into each roasted onion shell. You can mound the filling slightly at the top. If you have extra meat, you can pile it around the base of the onions on the baking sheet. Sprinkle the grated Parmesan cheese over the top of each stuffed onion. This will melt and create a savory crust during the final bake.
Step 5: Final Bake
Place the stuffed onions back into the 400-degree Fahrenheit oven. Bake them for another 30 minutes. You are looking for the onion skin to become tender and slightly charred in places. The filling should be hot, and the cheese on top should be melted and lightly browned. Use a food thermometer to ensure the meat filling has reached an internal temperature of at least 160 degrees Fahrenheit. Once they reach this temperature, carefully remove the tray from the oven.
Mistakes I Made (So You Don't Have To)
Over-scooping the Onions
The first time I made this, I tried to scoop out too much of the onion because I wanted more space for the meat. I ended up with walls that were only one layer thick. When I tried to stuff them, the onions collapsed in the heat of the oven, leaving me with a heap of meat and onion mush. The fix is simple: keep at least two to three layers of the onion intact. This provides the structural support needed to keep them standing.
Not Par-roasting the Shells
I once thought I could skip the initial roast of the onion shells to save time. I filled the raw onions and put them straight into the oven for a longer period. The result was a mess where the onions were still tough and crunchy, while the meat filling started to overcook and become dry. Par-roasting is non-negotiable. It allows the onion to cook evenly alongside the filling. It softens the vegetable enough that it can absorb the juices of the meat.
Using Lean Ground Meat
I once tried to use extra-lean ground beef for this recipe because I thought it would be better. It turned out very dry and lacked the flavor that comes from rendering fat. The fat is crucial here because as it renders, it bastes the onion from the inside. If you only have lean meat, add a tablespoon of butter or oil to the skillet when you brown the beef to make up for the lack of fat.
Forgetting to Season the Onions
In my second attempt, I seasoned the filling well but forgot to season the onion shells themselves. The filling was tasty, but the surrounding onion layers tasted flat and bland. Always give the hollowed-out shells a light brushing of oil and a sprinkle of salt before you start stuffing them. This ensures every bite is seasoned from the outside in.
Variations and Tips
Sausage and Apple Twist
For a different flavor profile, try replacing half the ground beef with sweet Italian sausage. Also, add half a cup of finely diced tart apple to the filling. The sweetness of the apple pairs beautifully with the roasted onion and adds a unique texture. This version is particularly good during the autumn months when apples are in season.
Adding Grains
You can mix in cooked quinoa or rice into your meat filling. This stretches the meal further and adds a different texture to the stuffing. Make sure the grains are already cooked before mixing them in, as they will not cook through in the time it takes for the meat and onions to roast. This is a great way to use up leftover grains from a previous meal.
Make-Ahead Strategy
You can prepare the onion shells and the filling a day in advance. Keep them in separate airtight containers in the refrigerator. When you are ready to eat, stuff the cold shells and increase the final baking time by about 5 to 10 minutes to account for the temperature difference. This makes a great dinner for a busy weeknight when you have limited time to cook from scratch.
Serving Suggestions
These stuffed onions are quite substantial on their own. I like to serve them with a simple side salad of peppery arugula dressed with a light lemon vinaigrette. The brightness of the lemon cuts through the richness of the meat and the sweetness of the onion perfectly. A crusty piece of sourdough bread is also great for mopping up any extra juices left on the plate.
Storage and Reheating
If you have leftovers, they keep quite well. Transfer any remaining stuffed onions to an airtight container and store them in the refrigerator within two hours of cooking. They will stay good for up to three days. I do not recommend freezing this dish, as the texture of the onion changes too much once it has been frozen and thawed, becoming quite watery and mushy.
To reheat, the best method is to use your oven. Place the leftovers in a baking dish and heat them at 350 degrees Fahrenheit for about 15 to 20 minutes. You want them to be heated through until the center reaches at least 165 degrees Fahrenheit. You can also use an air fryer at 350 degrees Fahrenheit for about 8 to 10 minutes, which helps keep the top a bit crispy. Avoid the microwave if you can, as it tends to soften the onion skin too much and can make the meat feel rubbery.
Frequently Asked Questions
Can I use red onions instead of yellow?
I generally suggest sticking with yellow or white onions. Red onions have a higher water content and a different flavor profile that can become a bit sharp and slightly bitter when roasted for this length of time. Yellow onions are consistently more reliable for this specific preparation as they turn sweeter and maintain their structural integrity better in the high heat of the oven.
How do I know when the onions are finished?
You will know they are done when the outer layers are soft and easily pierced with a fork. They should look slightly golden brown around the edges and have a bit of char. If you are using a meat thermometer, the center of the meat filling should read at least 160 degrees Fahrenheit. The smell of roasted, savory onion should be quite prominent in your kitchen.
What can I use if I do not have a thermometer?
If you do not have a digital thermometer, look for visual signs of doneness. The meat should be thoroughly browned and not showing any pink. The top of the stuffing should be firm, and the cheese should be bubbling and golden. The onion shell itself should be yielding when pressed gently with a spoon. Ensure the cooking time is followed carefully to avoid undercooked meat.
Can I make these in a slow cooker?
I would advise against using a slow cooker for this dish. Slow cookers operate at a much lower temperature and create a lot of moisture through steam. This will make your onion shells fall apart and prevent the meat filling from achieving that nice, browned, savory quality. You really need the dry, high-heat environment of an oven to get the result that makes these stuffed onions taste their best.
Are these supposed to be crispy?
These onions are not intended to be crispy. The goal is for them to be tender, soft, and slightly caramelized. You want the texture of the onion to melt into the savory meat filling. If you prefer a bit of crunch, you can add a generous layer of breadcrumbs mixed with a little Parmesan on top, which will provide a slight texture contrast, but the onion itself will remain soft and supple.
Final Thoughts
Making stuffed roasted onions is one of those tasks that feels rewarding once you pull that tray out of the oven. It is a dish that honors simple ingredients, allowing the natural sweetness of the onion to shine alongside the savory, seasoned meat. It takes a little bit of prep work to scoop them out, but once they are in the oven, you have plenty of time to set the table or relax for a moment.
I hope this becomes a regular part of your dinner routine just like it is in mine. It is a humble, filling meal that always leaves me satisfied without any fuss. Remember to adjust the seasoning to your own taste, and do not be afraid to experiment with different herbs or bits of cheese to see what you like best. Enjoy the process of creating something warm and wholesome in your own home.