
If there is one culinary tragedy experienced in almost every home kitchen, it’s the dreaded rubbery, unseasoned boneless chicken breast.
For the first few years of living on my own, baked chicken breasts were my dinner enemy. I bought those bulk, discount family packs of chicken from the supermarket, seasoned them with whatever dusty garlic powder was lingering in the cabinet, slapped them into a glass Pyrex dish, and baked them until they surrendered completely. The result was always the same: a puddle of murky liquid at the bottom of the dish, dry chalky edges, and a texture that felt like chewing through a clean pencil eraser.
My wake-up call happened when I tried one of those viral recipes that told me to mix a cup of mayonnaise with bottled grated parmesan cheese and slather it over raw, ice-cold chicken breasts before baking at high heat.
It was an oily catastrophe.
The mayonnaise separated under the heat into an ocean of grease, the pre-shredded cheese turned into rubbery beads that slid right off the meat, and the bottom half of the chicken steamed in its own juices while the top remained pale and slick. My partner was polite enough to scrape the curdled topping away and drown the meat in barbecue sauce, but I knew I had failed.
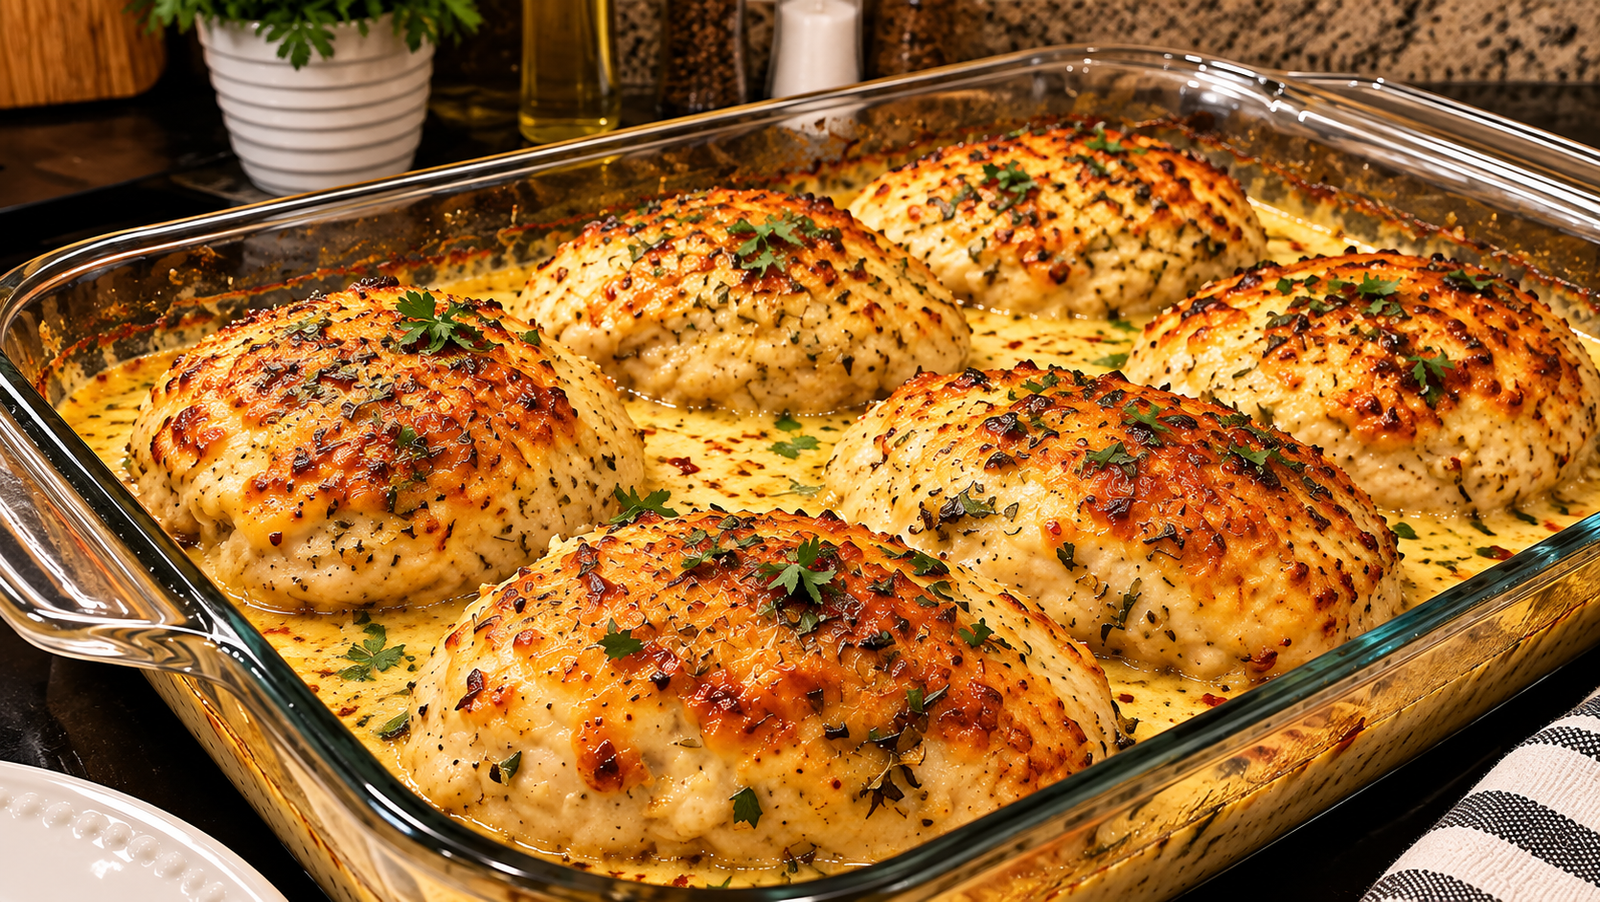
The good news? It turns out you don’t have to settle for dry baked chicken, nor do you need to endure greasy mayonnaise soups. The photo above shows the finished masterpiece I spent weeks refining: plump, fork-tender chicken breasts coated in a bubbly, golden-brown crust of real Parmesan, garlic, cream cheese, and herbs, resting in a rich pan sauce that tastes incredible over rice or mashed potatoes.
Here is how you fix the dry chicken curse forever.
The Science of Juicy, Golden Baked Chicken
Before we grab our ingredients, let’s break down the mechanics of why standard baked chicken breasts fail so often—and how this recipe solves every single issue.
1. The Uneven Thickness Problem
A chicken breast is naturally teardrop-shaped: thick and rounded at one end, tapered and thin at the other. If you bake it straight from the package, the thin tail will be severely overcooked and dried out by the time the thickest core reaches a safe temperature. Pounding the meat to a uniform thickness is the single most important step for even cooking.
2. The Dairy Separation Trap
Mayonnaise alone has an emulsion that easily breaks down into clear oil under prolonged high heat. By combining real full-fat cream cheese, freshly grated Parmesan, and a touch of Greek yogurt or sour cream, you build an emulsion with protein stability. It holds onto the meat, protects the lean poultry from drying out, and browns under oven heat like a savory gratin crust.
3. Surface Moisture Robs You of Browning
Chicken straight out of the plastic tray is coated in brine and purged moisture. If you add toppings to wet poultry, the water steams beneath the crust, preventing the topping from adhering and diluting the seasonings. A thorough pat-down with paper towels is non-negotiable.
Ingredients & Tools You’ll Need
Essential Kitchen Gear
- 9×13-inch Tempered Glass Baking Dish: (A standard Pyrex baking dish like the one in the photo distributes gentle, even heat and lets you watch the sauce bubble around the edges).
- Meat Mallet or Heavy Rolling Pin: For flattening the chicken breasts into an even thickness.
- Microplane or Fine Box Grater: Essential for grating real block Parmesan cheese.
- Instant-Read Digital Thermometer: (A ThermoWorks ThermoPop or similar digital meat probe is the only foolproof way to know when chicken hits safe temperature without slicing it open).
The Ingredient Breakdown
| Component | Ingredient | Quantity | Practical Role |
| The Protein | Boneless, Skinless Chicken Breasts | 4 to 6 breasts (approx. 2 to 2.5 lbs total) | Lean base that stays plump and tender under the savory blanket. |
| The Flavor Crust | Block Parmesan Cheese (Parmigiano-Reggiano) | 1 cup (finely grated) | Melts and browns into a salty, nutty, golden gratin topping. |
| The Emulsion Base | Full-Fat Cream Cheese | 4 oz (half a block, softened to room temp) | Stabilizes the topping so it does not separate or turn into clear oil. |
| Tang & Creaminess | Sour Cream or Plain Whole-Milk Greek Yogurt | ¼ cup | Thins out the cream cheese slightly so it spreads smoothly over the meat. |
| Aromatic Backbone | Fresh Garlic | 4 to 5 cloves (minced) | Delivers that classic Italian-American garlic punch. |
| Herbal Lift | Italian Seasoning | 1 tsp | Blend of oregano, basil, and marjoram that blooms in the oven heat. |
| Herbal Lift | Dried Thyme | ½ tsp | Adds an earthy undertone that complements roasted poultry. |
| Savory Depth | Onion Powder | 1 tsp | Evenly seasons the poultry meat without adding raw bits. |
| Color & Heat | Smoked Paprika | ½ tsp | Imparts a warm amber hue to help achieve that deep golden color. |
| Seasoning | Coarse Kosher Salt & Cracked Black Pepper | 1 tsp salt, ¾ tsp pepper | Essential base seasoning for both the meat and the topping. |
| Garnish | Fresh Flat-Leaf Parsley | 2 tbsp (finely chopped) | Adds clean herbal freshness right out of the oven. |
Step-by-Step Cooking Instructions
Step 1: Prep and Pound the Chicken
Preheat your oven to 400°F (200°C).
Take your chicken breasts out of the refrigerator. Place one breast at a time inside a gallon-sized zip-top bag or between two sheets of parchment paper.
Using the flat side of a meat mallet or a heavy rolling pin, gently pound the thick end of each chicken breast until the entire piece is roughly ¾-inch to 1-inch thick from end to end. You are not trying to smash it into a thin cutlet; you just want a uniform thickness across each piece so they cook at the identical rate.
Grab paper towels and thoroughly pat every piece of chicken bone-dry on both sides.
Step 2: Season the Meat Directly
Lay the chicken breasts flat in your 9×13-inch glass baking dish in a single layer. They can rest close together, but do not stack them on top of one another.
Lightly dust both sides of the chicken directly with half of your kosher salt, black pepper, onion powder, and smoked paprika.
Cook’s Mistake to Avoid: Never rely purely on the topping to flavor your chicken! If you don’t season the raw meat itself before adding the spread, you will bite through a flavorful crust into totally bland, unseasoned poultry.
Step 3: Mix the Garlic Parmesan Blanket
In a medium mixing bowl, combine your softened cream cheese and sour cream (or Greek yogurt). Use a fork or silicone spatula to mash and stir until completely smooth and lump-free.
Add in:
- 1 cup finely grated Parmesan cheese (keep a couple tablespoons aside for a final sprinkle)
- 4 to 5 minced garlic cloves
- 1 teaspoon Italian seasoning
- ½ teaspoon dried thyme
- The remaining kosher salt, black pepper, and paprika
Mix until you have a thick, fragrant paste.
Step 4: Slather and Crown
Divide the Parmesan garlic mixture evenly among the tops of the chicken breasts.
Using the back of a spoon or an offset spatula, spread the mixture from edge to edge across the top of each breast, creating a thick, uniform blanket.
Sprinkle the reserved tablespoons of grated Parmesan lightly over the spread. This dry cheese layer on top catches the hot oven air and creates that blistered, golden-brown crust you see in the pan.
Step 5: The High-Heat Bake
Slide the uncovered glass baking dish onto the center rack of your preheated 400°F (200°C) oven.
Bake untouched for 20 to 25 minutes.
As it cooks, the garlic and herbs will perfume the entire kitchen, the cream base will melt into the chicken juices to create a savory pan sauce, and the cheese topping will begin to bubble and toast.
Step 6: Verify with a Digital Probe
Insert your digital instant-read thermometer into the center of the thickest chicken breast.
You are looking for an internal reading of 160°F to 162°F (71°C to 72°C).
If the chicken has reached this temperature but you want a deeper golden crust, switch the oven to BROIL (High) for 60 to 90 seconds. Watch it through the glass window constantly; cheese burns from golden to blackened in an instant under a direct broiler element.
Step 7: The Mandatory 8-Minute Rest
Pull the bubbling baking dish out of the oven and set it on a trivet or heatproof counter.
Do not cut into the chicken right away! If you slice into chicken breasts the second they leave the oven, the muscle fibers will push all the trapped moisture out onto the plate, leaving the meat dry.
Let the dish rest undisturbed for 8 to 10 minutes. During this time, carryover heat brings the internal temperature to the USDA-recommended 165°F (74°C), while the juices reabsorb back into the chicken meat fibers. The cheese topping will also set slightly into a rich, sliceable gratin crust.
Scatter fresh minced parsley over the top and spoon the rich, savory garlic-butter pan juices back over each breast as you plate.
Practical Troubleshooting & Common Mistakes
- “My sauce broke into a pool of greasy liquid.”
This happens when home cooks use shelf-stable grated parmesan from a green shaker bottle or rely exclusively on high-fat mayonnaise. Green shaker parmesan contains cellulose and wood pulp fillers that prevent smooth melting. Always grate real block Parmigiano-Reggiano, and stick to the cream cheese and sour cream emulsion. - “The bottom of the chicken released too much liquid.”
Cheap supermarket chicken is often injected with up to 15% saltwater solution (often labeled as “broth added for tenderness”). Look for “air-chilled” chicken that contains no added solution or saline injections. Also, make sure the chicken is patted completely dry before seasoning. - “Can I use boneless chicken thighs instead?”
Yes! Boneless, skinless chicken thighs work beautifully with this exact same topping. Because thighs have more fat and connective tissue, bake them at the same temperature for 25 to 30 minutes until they reach 170°F to 175°F for maximum tenderness.
What to Serve with It & Handling Leftovers
The pan juices that collect at the bottom of the glass dish are liquid gold. Serve these chicken breasts over:
- A bed of garlic mashed potatoes, spooning the pan drippings right over the top.
- Buttered egg noodles or fettuccine pasta.
- Steamed jasmine rice with roasted asparagus or tender broccoli.
If you have leftover chicken breasts, keep them in an airtight container in the refrigerator for up to 3 days.
To reheat without drying out the chicken or breaking the cheese crust, avoid the microwave if possible. Place the leftover breast in a small oven-safe dish with a tablespoon of water or chicken broth, cover it loosely with foil, and warm it in a 325°F (165°C) oven or toaster oven for 12 to 15 minutes. It will taste just as juicy as the night you made it.