
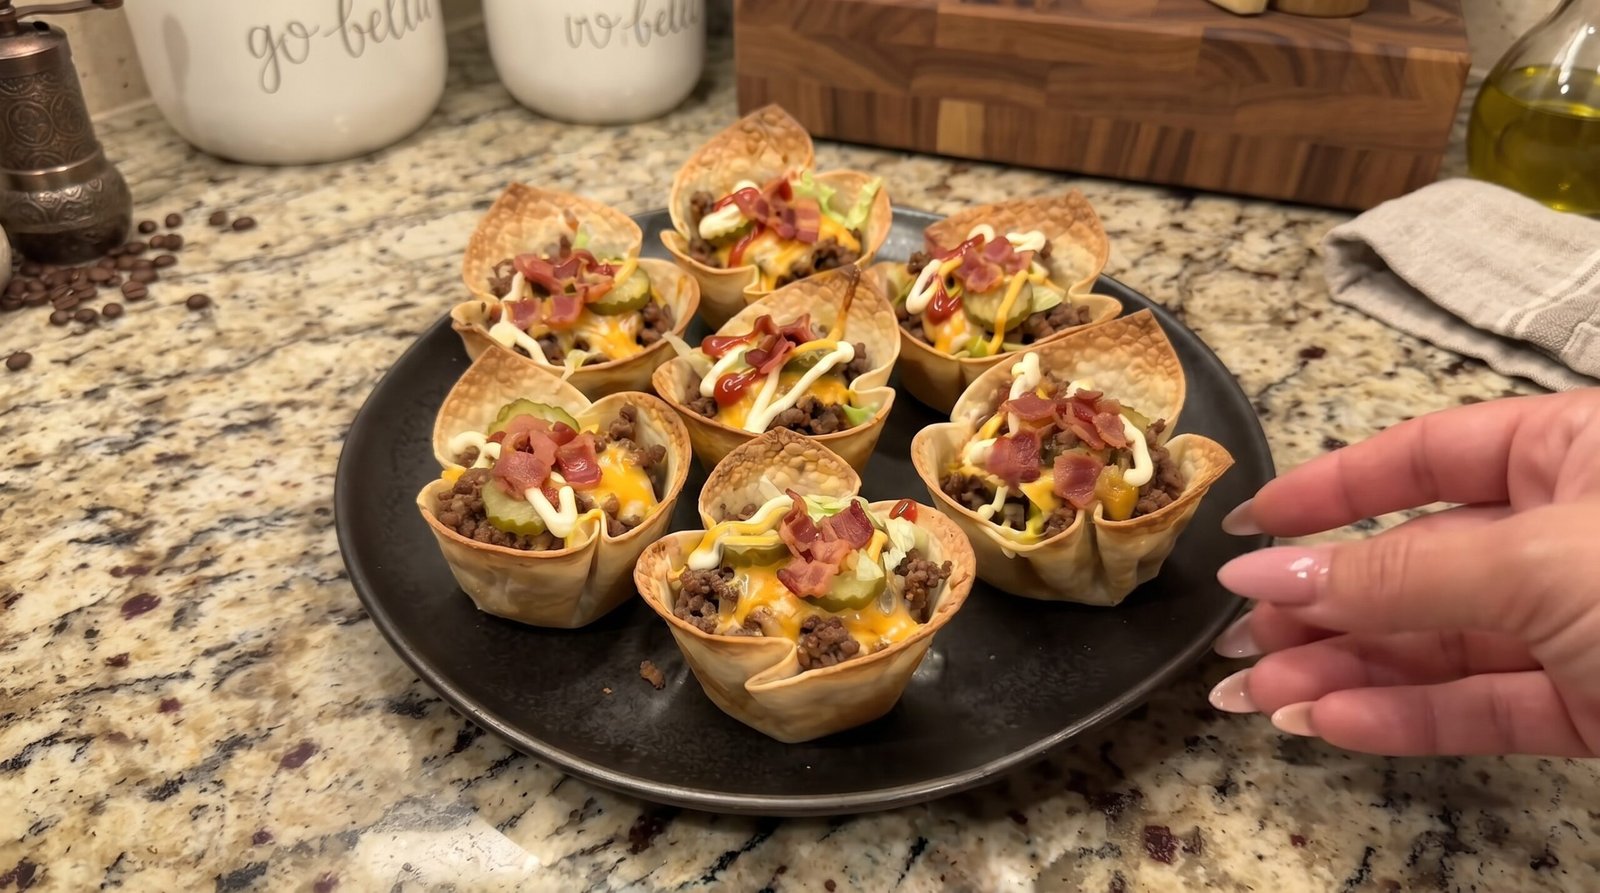
It is always a challenge to come up with something for game day or a casual evening with friends that is not just another plate of plain chips or heavy sliders. I found myself staring at a pack of flour tortillas and a pound of ground beef one Tuesday evening, wanting the flavor of a classic burger without the mess of buns and toppings falling all over the table. I realized I could turn the tortillas into small, crunchy vessels that hold all the components of a cheeseburger in one bite. Since then, these cheeseburger taco cups have become my go-to when I need a snack that keeps everyone happy. They are portable, easy to grab, and they deliver that familiar combination of seasoned meat, melted cheese, and crisp pickles that everyone enjoys. If you are looking for a way to liven up your menu, this recipe is a simple way to serve something fun and satisfying that does not require hours in the kitchen.
Why This Recipe Works
This recipe relies on the contrast between textures to keep things interesting. You start with a flour tortilla shell that becomes rigid and slightly golden when baked, creating a structure that holds the filling without breaking apart. Inside, you have the soft, savory ground beef which is seasoned to mimic the taste of a burger patty. The heat from the oven ensures the cheese melts completely, creating a gooey layer that acts as a binder for the meat. Once you add the cold, crisp toppings like shredded lettuce and sliced pickles, you get a temperature contrast that makes each bite feel fresh rather than heavy.
The efficiency of this dish is another major benefit. Because you are using a muffin tin, you can produce twelve individual snacks at the same time. There is no need to flip individual patties or manage multiple pans on the stove. Once the meat is browned and the shells are set, assembly is fast. This is helpful when you are hosting because you spend less time hovering over the stove and more time hanging out with your guests. It also reduces cleanup significantly since you are only using one skillet for the meat and one muffin pan for the shells.
Finally, the flavor profile is familiar and universally liked. By incorporating condiments like mustard and ketchup, you tap into the nostalgia of a classic fast-food burger. People often get bored with standard dips, but presenting the same flavors in a handheld cup is a fresh approach. The acidity from the pickles cuts through the richness of the beef and cheese, which prevents the bite from feeling too heavy. It is a well-rounded snack that hits all the right notes without any unnecessary complexity or obscure ingredients.
Ingredient Notes
The Base and Filling
The core of the dish consists of ground beef and flour tortillas. For the beef, I prefer an 80/20 lean-to-fat ratio because the fat renders down and keeps the meat moist during the baking process. If you use something leaner, you might find the meat gets a bit dry. As for the tortillas, standard 6-inch flour tortillas are the right size for a standard muffin tin. If you get larger ones, you will have to cut them down, which adds extra work.
Seasoning and Cheese
To get that burger flavor, I stick to basic staples. Salt, black pepper, and garlic powder provide the foundation. I do not use heavy spices because I want the flavor of the beef to shine. For the cheese, a sharp cheddar or a blend of cheddar and Monterey Jack works best. You want something that melts well but has enough character to stand up to the meat. I avoid pre-shredded cheese if possible because it is coated in starch that prevents smooth melting, but it will work in a pinch if you are short on time.
Toppings and Condiments
The finish is what makes these feel like a cheeseburger. I always use crunchy iceberg lettuce for texture and sliced dill pickles for that essential tang. A drizzle of ketchup and yellow mustard is non-negotiable for the flavor profile. You can also add finely diced red onion if you enjoy the extra bite, but keep the pieces small so they distribute evenly.
| Ingredient | Amount | Notes |
|---|---|---|
| Ground beef | 1 pound | 80/20 fat content is ideal |
| Flour tortillas | 12 count | 6-inch diameter works best |
| Cheddar cheese | 1.5 cups | Shredded from a block |
| Garlic powder | 1 teaspoon | Adds depth to the beef |
| Salt | 0.5 teaspoon | Adjust to your preference |
| Black pepper | 0.5 teaspoon | Freshly ground is better |
| Iceberg lettuce | 1 cup | Shredded finely |
| Dill pickles | 0.5 cup | Sliced into thin rounds |
| Ketchup | 3 tablespoons | For the final drizzle |
| Mustard | 3 tablespoons | Yellow mustard preferred |
The Recipe
- Prep time: 15 minutes
- Cook time: 20 minutes
- Total time: 35 minutes
- Servings: 12 cups
- Difficulty: Easy
- Equipment: 12-cup muffin tin, large skillet, wooden spoon, knife, cutting board
Step-by-Step Instructions
Step 1: Prepare the Tortilla Cups
Preheat your oven to 375 degrees Fahrenheit. Take your 6-inch flour tortillas and warm them slightly in the microwave for about 15 seconds. This makes them pliable so they do not crack when you press them into the muffin tin. Gently push each tortilla into an individual muffin cup, folding the edges over themselves to create a pleated, bowl-like shape.
Ensure the tortillas sit snugly against the bottom and sides of the muffin tin holes. If they keep popping up, use your fingers to press them down firmly. You want them to hold their shape so they can act as a container for the meat and cheese. Set the pan aside while you prepare the filling.
Step 2: Cook the Beef
Place a large skillet over medium-high heat. Add the ground beef and break it apart with a wooden spoon. Cook the meat until it is fully browned and no pink remains, which usually takes about 6 to 8 minutes. You want to ensure the meat is cooked through, so look for a consistent deep brown color and an internal temperature of 160 degrees Fahrenheit if you are using a digital thermometer to verify.
Once the beef is browned, drain any excess grease from the skillet. If you leave too much fat in the pan, the cups will become soggy when you bake them. After draining, stir in the salt, black pepper, and garlic powder. Mix everything well so the spices coat all the meat, then remove the skillet from the heat.
Step 3: Fill and Bake
Distribute the cooked beef mixture evenly among the twelve tortilla cups in the muffin tin. Each cup should be about two-thirds full to leave room for the cheese. Once the meat is added, sprinkle the shredded cheese over the top of each cup, ensuring the beef is well covered.
Place the muffin tin in the center rack of your preheated oven. Bake for 10 to 12 minutes. You are looking for the edges of the tortillas to turn a light golden brown and for the cheese to be completely melted and bubbling. Keep an eye on them toward the end of the time so the tortilla edges do not get burnt or too dark.
Step 4: Add the Toppings
Remove the muffin tin from the oven and let it sit for about 3 minutes. This short resting period allows the cheese to set slightly so the contents do not spill out when you lift the cups from the pan. Using a small spoon or spatula, carefully remove the cups from the muffin tin and arrange them on a serving plate.
Now you can add your fresh toppings. Start by placing a pinch of the shredded iceberg lettuce into each cup. Then, add one or two slices of dill pickles. If you are adding diced onions, do that now. Finally, drizzle a small amount of ketchup and yellow mustard over the top of each cup. Serve them immediately while the meat and cheese are still warm.
Mistakes I Made (So You Don't Have To)
Overfilling the Cups
Early on, I tried to pack as much beef as possible into each cup. The problem was that the weight caused the soft tortillas to lean and spill over into the muffin tin. Now, I keep the beef to about two-thirds of the cup depth. This leaves enough room for the cheese to melt without overflowing and ensures the structure holds up when you lift it out.
Skipping the Tortilla Warm-up
I once tried to press cold, straight-from-the-fridge tortillas into the tin. They ended up cracking and splitting at the folds, which meant the grease from the meat leaked through and made the bottom of the cups limp. A quick 15-second blast in the microwave makes the tortillas flexible and prevents them from breaking when you shape them.
Ignoring the Grease
One time, I was in a rush and did not drain the ground beef properly. Because I left the rendered fat in the pan, the tortilla bottoms turned greasy and soft within minutes of coming out of the oven. Always drain the grease after browning the meat. It keeps the base of your taco cup stable and prevents the entire dish from feeling too oily to handle.
Adding Cold Toppings Too Soon
I previously added the lettuce and pickles before putting the cups in the oven. This was a mistake because the lettuce wilted and turned brown from the heat, and the pickles lost their crispness. Always wait until the cups are out of the oven and slightly cooled before adding the fresh lettuce and pickles. The contrast of the hot beef and the cold, fresh toppings is what makes this dish work.
Variations and Tips
Making Them Ahead of Time
If you have a busy day, you can prep these ahead. Brown the beef and season it, then keep it in the fridge. You can also shape the tortillas into the muffin tin ahead of time. When you are ready to eat, simply fill the cups, add the cheese, and bake. This saves you about 15 minutes of work when you have guests arriving.
Using Different Proteins
While I love the classic beef version, you can swap the beef for ground turkey or even finely crumbled sausage. If you choose a different meat, just remember to drain it well just as you would with beef. If you use a very lean turkey, you might want to add a splash of Worcestershire sauce to the meat to ensure it has enough depth of flavor.
Adding a Sauce Base
If you like your burgers with a specific sauce, you can stir a little bit of mayonnaise or a burger sauce blend into the beef once it is cooked. Do this just before filling the cups. It adds a creaminess that ties everything together. Just be careful not to add too much, or the cups might get a bit too moist before they hit the oven.
Crispier Tortillas
If you prefer a much firmer shell, you can bake the empty tortilla-lined muffin tin for 5 minutes before adding the meat. This par-baking step helps the base get extra crisp. Just make sure to watch them closely so they do not darken too much, as they will spend another 10 to 12 minutes in the oven once filled.
Storage and Reheating
If you have leftovers, do not let them sit out on the counter. Put them in an airtight container and store them in the refrigerator within 2 hours of cooking. They will stay good for up to 3 days. Because these contain meat, you want to be careful with how you reheat them to ensure they stay safe.
When you are ready to eat the leftovers, place them on a baking sheet and heat them in the oven at 350 degrees Fahrenheit for about 8 to 10 minutes, or until the center is steaming hot. You want to reach an internal temperature of 165 degrees Fahrenheit for the meat. I do not recommend the microwave, as it will make the tortillas soft and chewy rather than crisp. These do not freeze well, as the texture of the tortilla and the lettuce will suffer significantly.
Frequently Asked Questions
Can I use corn tortillas instead of flour?
You can, but corn tortillas are much more fragile. They tend to crack easily when you fold them into the muffin tin, and they do not hold their shape as well as flour tortillas. If you only have corn tortillas, heat them for a bit longer so they are very pliable, and handle them gently. Be aware that the texture will be quite different.
How do I stop the bottom from getting soggy?
The key is to drain the beef thoroughly after cooking it. Any excess fat or liquid will soak into the tortilla and make it limp. Also, ensure the oven is fully preheated to 375 degrees Fahrenheit before putting the pan in. A hot oven helps the tortilla crisp up quickly rather than absorbing the moisture from the filling.
Is there a way to make these without a muffin tin?
The muffin tin is essential for getting the cup shape and keeping the ingredients contained. Without it, the tortilla would just lay flat and the meat would fall off the edges. If you do not have a muffin tin, you could potentially use individual ramekins, though you would need to adjust the number of tortillas and the spacing on your baking sheet.
Can I make these vegetarian?
You certainly can. Use a plant-based ground meat substitute and cook it according to the package directions. You may need to add a little extra seasoning, such as a touch of smoked paprika or soy sauce, to mimic the savory depth of beef. The rest of the process, including the cheese and toppings, remains exactly the same.
Why did my tortilla edges burn?
This usually happens if the oven rack is placed too high or if the tortillas are very thin. If your oven tends to run hot, try moving the muffin tin to the middle or lower rack. You can also cover the muffin tin loosely with aluminum foil for the first 5 minutes of baking, then remove it for the final minutes to allow the cheese to bubble.
Final Thoughts
Making these cheeseburger taco cups is a simple way to bring a bit of variety to your table without spending all day prepping. They are straightforward, rely on ingredients that most home cooks keep in their pantry, and are always a hit because they provide a familiar, comforting flavor profile in a fun package.
I hope you enjoy making these as much as I do. They are meant to be eaten with your hands, and they work just as well for a quick solo lunch as they do for a larger crowd. Just keep the ingredients simple, watch your baking time, and you will have a hit on your hands every time.