
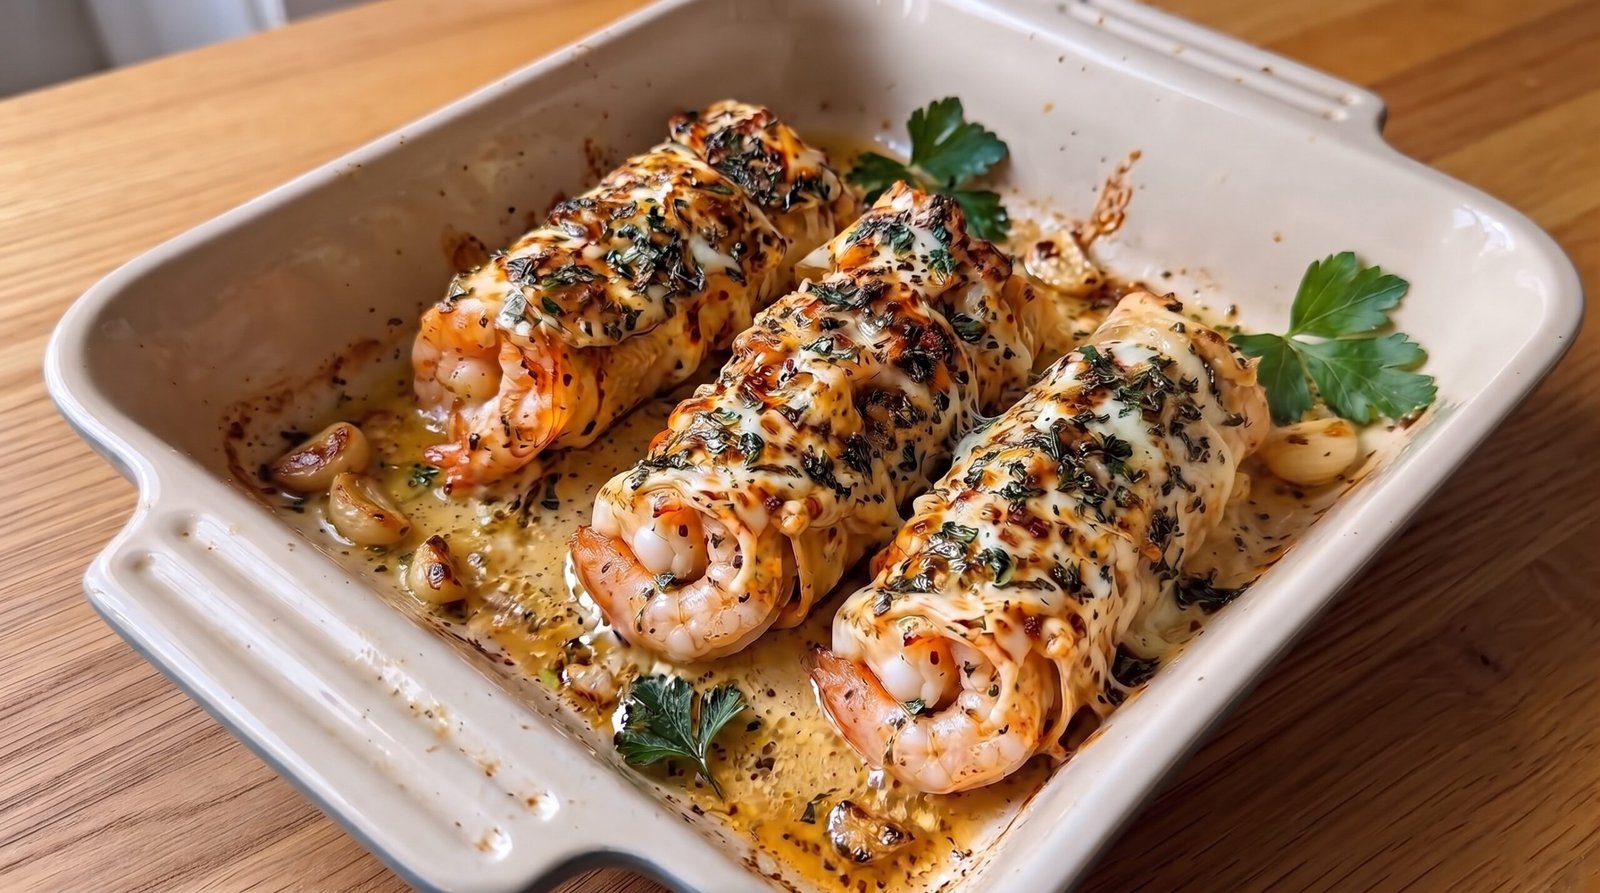
I remember the first time I tried to make a quick dinner on a Tuesday night when I had absolutely zero energy left. My kitchen was a mess, my fridge looked pretty empty, and I just wanted something comforting that would actually feel like a meal. I had a pack of shrimp and some tortillas tucked away, and honestly, the thought of turning them into something special seemed like a stretch. But when I rolled those shrimp up with a bit of cheese and let them bake in a simple garlic butter sauce, the whole mood of the evening changed. It turned out to be one of those go-to meals that I rely on whenever I am in a time crunch but still want to enjoy a bit of flavor.
These baked shrimp roll ups are not fancy or overly complicated, but they hit the spot every single time. By keeping the ingredients simple, you let the sweetness of the shrimp and the richness of the cheese lead the way. You get a nice contrast between the slightly soft tortilla edges and the warm, gooey interior, making it a satisfying dish to bring to the table. Whether you are cooking for one or trying to feed a small group, this dish adapts well and feels like a genuine treat without requiring you to spend all evening standing over the stove.
Why This Recipe Works
The main reason I come back to these roll ups is the balance of textures. When you bake the tortillas with a bit of butter and cheese, the parts touching the pan get a little bit chewy while the tops stay soft and coated in the melted cheese. It creates a satisfying mouthfeel that you just cannot get if you pan-fry or steam the ingredients separately. Shrimp have a natural sweetness that pairs wonderfully with savory cheeses like mozzarella or a mild cheddar, and the garlic butter adds a savory depth that ties everything together. It is a harmonious combination where no single flavor overwhelms the rest of the plate.
Another factor is the ease of preparation. You do not need to prep a million components or wash a dozen different bowls. Everything happens in the same dish where you bake the food. Because shrimp cook so quickly, this entire meal is ready in about twenty minutes from the time you start assembling. This is helpful when you are juggling other things or just do not want to spend an hour cleaning up afterward. It is a straightforward process that is difficult to mess up, provided you keep an eye on the clock to ensure the shrimp stay tender and do not turn rubbery from overcooking.
Lastly, this recipe is flexible. You can stick to the basic version I describe, or you can add a pinch of chili flakes for heat, a squeeze of lemon juice for brightness, or even some finely chopped bell peppers if you want a bit of crunch inside the roll. It is a forgiving base that welcomes small additions based on what you have sitting in your pantry. It is not about strict rules; it is about making something good to eat that fits the ingredients you have on hand. It is a reliable recipe that remains consistent even when you are rushing through your prep work.
Ingredient Notes
Shrimp and Tortillas
When it comes to the shrimp, I always try to buy them peeled and deveined to save myself a headache. Whether you use fresh or frozen is entirely up to you. If you go the frozen route, just make sure to thaw them completely in a bowl of cold water and pat them dry with a paper towel before you begin. Moisture is your enemy here because it can make the tortillas soggy during the baking process. For the tortillas, I prefer flour tortillas because they hold their shape better when rolled up tight. You want the smaller taco-sized tortillas, which are about six inches in diameter.
Cheese and Butter
For the cheese, mozzarella is my top choice because it melts well and provides that classic stretch. If you prefer something with more character, you can mix in a bit of sharp cheddar or monterey jack, but keep it to about twenty percent of the total cheese volume so it does not overpower the delicate taste of the shrimp. Regarding the butter, please use unsalted butter so you have full control over the salt levels in the dish. Since we are adding garlic and herbs, the butter acts as a carrier for those flavors to coat the surface of the tortillas.
Herbs and Seasonings
Fresh parsley is the star here for color and a fresh, clean finish. Dried oregano or thyme can be used in a pinch, but the brightness of fresh parsley is really what makes this dish pop when you pull it out of the oven. For the garlic, I strongly suggest using freshly minced cloves rather than the jarred stuff. The difference in pungency and aroma is significant, especially when it is infusing into the butter. A pinch of coarse black pepper completes the profile, adding just enough spice to wake up the palate without being aggressive.
| Ingredient | Amount | Notes |
|---|---|---|
| Medium shrimp | 12 count | Peeled and deveined |
| Flour tortillas | 6 pieces | Small taco size |
| Mozzarella cheese | 1.5 cups | Shredded |
| Unsalted butter | 4 tablespoons | Melted |
| Fresh garlic | 3 cloves | Finely minced |
| Fresh parsley | 2 tablespoons | Chopped |
| Black pepper | 1/2 teaspoon | Coarsely ground |
| Salt | 1/4 teaspoon | Adjust to taste |
The Recipe
- Prep Time: 10 minutes
- Cook Time: 12 minutes
- Total Time: 22 minutes
- Servings: 2 to 3
- Difficulty: Easy
Equipment needed:
– Baking dish
– Small bowl for mixing sauce
– Measuring spoons
– Chef's knife and cutting board
(Table included above in Ingredient Notes section)
Step-by-Step Instructions
Step 1: Prep the Oven and Ingredients
Start by preheating your oven to 400 degrees Fahrenheit. This temperature is ideal for getting a bit of color on the cheese while ensuring the shrimp cook through without drying out. While the oven is warming up, take your peeled and deveined shrimp and ensure they are thoroughly patted dry. This prevents the filling from becoming watery. If you are using frozen shrimp, make sure every drop of water is removed after thawing, as excess moisture will ruin the texture of the tortillas.
Gather your ingredients on the counter. Chop the fresh parsley into fine pieces and mince the garlic cloves until they are very small. If you have large pieces of garlic, they can be distracting in the final bite, so aim for consistency. Set your shredded mozzarella aside in a bowl so it is ready to be portioned out into the tortillas as you assemble the rolls.
Step 2: Prepare the Garlic Butter
In a small bowl, combine the four tablespoons of melted unsalted butter with the minced garlic, the chopped parsley, the black pepper, and the salt. Stir everything together until it is well combined. The smell should be quite strong and fresh at this point. I like to let this mixture sit for a minute while I layout the tortillas. This helps the butter take on some of the raw bite of the garlic, creating a more mellow flavor profile that will permeate the shrimp as they bake.
Do not be tempted to add extra oil or fats here. The butter is plenty rich, and the cheese will provide its own fats as it melts. If you use too much butter, the bottom of the dish will end up greasy rather than flavorful. Stick to the measured amount and spread it evenly across the surface of the tortillas before rolling them up.
Step 3: Assemble the Roll Ups
Lay your six tortillas flat on your cutting board or clean counter. Place a small amount of the shredded cheese in the center of each tortilla, followed by two of the shrimp. Drizzle a small teaspoon of your garlic butter mixture over the shrimp. Roll each tortilla up snugly, ensuring the seam is facing down. This keeps the roll from unfurling while it is sitting in the baking dish.
Arrange the rolls in the baking dish side by side, making sure they fit comfortably without being crushed. If you pack them too tightly, the heat won't circulate between them, and the sides won't get that slightly firm texture I mentioned earlier. If they are loose, they might tip over, but usually, the weight of the shrimp and cheese helps keep them in place.
Step 4: Add the Final Toppings
Take the remaining garlic butter and brush or drizzle it over the tops of the rolled tortillas. Sprinkle the rest of the mozzarella cheese across the tops of all the rolls. If you have any extra parsley left, you can sprinkle that on as well. Ensure that the cheese is evenly distributed so every roll gets a good portion of the bubbly, melted topping.
The cheese will act as a blanket, trapping the moisture inside the tortilla so the shrimp can steam gently in their own juices. Because we are cooking at a high heat, this process happens quickly. You want the cheese to just start turning a light golden brown color on the edges, which is the visual cue that it is time to take the dish out of the oven.
Step 5: Bake and Serve
Place the dish into the preheated oven and bake for 10 to 12 minutes. At the 10-minute mark, check the internal temperature of one of the shrimp if you are unsure about the doneness. You are looking for an internal temperature of 145 degrees Fahrenheit for shrimp. They should be opaque, pink, and firm to the touch. If you poke one gently with a fork, it should offer very little resistance.
Remove the dish from the oven and let it sit for two minutes before serving. This short rest allows the cheese to set slightly so it doesn't slide right off the tortilla when you pick up a roll. Serve these warm directly from the dish, and feel free to add an extra garnish of fresh parsley or even a squeeze of fresh lemon if you want that extra acidic kick.
Mistakes I Made (So You Don't Have To)
Overstuffing the Tortillas
The first time I made these, I tried to pack three or four shrimp into each tortilla. I thought more was better, but it actually prevented the tortilla from closing properly. The rolls kept popping open in the oven, and the shrimp on the ends didn't cook evenly because they were exposed to the dry heat of the oven. The fix is simple: stick to two shrimp per tortilla. It allows the tortilla to form a tight, neat roll that keeps all the juices and the cheese trapped inside where they belong.
Using Wet Shrimp
I learned the hard way that shrimp are naturally watery. If you don't pat them dry, all that water leaks out into the tortilla while it's in the oven. The result is a gummy, sad tortilla that loses all its structural integrity. Always use paper towels to dry the shrimp thoroughly. If you are really worried, you can even toss the dried shrimp in a tiny pinch of cornstarch, though I usually find that just patting them dry is enough to get a great result without any extra steps.
Ignoring the Internal Temperature
Early on, I relied only on the timer. Sometimes my oven would run a bit hot, and I would end up with rubbery, overcooked shrimp that felt like chewing on pencil erasers. Shrimp are very unforgiving when overcooked. Now, I always set my timer for the minimum time and use an instant-read thermometer. Once they hit 145 degrees Fahrenheit, they are perfect. Do not wait for the timer to go off if the thermometer says the shrimp are ready. It is better to pull them out early than to let them dry out.
Not Measuring the Salt
I once assumed the cheese would provide enough saltiness and didn't add any extra, but the dish tasted flat and uninteresting. Shrimp need a bit of seasoning to really shine. On the other hand, I also once used salted butter and added extra salt, which made the dish almost inedible. The fix is to use unsalted butter and measure your salt carefully. You want to enhance the natural sweetness of the shrimp, not bury it in a heavy, salty crust. Start with the suggested amount and taste your sauce before you apply it to the rolls.
Variations and Tips
Adding a Kick
If you like a bit of heat, try adding a quarter teaspoon of red pepper flakes into the garlic butter mixture. It gives the roll ups a nice warmth that complements the richness of the cheese. I find this works especially well if you are serving these as a snack for friends who appreciate a bit of spice. Just remember that the heat can intensify in the oven, so start with a small amount and increase it next time if you want more of a punch.
Substituting Cheese
While mozzarella is the standard for a reason, you can definitely experiment with other cheeses. A mix of feta and cream cheese can make the filling taste like a savory pastry, which is quite nice. Just keep in mind that feta doesn't melt in the same way, so you might want to use it as a secondary cheese rather than the primary one. If you use cream cheese, make sure it is at room temperature so you can mix it easily with the garlic and butter before spreading it on the tortillas.
Make-Ahead Strategy
If you are expecting guests or just want to have dinner ready to go, you can assemble the rolls, place them in the baking dish, and cover the dish tightly with plastic wrap in the fridge for up to four hours before baking. Don't go longer than that, or the tortillas will start to absorb the moisture and become soggy. When you are ready to eat, just pop the dish into the preheated oven. You might need to add one or two extra minutes to the baking time since the rolls will be starting from a cold temperature.
Using Leftover Herbs
If you have leftover fresh herbs, such as chives or cilantro, they can be a great addition. Chives, in particular, provide a mild onion flavor that pairs beautifully with garlic and shrimp. I usually chop them up and sprinkle them over the top right after the roll ups come out of the oven. This keeps their flavor bright and fresh compared to baking them, which can sometimes make delicate herbs lose their character. It also makes the final dish look very professional and inviting.
Storage and Reheating
If you have leftovers, they should be stored in an airtight container in the refrigerator within two hours of cooking. They will stay fresh for up to two days. Because these contain both seafood and dairy, it is important not to leave them out on the counter. When you are ready to eat them again, the best way to reheat them is in the oven at 350 degrees Fahrenheit for about ten minutes, or until they are heated through to 165 degrees Fahrenheit.
I would not recommend freezing this dish. Tortillas tend to become very soggy and break apart after being frozen and thawed, and the texture of the shrimp will change significantly. You are much better off making only what you plan to eat. If you end up with too many, just keep the extra components separate and assemble them fresh when you are ready to have them again. It really only takes a few minutes to roll them up, so the quality will be much higher if you treat it as a fresh assembly.
Frequently Asked Questions
Can I use cooked shrimp instead of raw?
You can, but it is risky because the shrimp will likely become rubbery and tough by the time the cheese is melted and the tortilla is warm. If you must use cooked shrimp, reduce the baking time significantly and just watch until the cheese is melted and bubbling. It is much better to stick with raw shrimp to ensure you get the best texture.
What should I serve with these shrimp rolls?
A simple side salad with a bright vinaigrette is perfect to cut through the richness of the cheese and butter. You could also serve them alongside some steamed broccoli or asparagus if you want a more substantial meal. Because the roll ups are quite filling on their own, you do not need much else on the plate.
Can I use corn tortillas instead of flour?
You can try, but corn tortillas are much more fragile and prone to cracking when you roll them. If you want to use corn, heat them for a few seconds in a dry pan first to make them more pliable before you add the filling. Be very gentle when rolling, and keep in mind that the final texture will be a bit more brittle than the soft, chewy flour version.
Why did my cheese burn before the shrimp cooked?
Your oven might be running hotter than the dial suggests. If the cheese browns too quickly, cover the baking dish loosely with aluminum foil for the first eight minutes of baking, then remove the foil for the final two minutes to let the cheese melt and get a bit of color. This protects the cheese from the intense heat of the top rack.
How do I know when the shrimp are done?
The most reliable way is using a digital meat thermometer. Insert it into the thickest part of the shrimp; it should read 145 degrees Fahrenheit. Visually, the shrimp should be pink, opaque, and have curled into a loose 'c' shape. If they are curled into a tight 'o' shape, they have likely been in the oven for too long.
Final Thoughts
Making these cheesy baked shrimp roll ups has become a reliable part of my routine whenever I need a meal that delivers on flavor without demanding a lot of my time. It is a simple concept, but the combination of the garlic butter and the melted cheese makes it feel special enough for a casual Friday night dinner.
I hope you find this recipe as helpful as I do. Just remember to keep an eye on your shrimp, use fresh ingredients whenever possible, and enjoy the process of putting it all together in your own kitchen. It is a satisfying way to end the day with a warm, homemade bite.